Designing and Optimizing MPLS Tunnels with Paragon Routing Director
This document contains the hands on lab related to the Paragon Automation configuration template topic. The lab will be done at the 2025 Tech Summits in:
APAC/EMEA (Dubai) - June
AMER (Las Vegas) - July
Overview
This hands-on lab provides a practical experience in traffic engineering using Juniper Networks’ solutions. Participants will explore designing, planning, and provisioning MPLS tunnels within a private WAN infrastructure. The lab is designed for sales engineers looking to deepen their understanding of network optimization features and demonstrate these capabilities effectively.
Objectives
By attending this lab, participants will:
Gain practical insights into designing MPLS tunnels using the Juniper Traffic Engineering controller.
Learn how to create and manage Path Intent and Optimization Profiles for efficient network traffic management.
Understand the application of endpoint profiles in defining LSP endpoints.
Develop skills that enhance their ability to articulate Juniper’s network optimization solutions.
Key Topics/Content
The lab will focus on:
Understanding Path Intent and its components, including tunnel, optimization, and endpoint profiles.
Creating Optimization Profiles to define conditions for recomputing LSPs.
Utilizing Endpoint Profiles to specify source and destination endpoints of LSPs.
Implementing network optimization techniques with Juniper’s Traffic Engineering controller.
Skills and Tools
Necessary Skills:
Basic understanding of MPLS technology.
Familiarity with network design principles.
Tools/Platforms:
Juniper Traffic Engineering controller
Network simulation tools for practical exercises
Methodology/Approach
The lab is structured as a step-by-step walkthrough, guiding participants through the process of designing and provisioning MPLS tunnels. It includes interactive problem-solving exercises to reinforce learning and application.
Benefits and Value
Participants will leave with enhanced skills in traffic engineering and network optimization, empowering them to effectively communicate these capabilities within their sales roles. The hands-on experience gained from this lab provides valuable insights into the practical implementation of Juniper Networks’ solutions.
This structured approach ensures participants gain a comprehensive understanding of MPLS tunnel design and optimization using Juniper Technologies….
NOTICE: You are going to work in a shared environment with write access role. Please be careful on the performed actions.
REMEMBER: If you dont follow this steps, you might impact in the job of other colleagues.
PLEASE: Finish all the lab steps, so the network environment is clean for the next user.
Time
The lab will take around 10 to 30 minutes
Starting Lab
Topology
Devices
Devices have been already onboard for the sake of this demo.
Dynamic topology
Dynamic topology has been already configured and PCEP session has been established with PCC for the sake of this demo. BGP-LS configuration was already applied on one router in the domain (e.g. PE3)
set policy-options policy-statement pso-accept-link-state from family traffic-engineering
set policy-options policy-statement pso-accept-link-state then accept
set protocols bgp group BGP-LS type internal
set protocols bgp group BGP-LS local-address <Local-IP-Adress>
set protocols bgp group BGP-LS family traffic-engineering unicast
set protocols bgp group BGP-LS export pso-accept-link-state
set protocols bgp group BGP-LS peer-as 65200
set protocols bgp group BGP-LS allow 0.0.0.0/0
Connect to Routing Director
Make sure your Zscaler Private Connection is enabled. Then go the Routing Director GUI URL provided via email. Click
Advanceand thenAccept the Risk and Continue. If you using Chrome and cannot continue, click anywhere on the webpage and typethisisunsafe. Use the same credentials provided via email.Go to
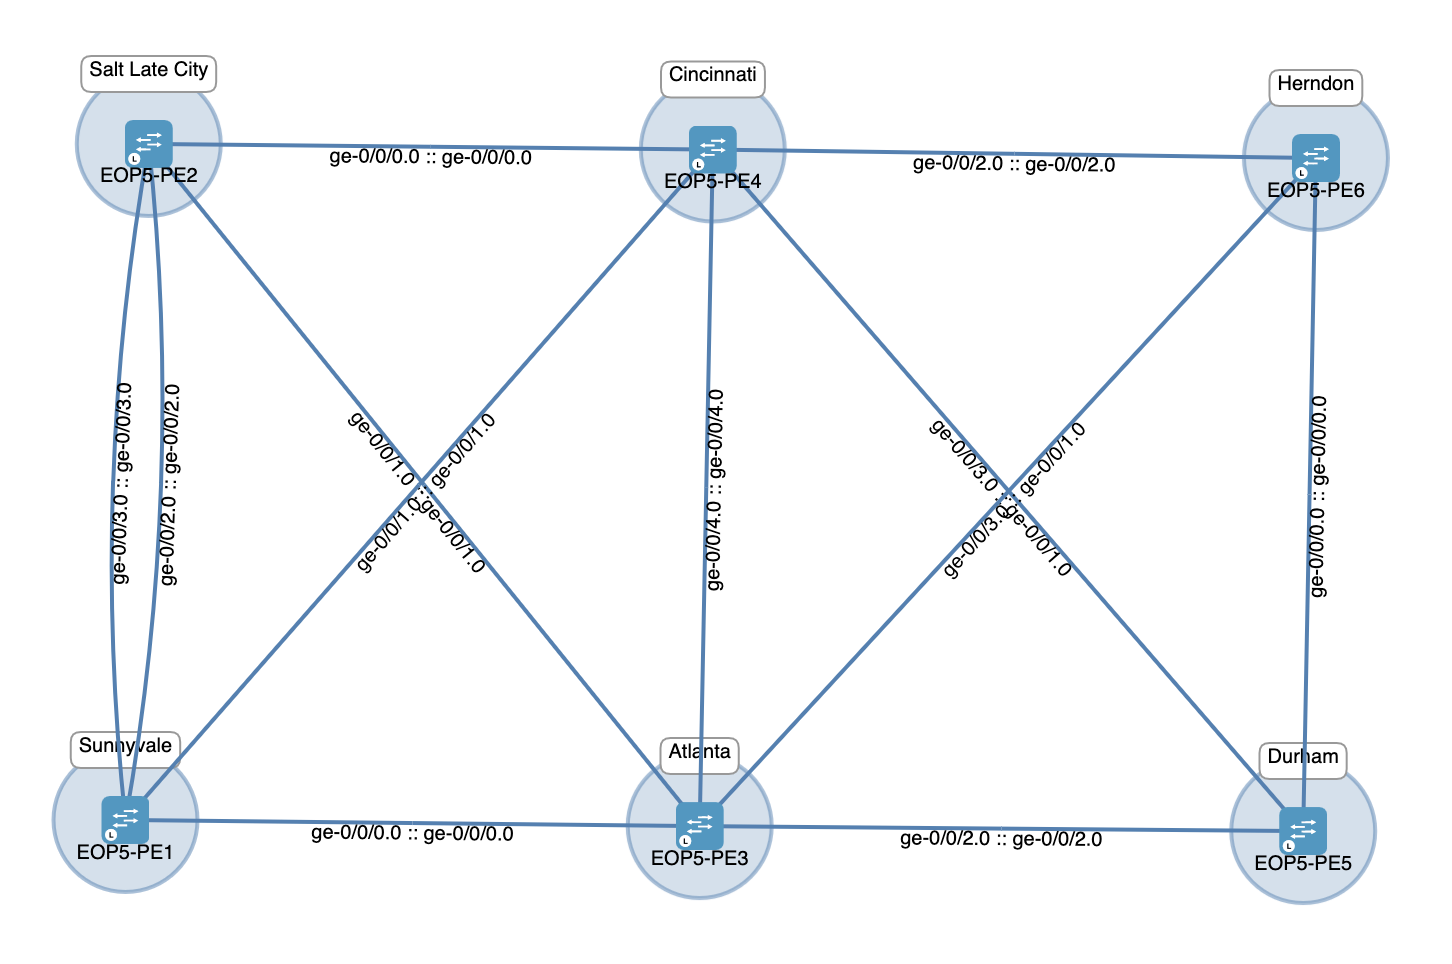
Network Optimization Intentfrom the left hand side menu:On the Topology map, view the devices previously onboarded and the links associated to those devices.
Network Optimization
Traditionally, tunnels are provisioned on a per-instance basis directly from the network information. Path intent abstracts this process by breaking down the attributes of a tunnel into reusable components, known as sub-profiles. These sub-profiles include:
tunnel profile
optimization profile
endpoint profile
This modular approach allows you to define and manage these components separately and then combine them to create one or more tunnels. Path intents simplify tunnel management and enhances the efficiency. In order to create a path intent it is mandatory to create first the different subprofiles.
Tunnel Profile
Create tunnel profiles to define some of tunnel properties like signaling protocol, routing method, and so on.
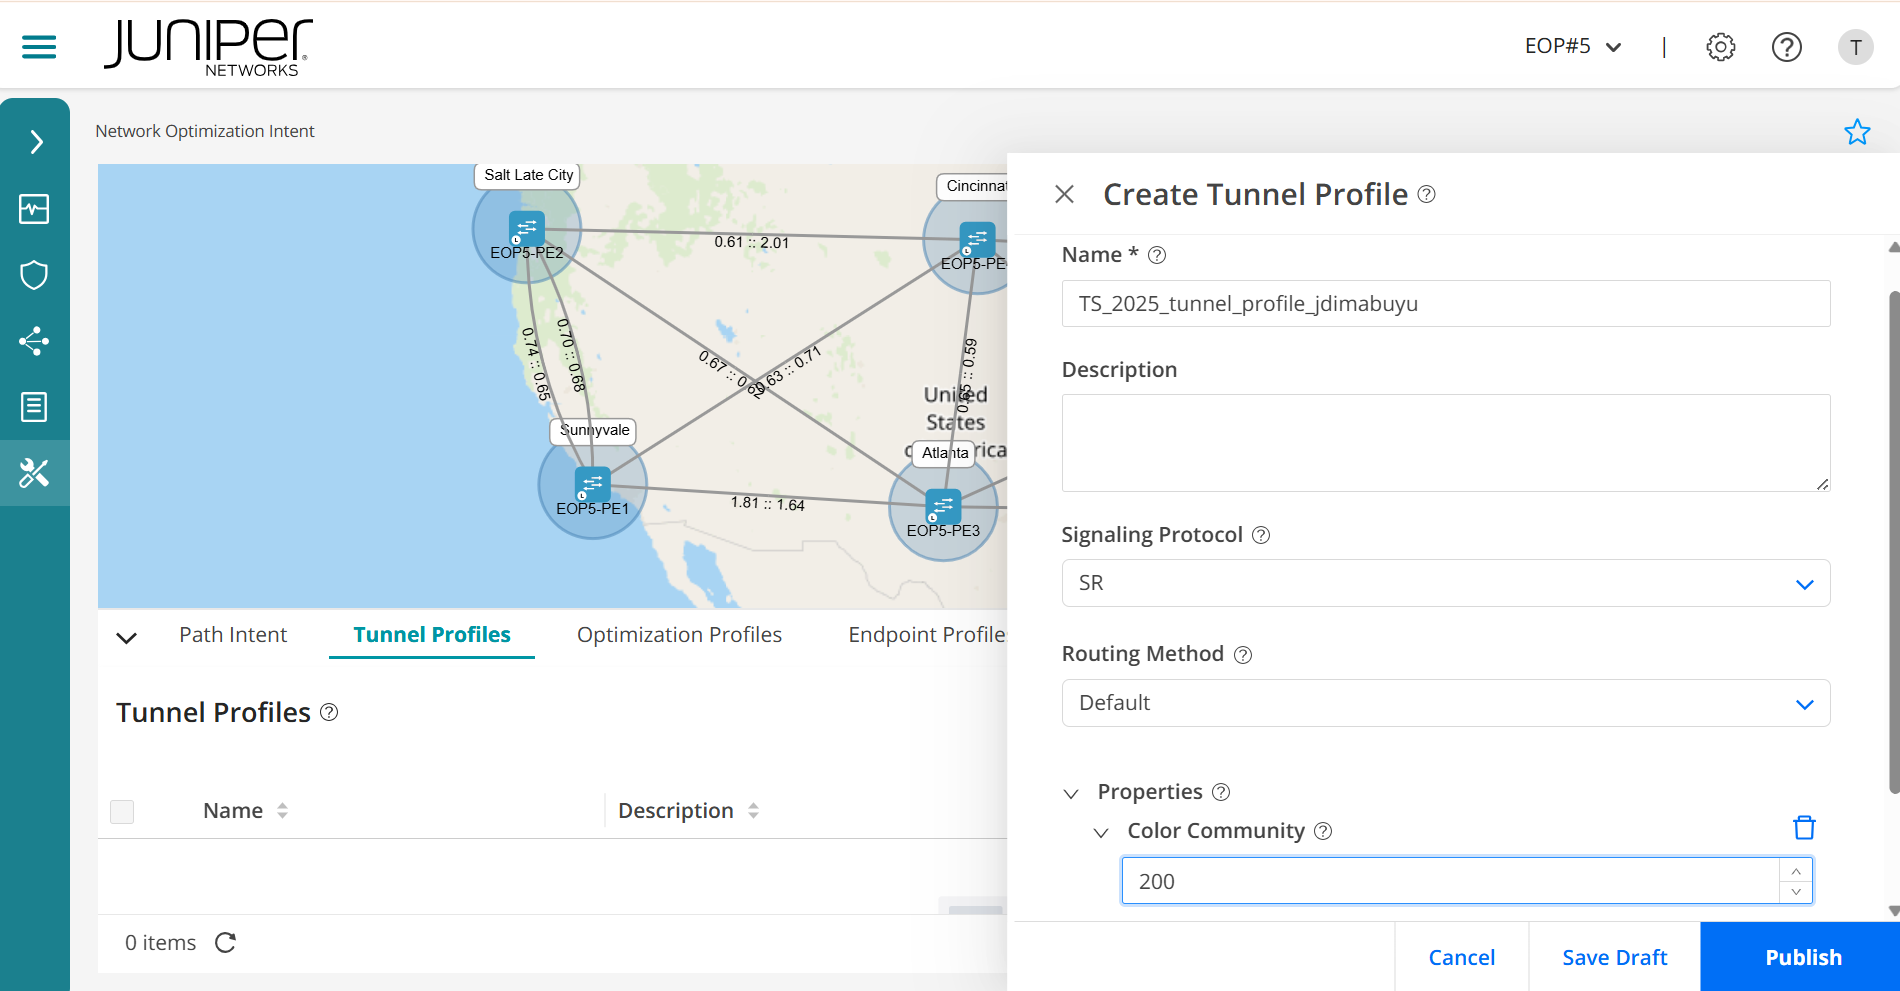
Navigate to the Tunnel Profiles tab and click
+to create atunnel profile.Name the tunnel profile (e.g.
TS_2025_tunnel_profile_*$YOUR_JUNIPER_ID$*).Add a description if you want.
Select
SRas the signaling protocol.Select
Defaultas the routing method.Click on
+to addProperties.Select
Color community. Type a color community (e.g.200).Ensure that you
publishthe tunnel profile.
Optimization Profiles
Create optimization profiles to define when the LSP must be recomputed, which can be later used to create path intents.
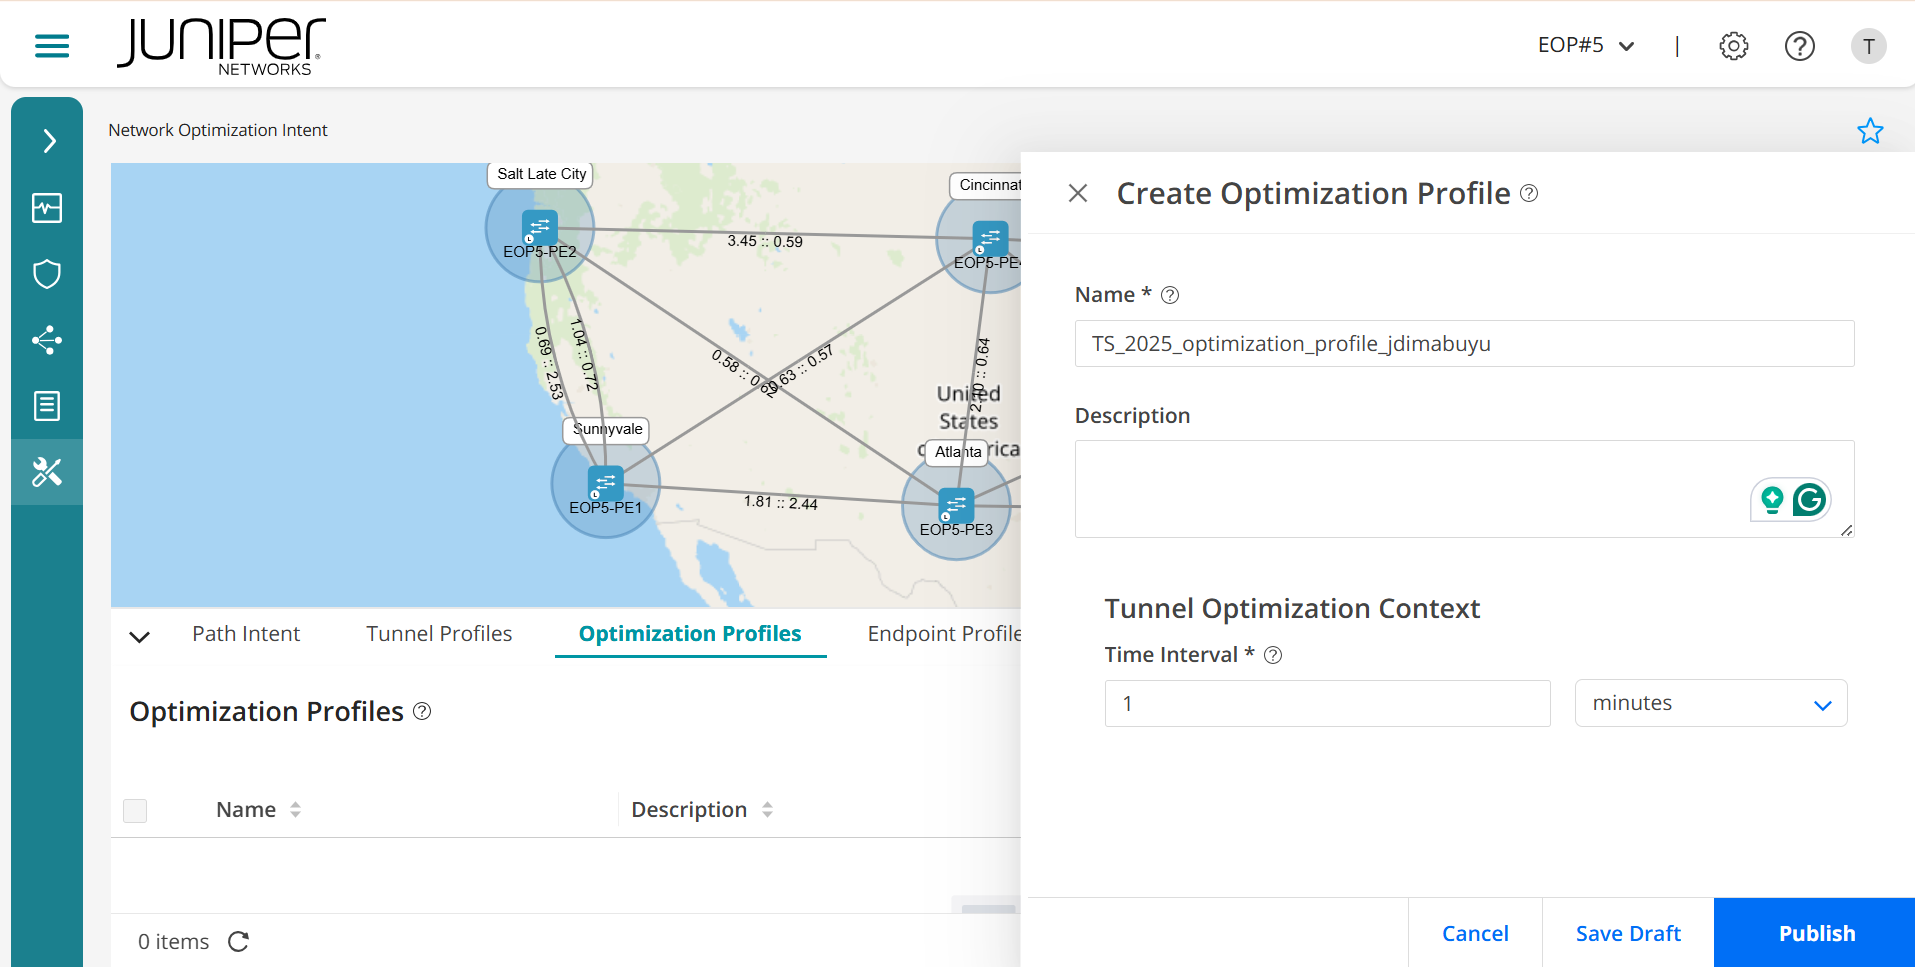
Navigate to the Optimization Profiles tab and click
+to create anoptimization profile.Name the optimization profile (e.g.
TS_2025_optimization_profile_*$YOUR_JUNIPER_ID$*).Add a description if you want.
In this profile, only
Time intervalis supported. Specify the time duration in minutes. A new optimized path will be created within the specified time duration.Ensure that you
publishthe optimization profile
Endpoint Profiles
Endpoint profiles define the endpoints of the LSPs (tunnels), which can be later used to create a path intents.
We are going to create 2 endpoint profiles. First one will be a Full-Mesh of all the nodes, and second one will be a One-to-One
Navigate to the Endpoint Profiles tab and click
+to create the first endpoint profile.Name the end profile (e.g.
TS_2025_Full_Mesh_endpoint_*$YOUR_JUNIPER_ID$*).Add a description if you want.
At the
Node A Selection, there is a grey arrow pointing down. Click on it and select all 6 nodes. Make sure the connection isFull Mesh. Do the same forNode B Selection.Ensure that you
publishthe endpoint profile.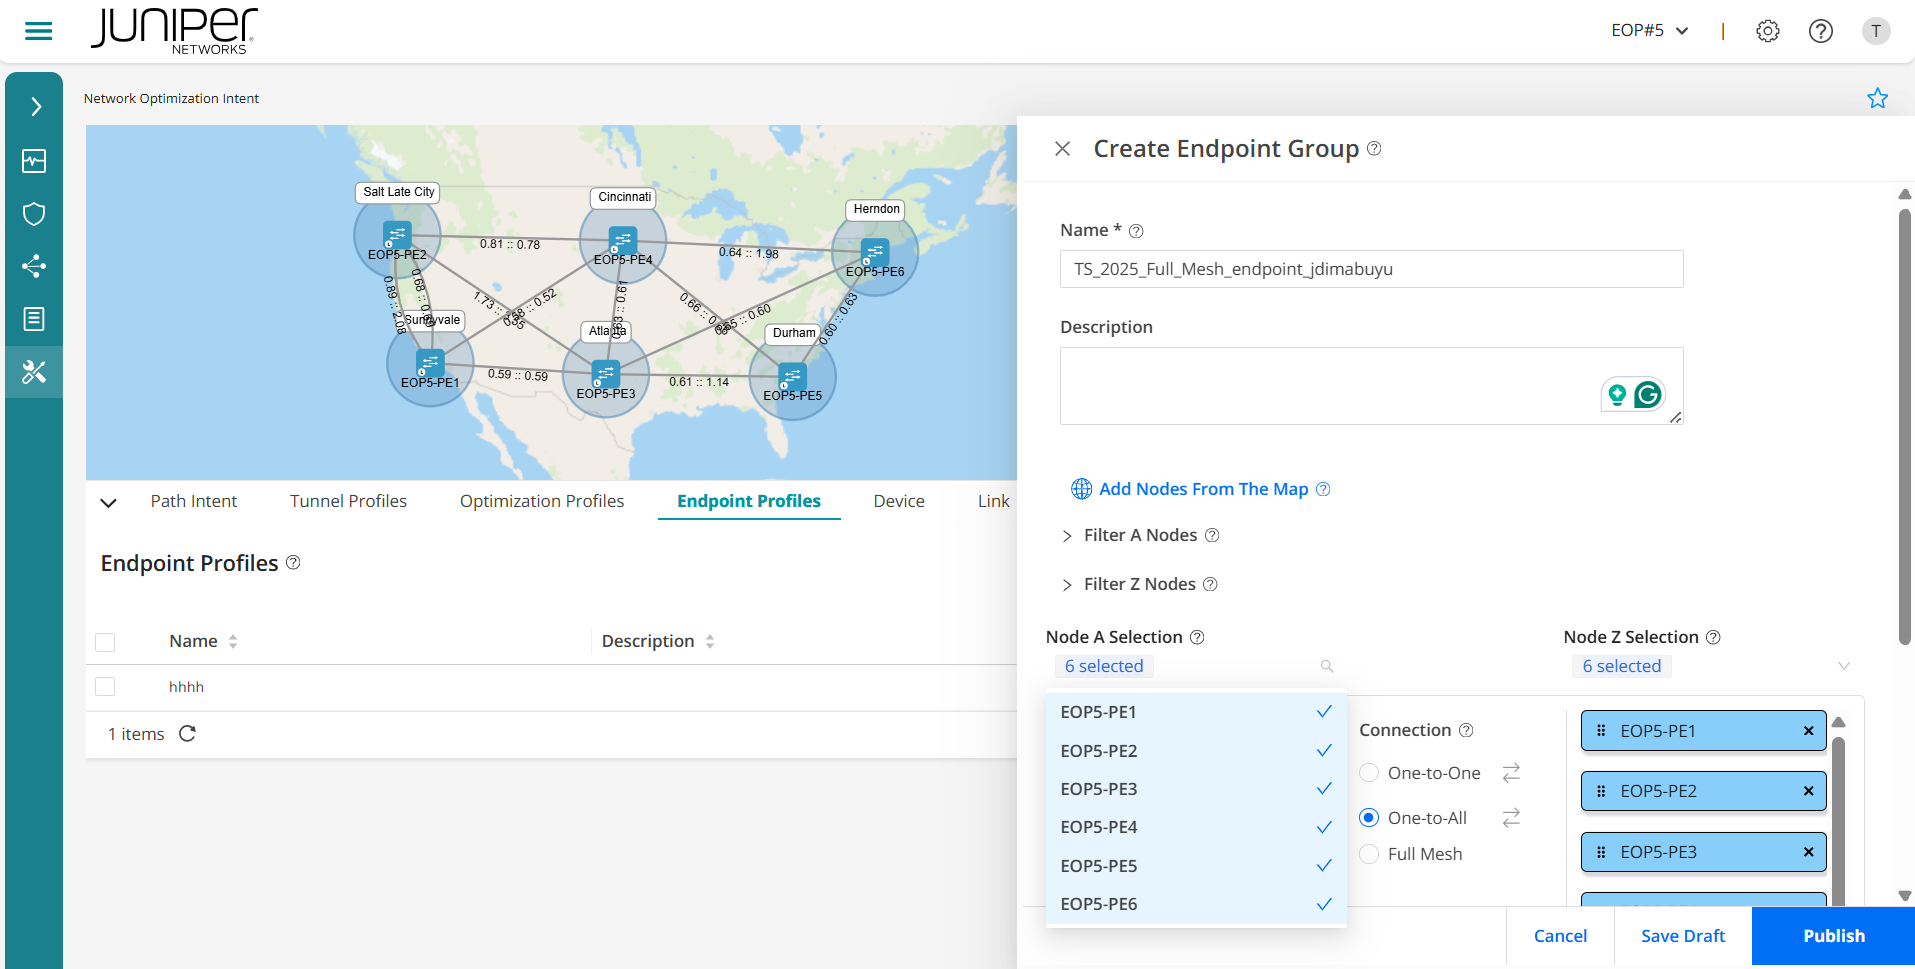
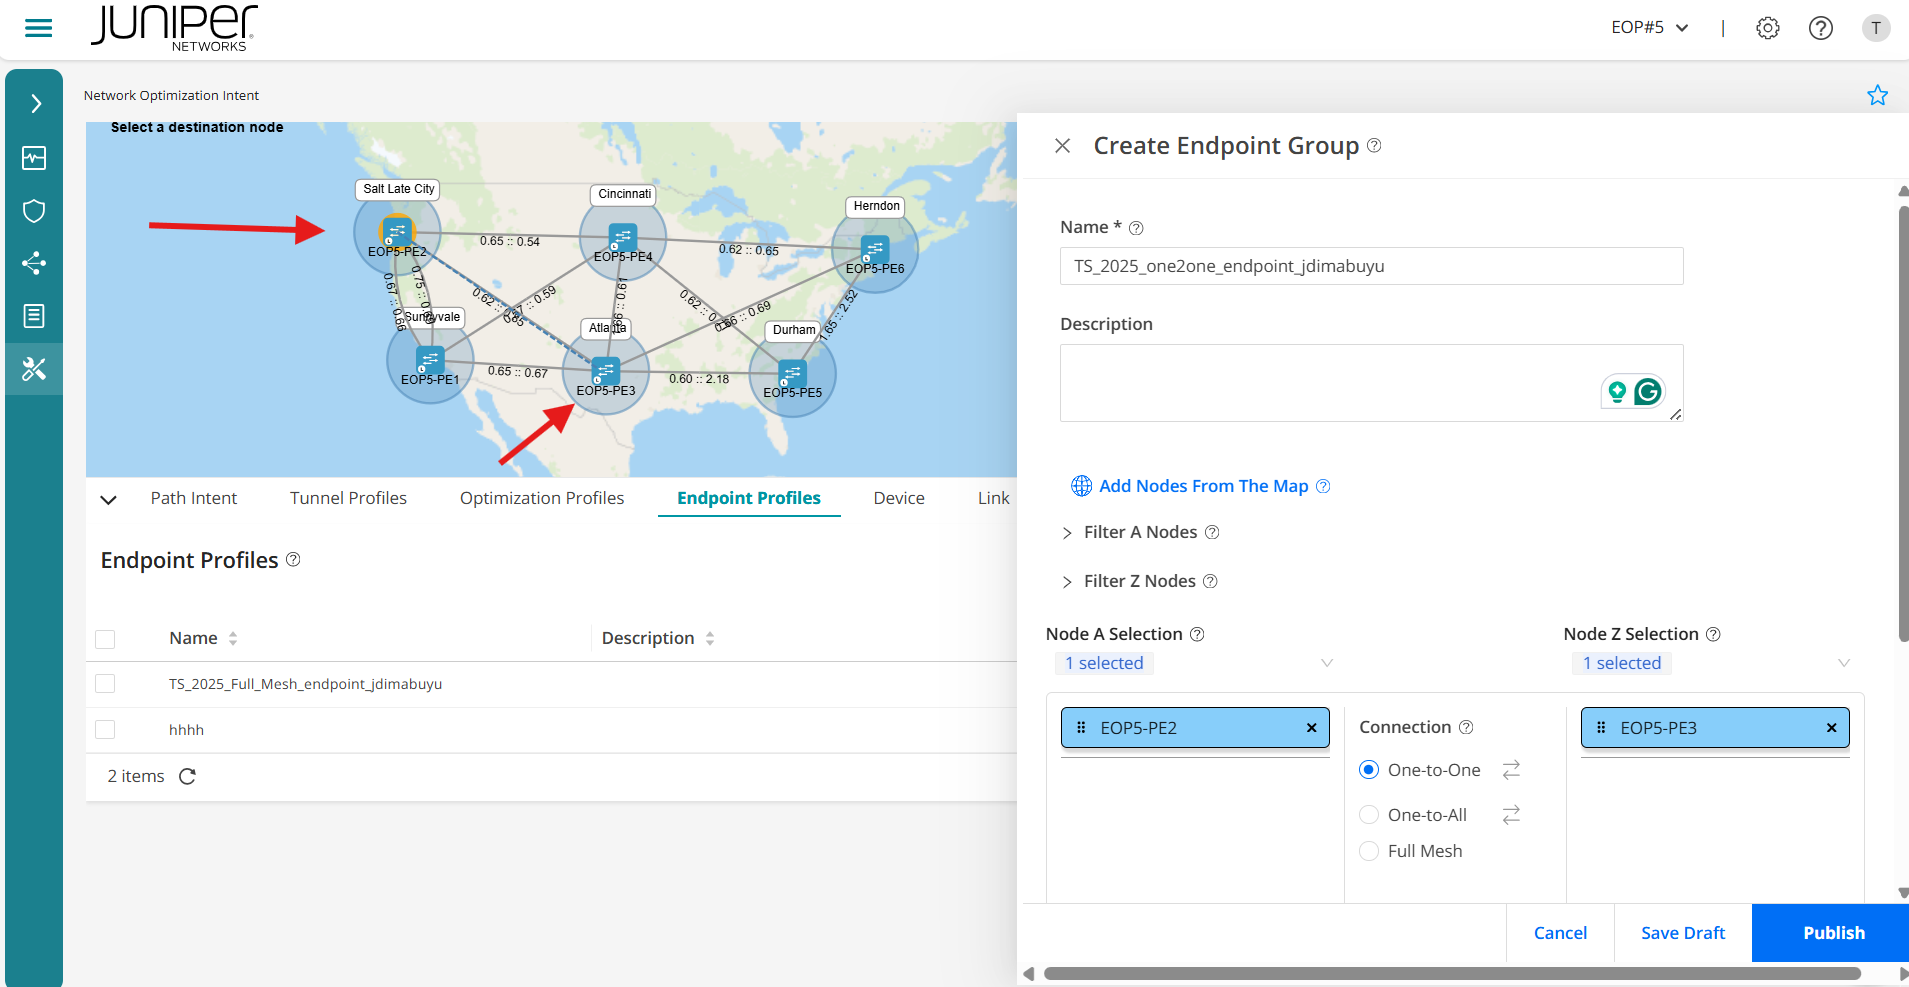
Navigate to the Endpoint Profiles tab and click
+to create the second endpoint profile.Name the end profile (e.g.
TS_2025_one2one_endpoint_*$YOUR_JUNIPER_ID$*).Add a description if you want.
At the node selection, you can either click
add nodes from the mapor select them as before with the grey arrow pointing down. Choose 2 of the routers (e.g.EOP5-PE2andEOP5-PE3) and make sure the connection isOne-to-One.Ensure that you
publishthe endpoint profile.
Path intents
Path intents implement specific LSP or segment routing policy configurations that define how traffic should be routed through the network.
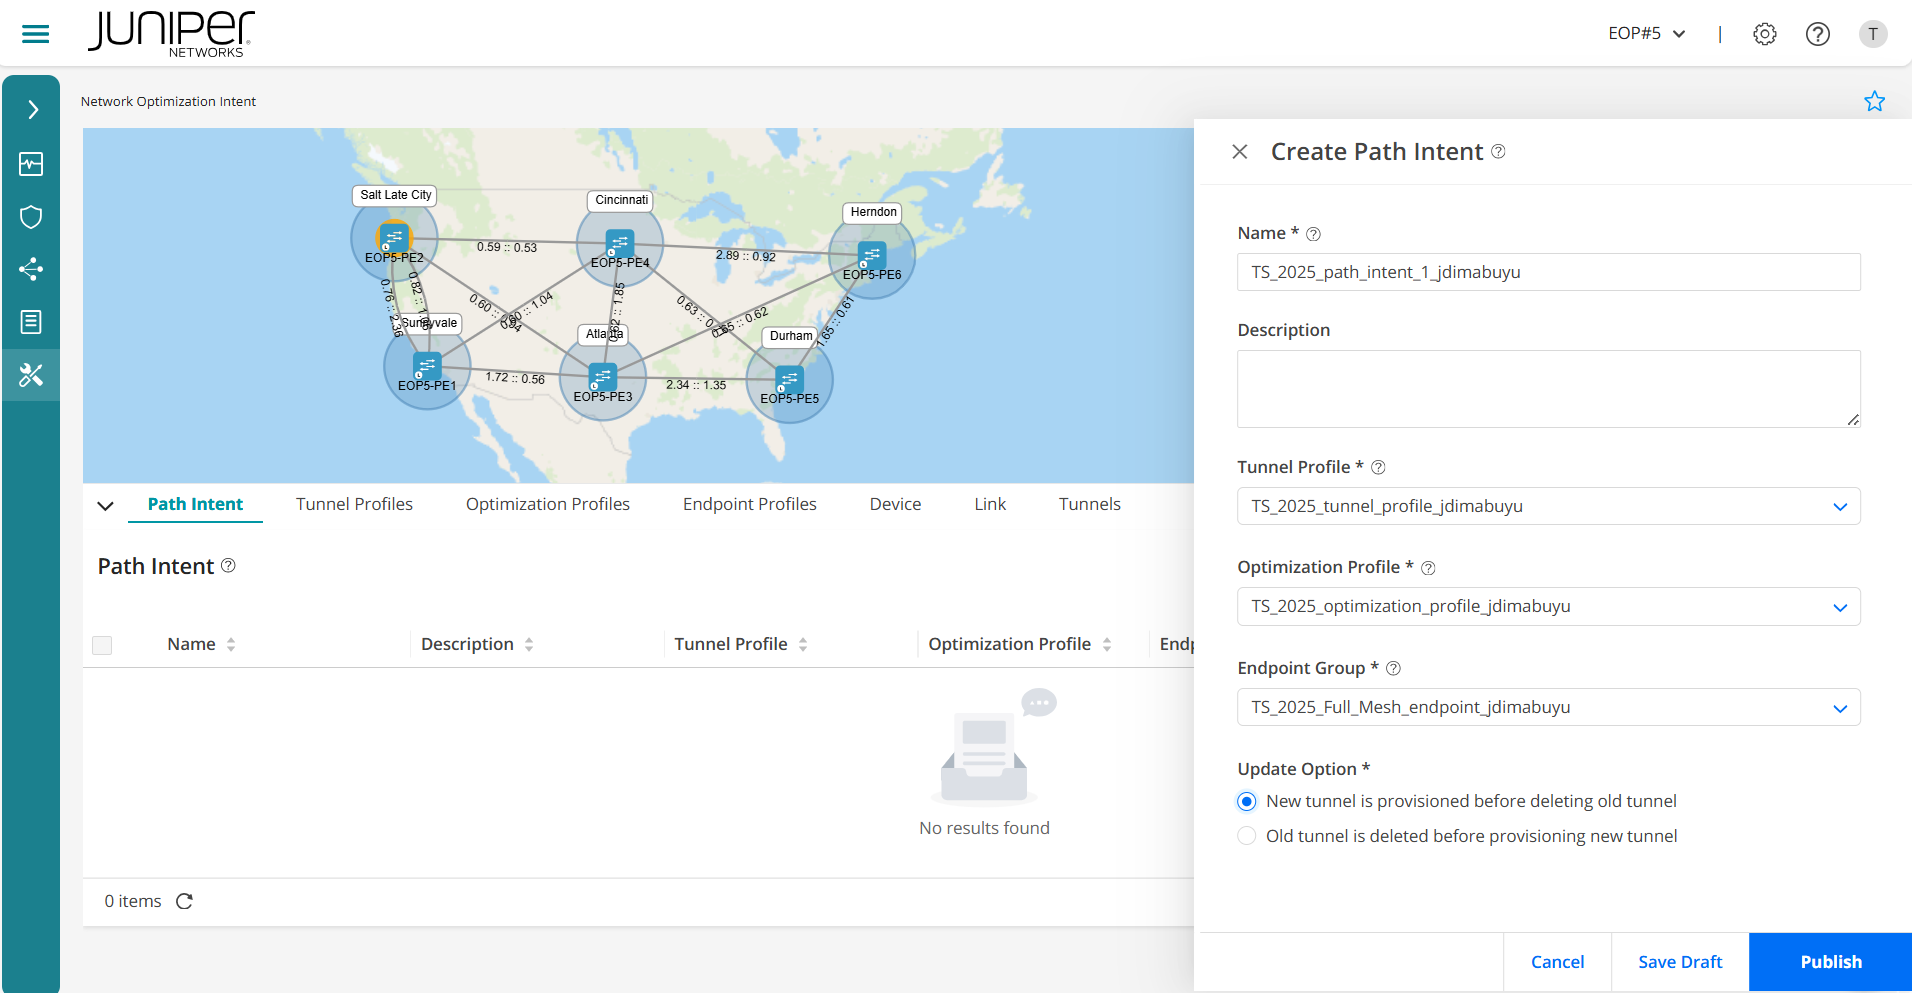
Navigate to the Path Intent tab and click
+to create a path intent.Specify the name of the path intent (e.g.
TS_2025_path_intent_1_*$YOUR_JUNIPER_ID$*).Enter a description for the path intent if you want.
Select the first tunnel profile you created from the list (e.g.
TS_2025_tunnel_profile_*$YOUR_JUNIPER_ID$*). Remember, a tunnel profile defines the properties of an LSP. Only published tunnel profiles are listed here.Select an optimization profile from the list (e.g.
TS_2025_optimization_profile_*$YOUR_JUNIPER_ID$*). Remember, an optimization profile defines the conditions when an LSP must be recomputed. Only published optimization profiles are listed here.Select an endpoint group from the list (e.g.
TS_2025_Full_Mesh_endpoint_*$YOUR_JUNIPER_ID$*). Remember, an endpoint group defines the source and destination endpoints of an LSP. Only published endpoint profiles are listed here.In the update option, select whether you want a new tunnel to be provisioned before deleting the old tunnel or you want an old tunnel to be deleted before provisioning the new tunnel.
Ensure that you
publishthe path profile.
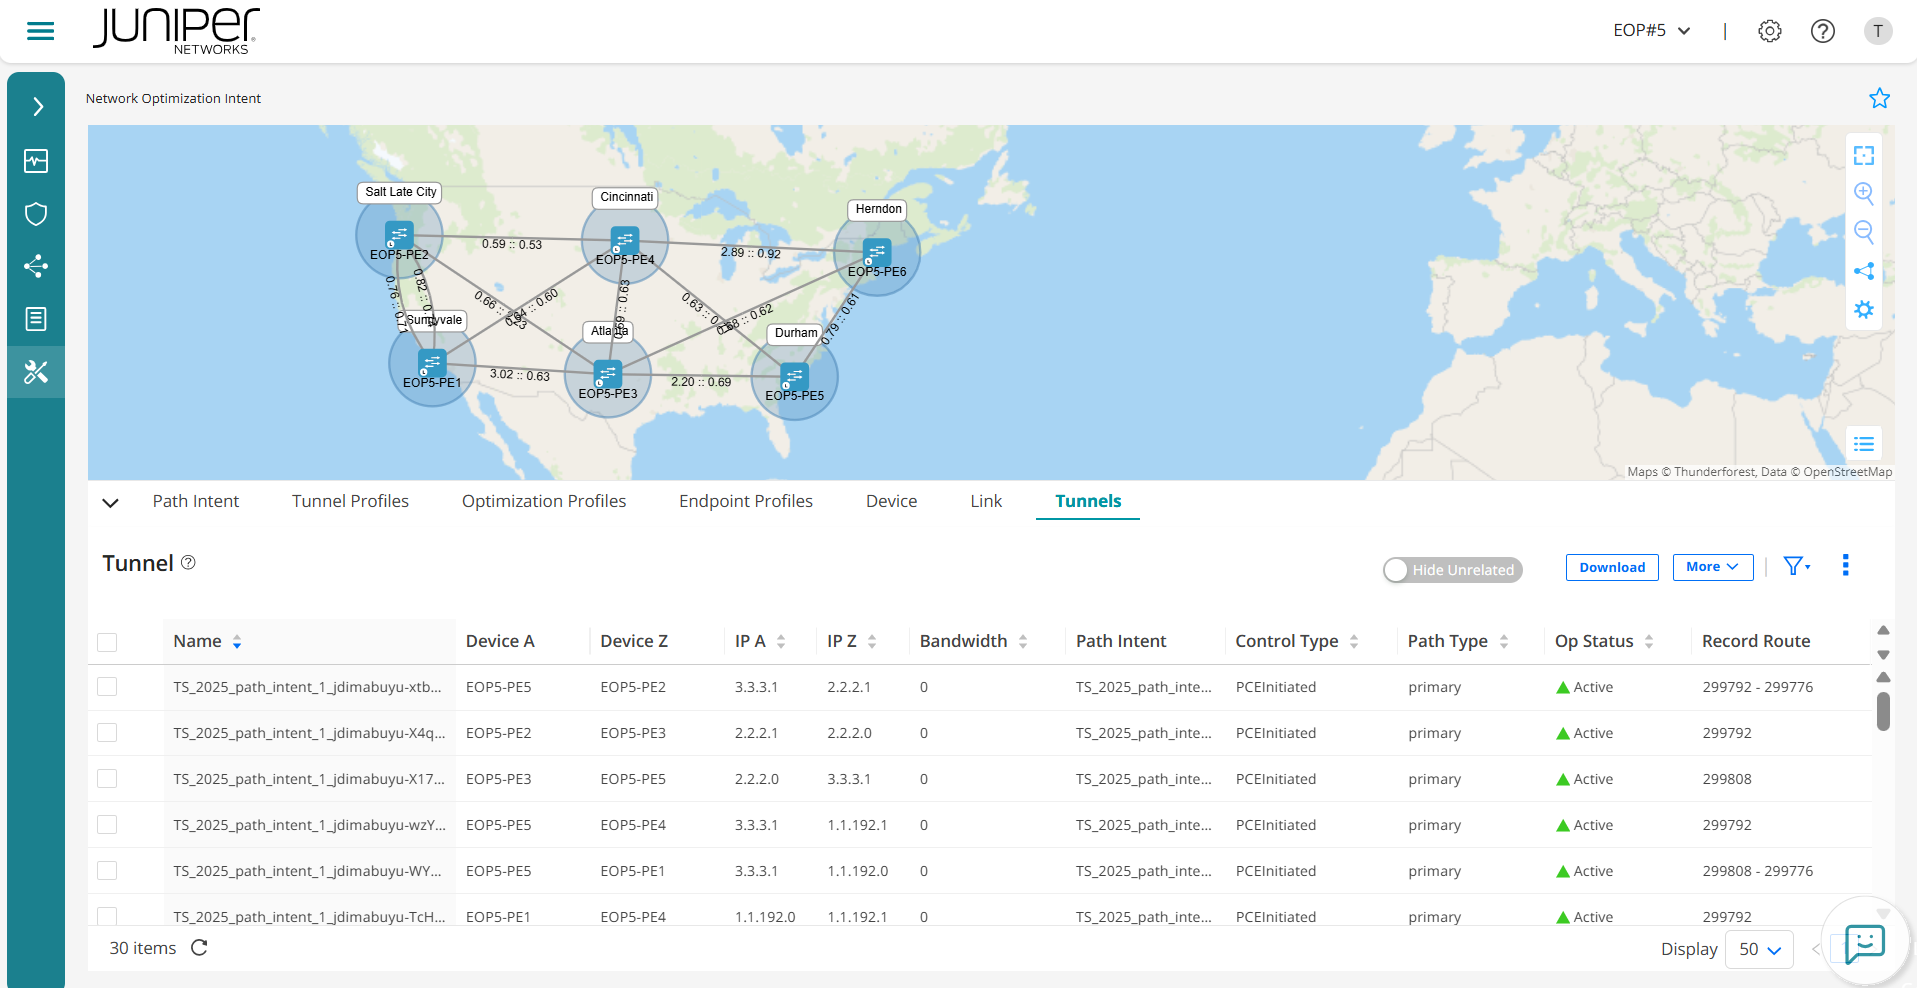
When you click the Publish button, the path intent is applied to the network. The tunnels are created and all the attributes and constraints specified in the profiles are applied consistently across the tunnels. You can view and manage the tunnels on the network topology map. The topology map shows the start
and end points of each tunnel, the path it takes, and any relevant attributes such as utilization and delay. You can filter and select tunnels to view detailed information and metrics, helping them monitor and manage the network effectively. This visualization is critical in understanding network topology and ensuring that tunnels meet the desired performance and reliability criteria.
Go to the
Tunnelstab and there should be 30 new tunnels created with the prefix of your path intent (e.g.TS_2025_path_intent_1_*$YOUR_JUNIPER_ID$*).
View details of a tunnel profile. You can select and view the details of a tunnel profile. You can either click
More > Detailor hover over the tunnel profile and click theDetailed Viewicon. TheTunnel Profile Detailspane appears on the right side of the page displaying the details.Repeat steps from step
#3to#6with a new path intent name (e.g.TS_2025_path_intent_2_*$YOUR_JUNIPER_ID$*), but this time when selecting the endpoint group from the list, make sure you select the other one. The one related to theOne-to-One(e.g.TS_2025_one2one_endpoint_*$YOUR_JUNIPER_ID$*).Ensure that you
publishthe path profile.Go again to the
Tunnelstab and there should be 1 new tunnel created.Check that this time it is only the one you created as
One-to-One.Once you have inspected your tunnels, please delete what you have created, so the next user can play with this lab after you:
i. Path Intents (select each and click in the bin icon).
ii. Tunnel Profile (select each and click in the bin icon).
iii. Optimization Profile (select each and click in the bin icon).
iv. Endpoint Profiles (select each and click in the bin icon).
You have successfully completed this Hands-On Lab!
Lab Survey
Please take 2 minutes and complet the Routing Director Network Optimization LCM Hands-On Lab Survey