Service Provisioning Lab
Overview
Juniper Routing Director’s service orchestration is an intent-based, model-driven framework that automates the entire lifecycle of network services—from design to monitoring and deprovisioning. It enables network administrators to specify service requirements using predefined service models or designs available in a service catalog, which are version-controlled and upgradable independently of the platform.
How does Routing Director Automation’s model-driven approach simplify service orchestration?
Juniper Routing Director’s model-driven approach simplifies service orchestration by using predefined, flexible service models that represent the desired network services and their requirements in a standardized, intent-based manner. This approach offers several key simplifications:
Intent-Based Design: Network administrators specify high-level business intents such as locations, speeds, and throughput using service models from a service catalog. This eliminates the need for manual, device-specific configuration and lengthy customization projects, reducing service design time from month to hours with repeatability and minimal human intervention.
Separation of Models and Orchestration Engine: The service models are logically separated from the orchestration engine, allowing easy customization or creation of new service models without modifying the underlying platform. This modularity enables agility and future-proofness in service deployment.
Automated Transformation and Provisioning: Once a service instance is created from a service design and published, Routing Director Automation automatically generates a service order that triggers workflows to transform the high-level service design into network configurations. This automates resource allocation and provisioning across the network.
Version-Controlled Service Catalog: The use of a version-controlled catalog of service designs ensures consistency, easy upgrades, and reuse across the organization, simplifying management and reducing errors.
Simplified Lifecycle Management: The model-driven framework covers the entire service lifecycle—design, provisioning, validation, monitoring, and deprovisioning—through automated workflows, reducing manual tasks and operational complexity.
Parameterization and Reusability: Service instances allow parameter adjustments without redesigning the service, enabling quick modifications and full audit trails of changes, which streamlines ongoing service management.
Starting Lab
This lab allows 4 people per sandbox. Each Sandbox has 4 sets of devices. We will be using 1 set per user (one of SETA, SETB, SETC, SETD). Please reverify that you are using the allocated SET
If you would like to do this lab raise your hand to get Lab User information.
Lab Blueprint Topology
The blueprint consists of sets of 2 vMX devices and Routing Director 2.4.0, A single set (one of SETA, SETB, SETC, SETD) is allocated to the user. Please make sure to identify the correct set allocation so as not to get into another users way.
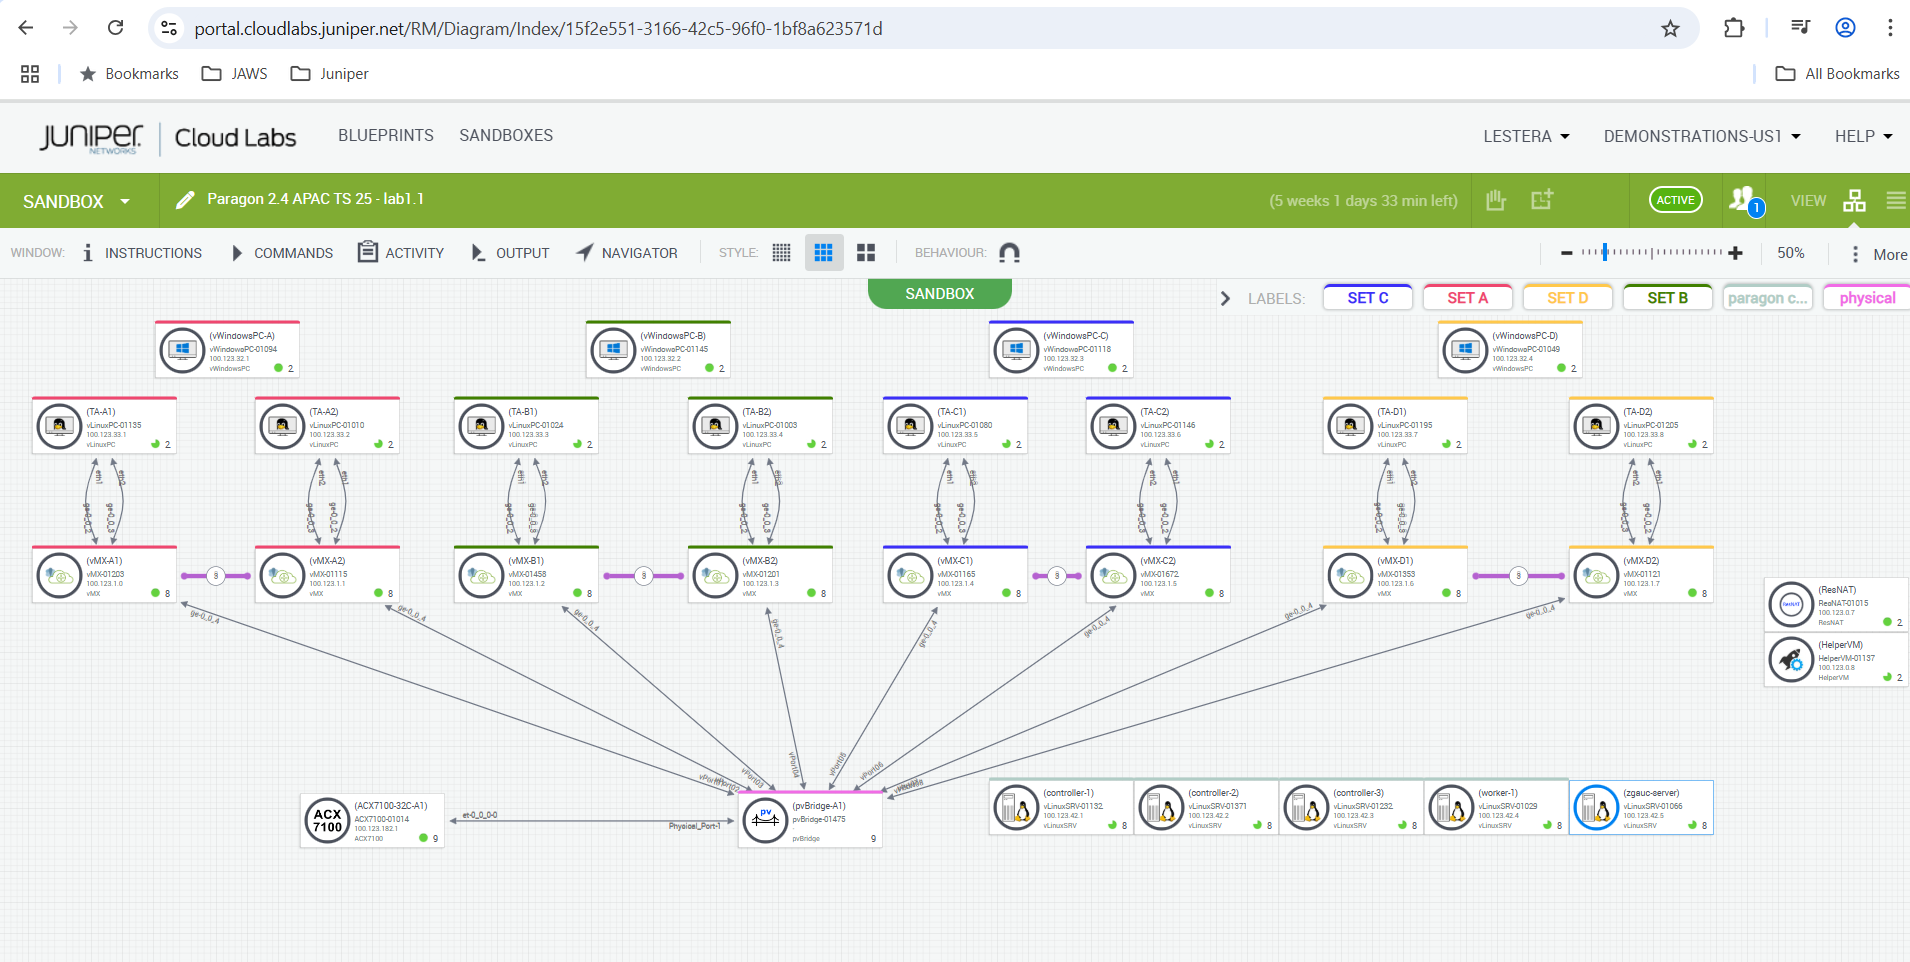
Allocations of SET, Devices and NIP , Please make sure to use only as per allocation .
SET |
Devices |
Network Implementation Plane |
JSON |
|---|---|---|---|
SETA |
vMX-A1, vMX-A2 |
NIP-A |
Instance-A-l3vpn.json |
SETB |
vMX-B1, vMX-B2 |
NIP-B |
Instance-B-l3vpn.json |
SETC |
vMX-C1, vMX-C2 |
NIP-C |
Instance-C-l3vpn.json |
SETD |
vMX-D1, vMX-D2 |
NIP-D |
Instance-D-l3vpn.json |
Provision a L3VPN Service using a pre canned JSON
In this section of the lab we will provision an L3VPN service instance using a JSON. Please note that customers may integrate Routing Director with third-party software and use API’s to orchestrate a service , we will now demonstrate using a combination of JSON and GUI how we can provision a L3VPN service.
Login to Routing Director via Jumpbox
Using RDP Client, connect to your Labuser assigned IP address/Port
Login using your Lab User credentials
Open Chrome, and navigate to https://100.123.42.100, you should see the login page to Juniper Routing Director GUI
Login using your Lab User credentials
Username - jcluser@juniper.net
Password - Juniper!1
Provsion Service
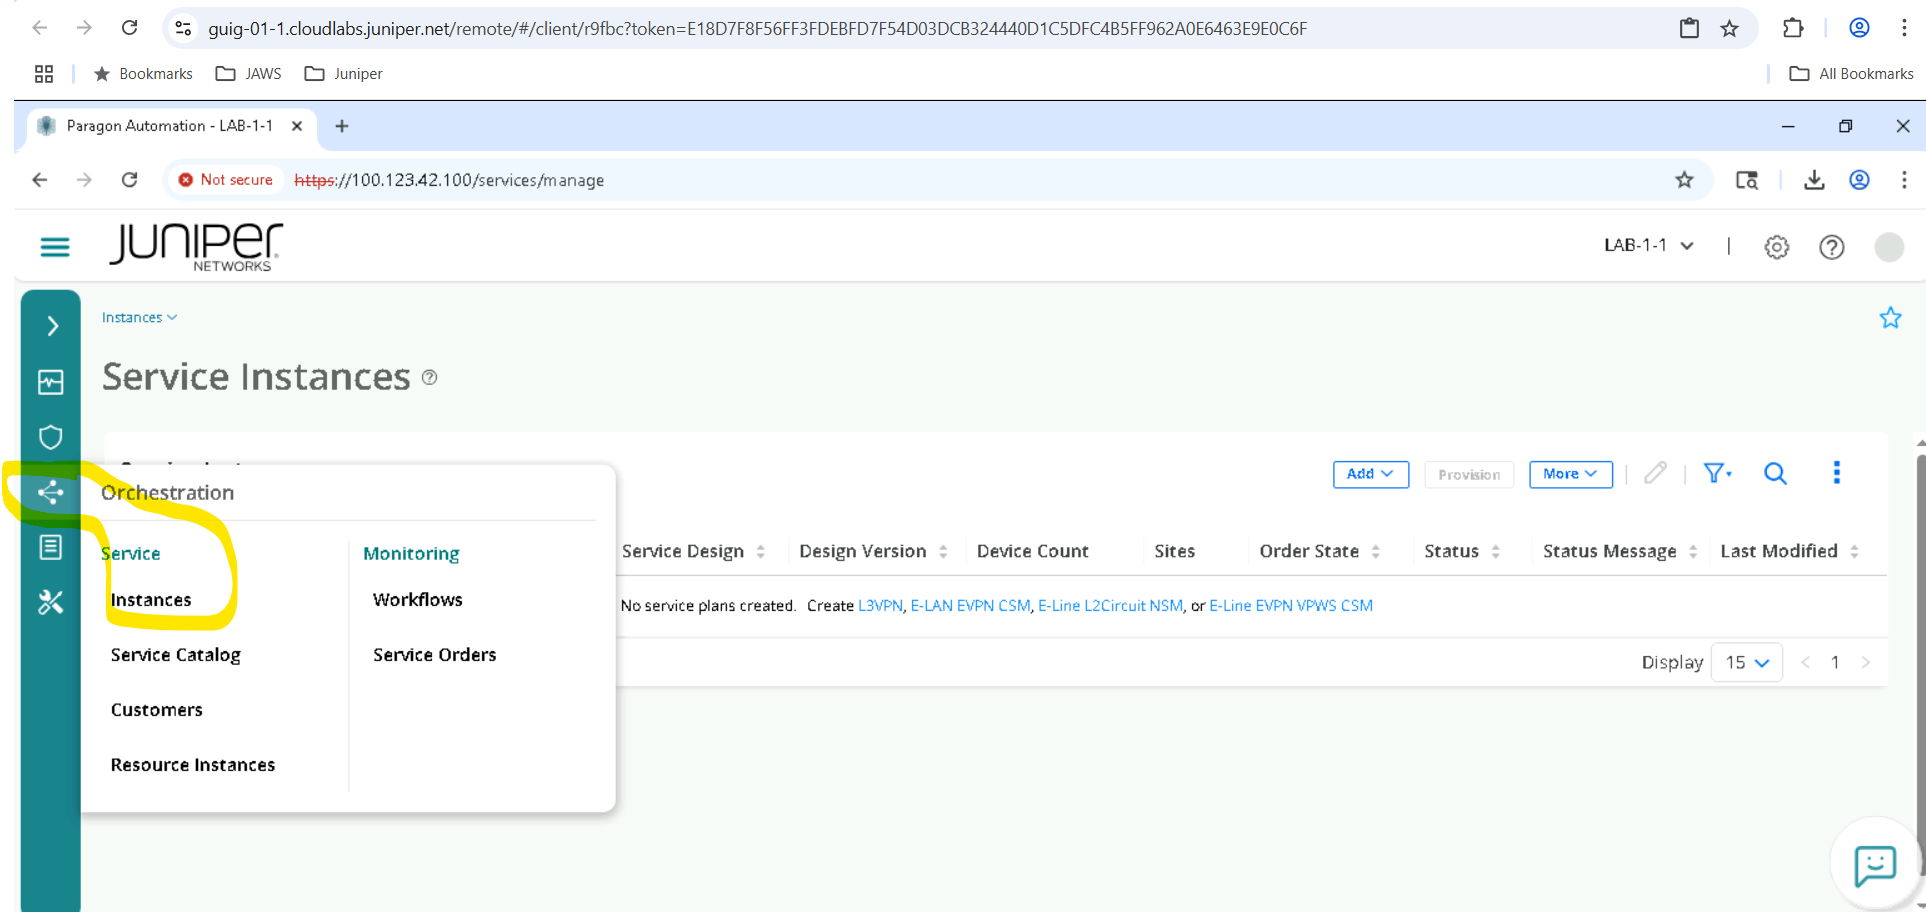
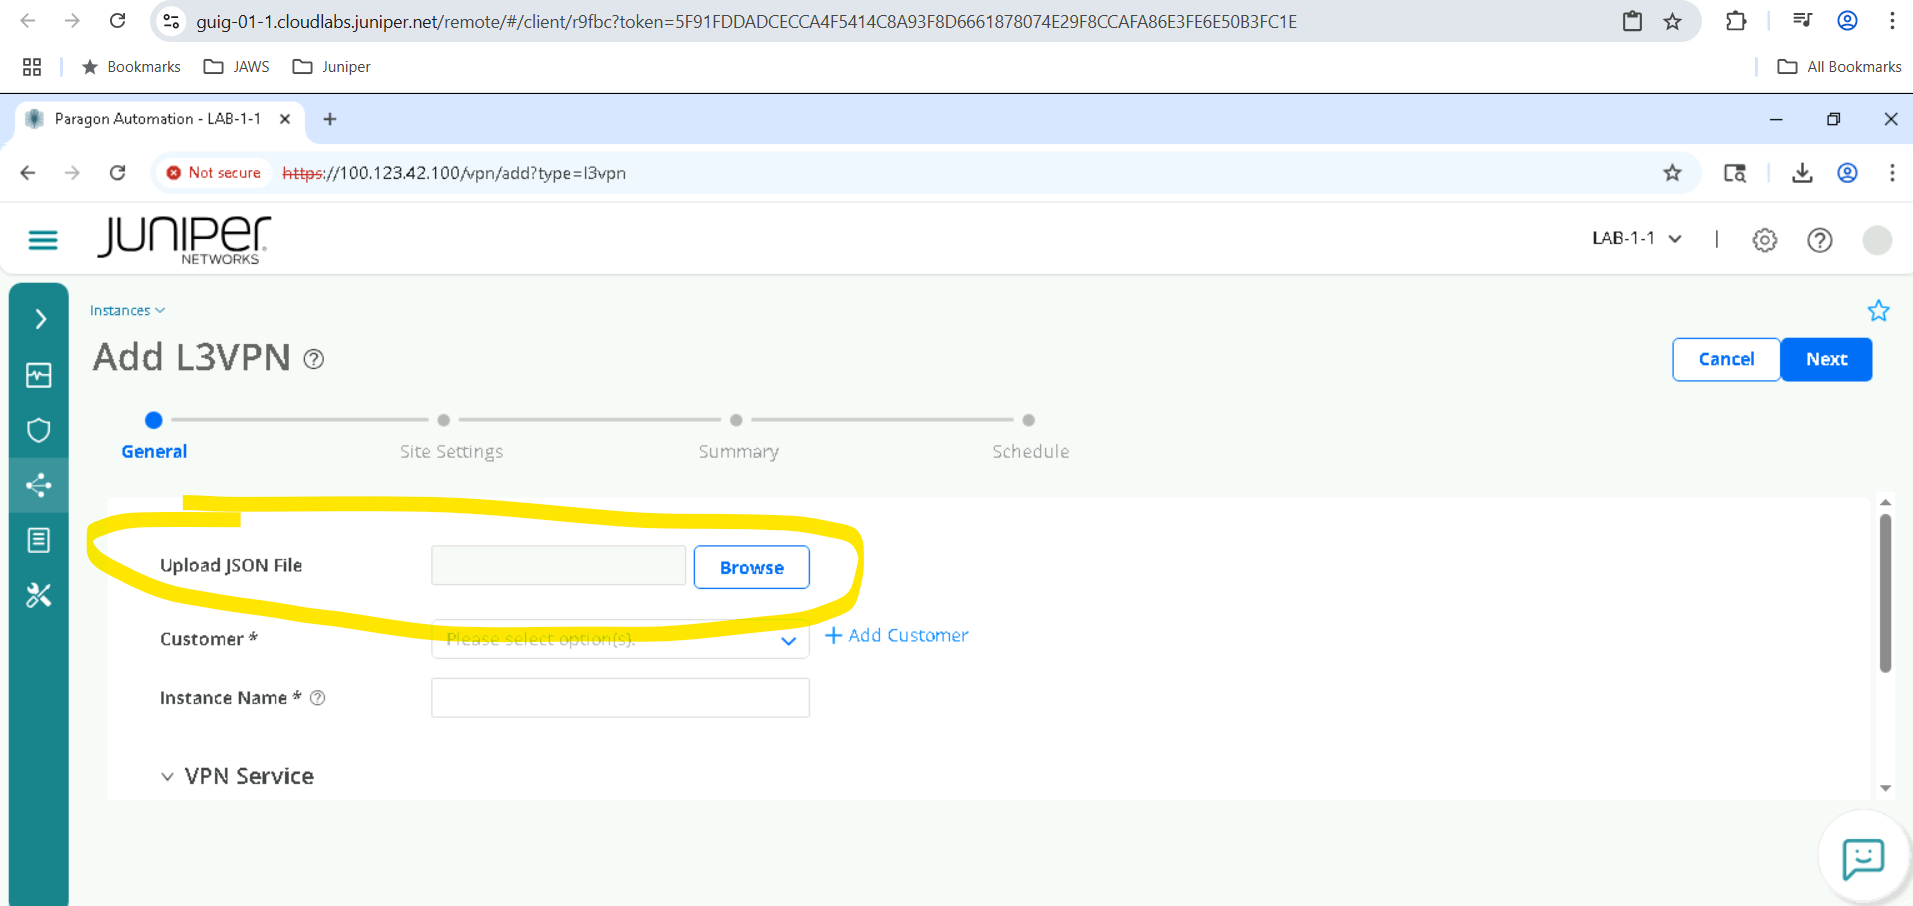
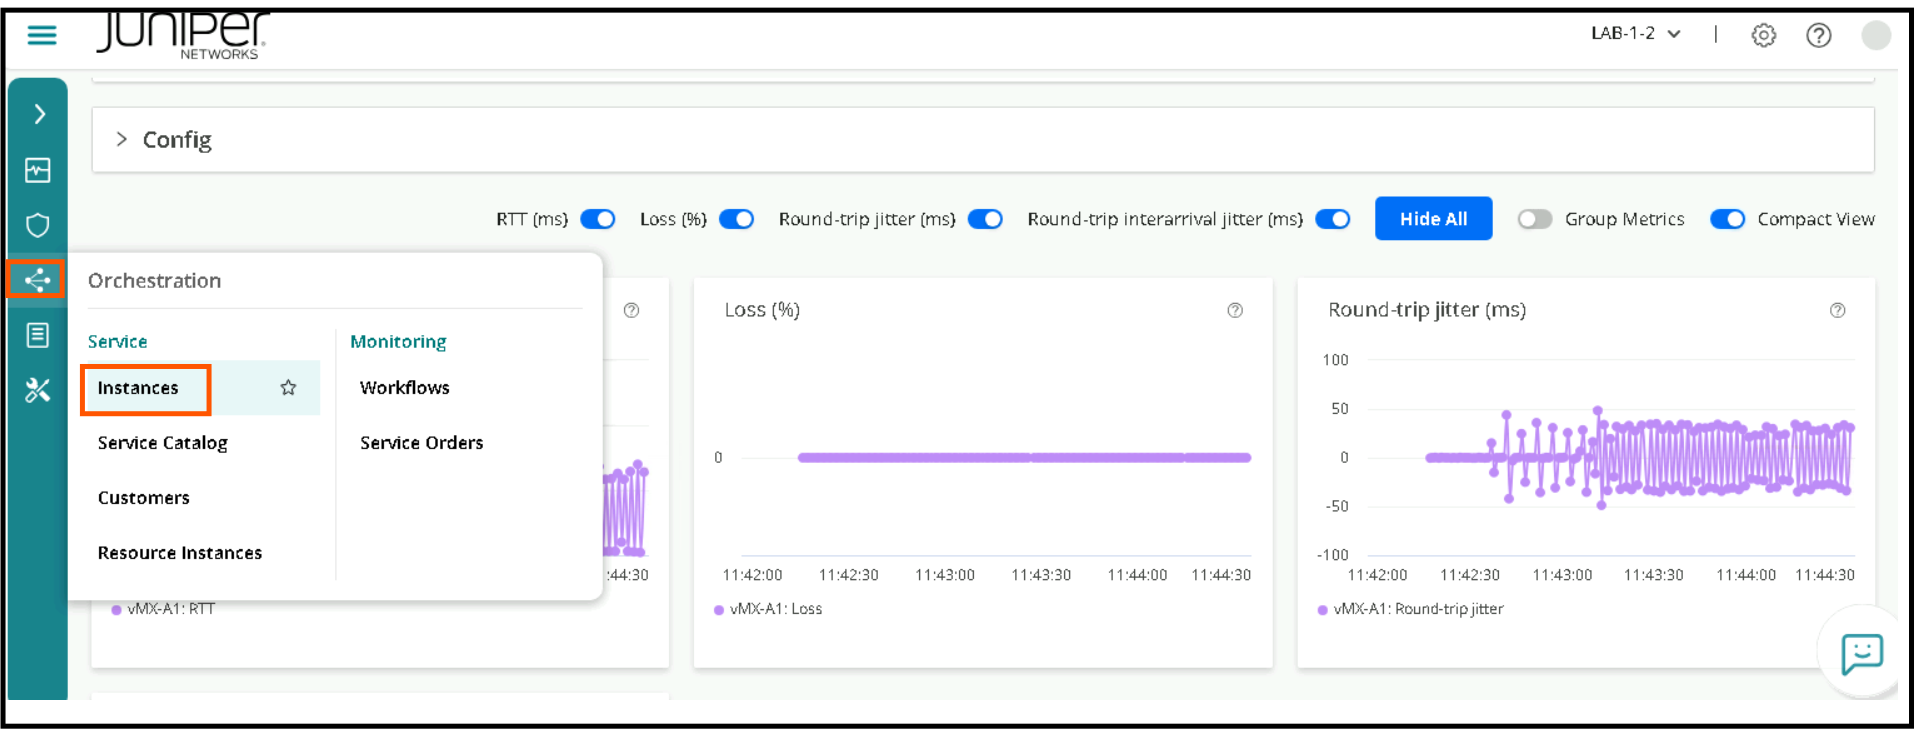
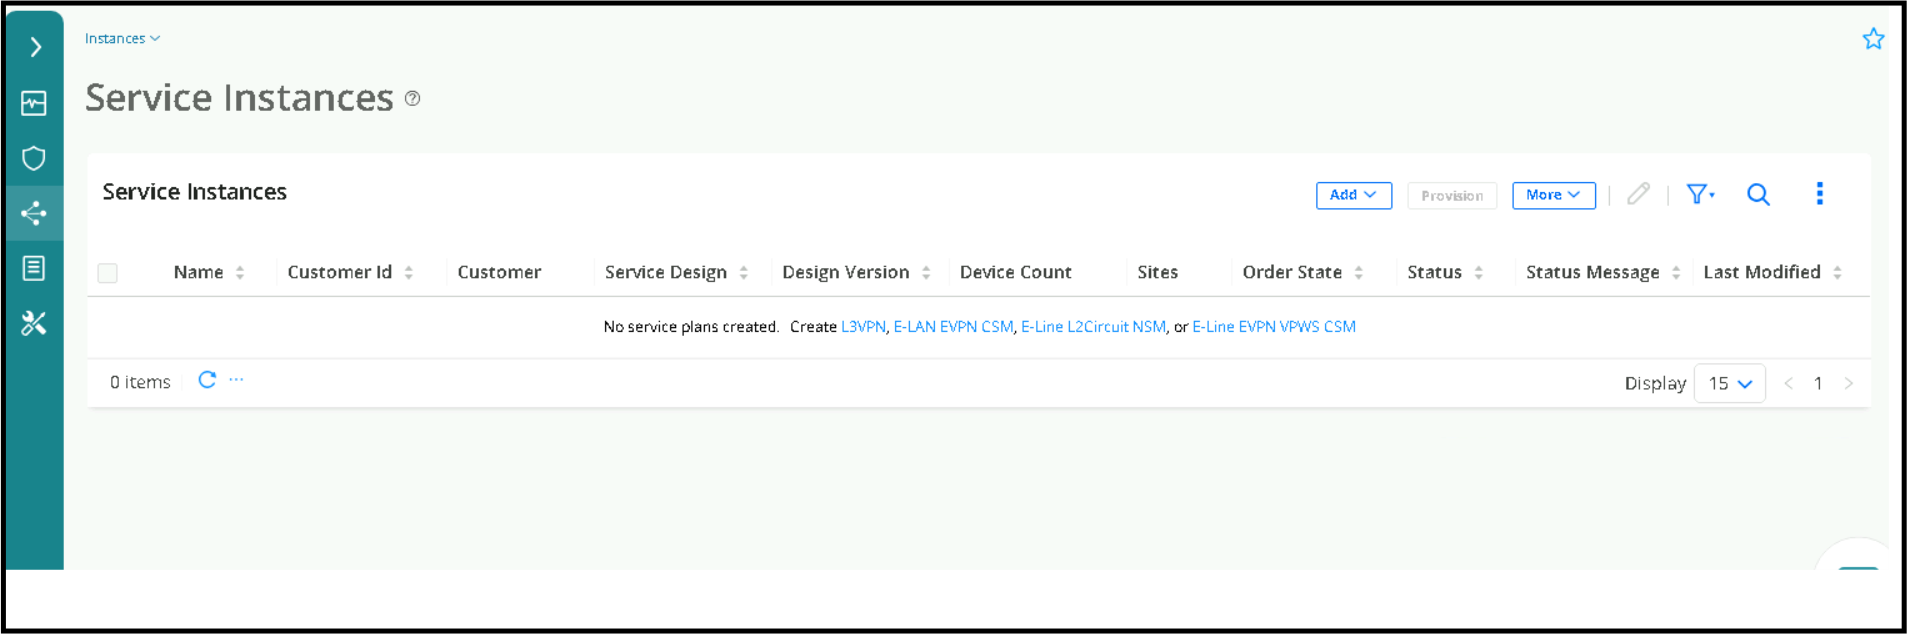
Click on Orchestration > Instances
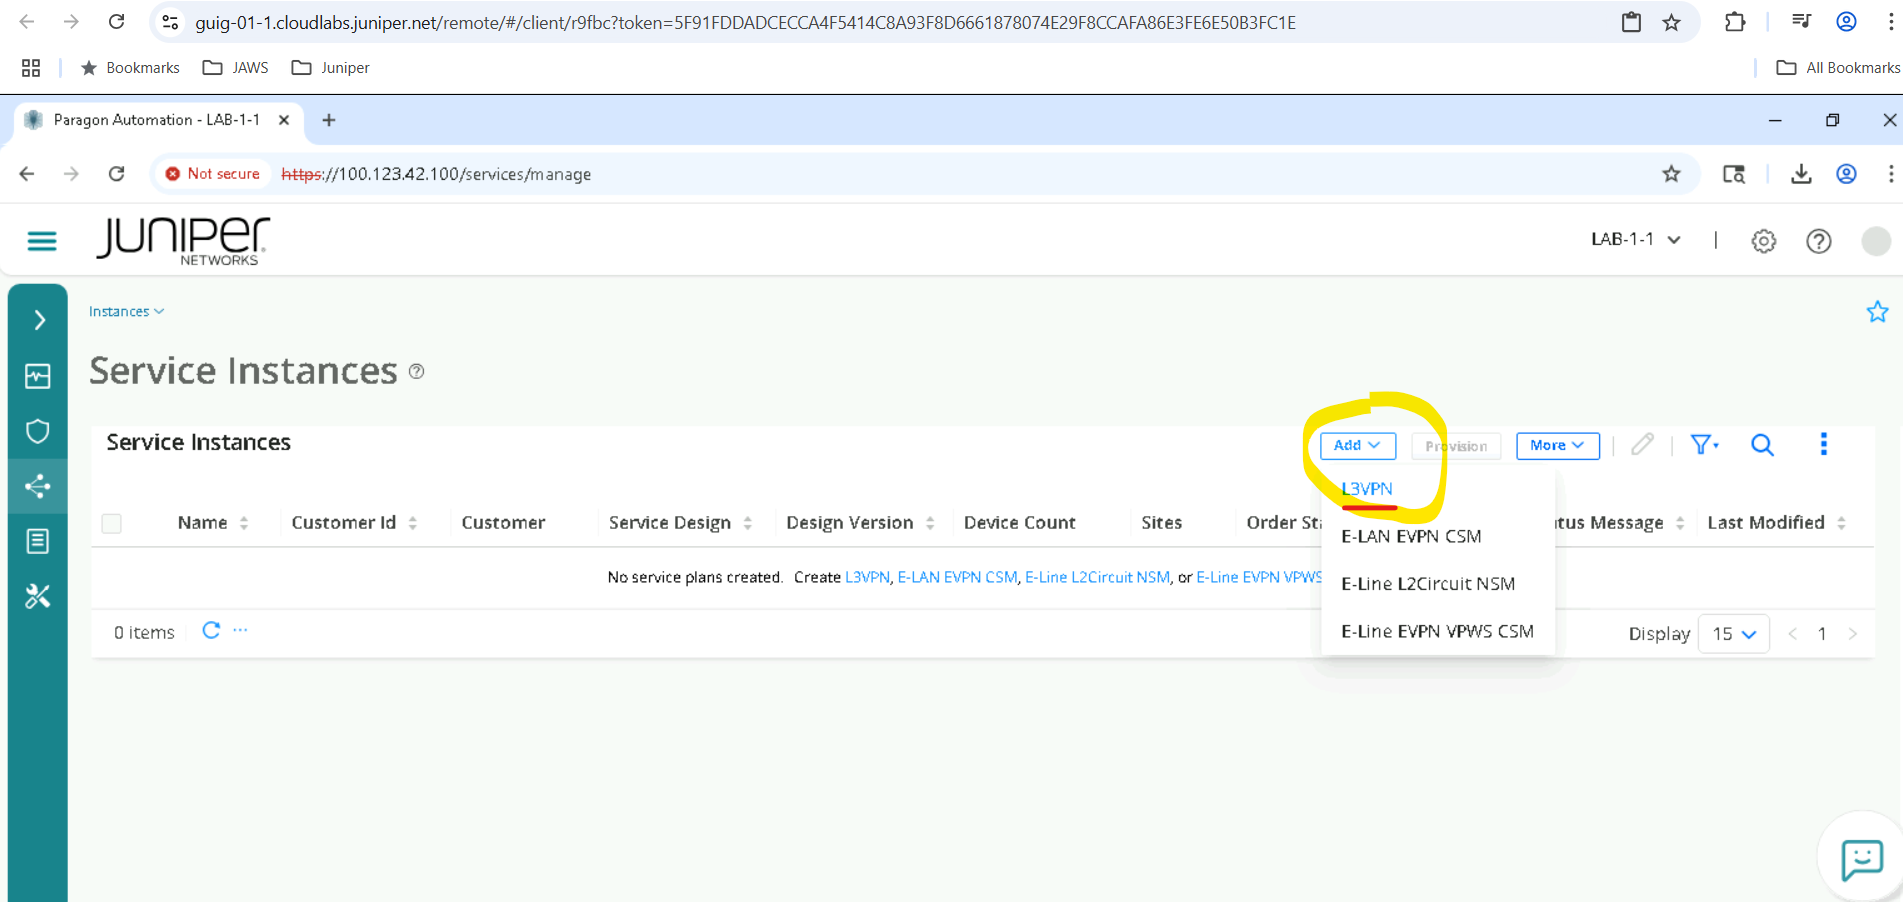
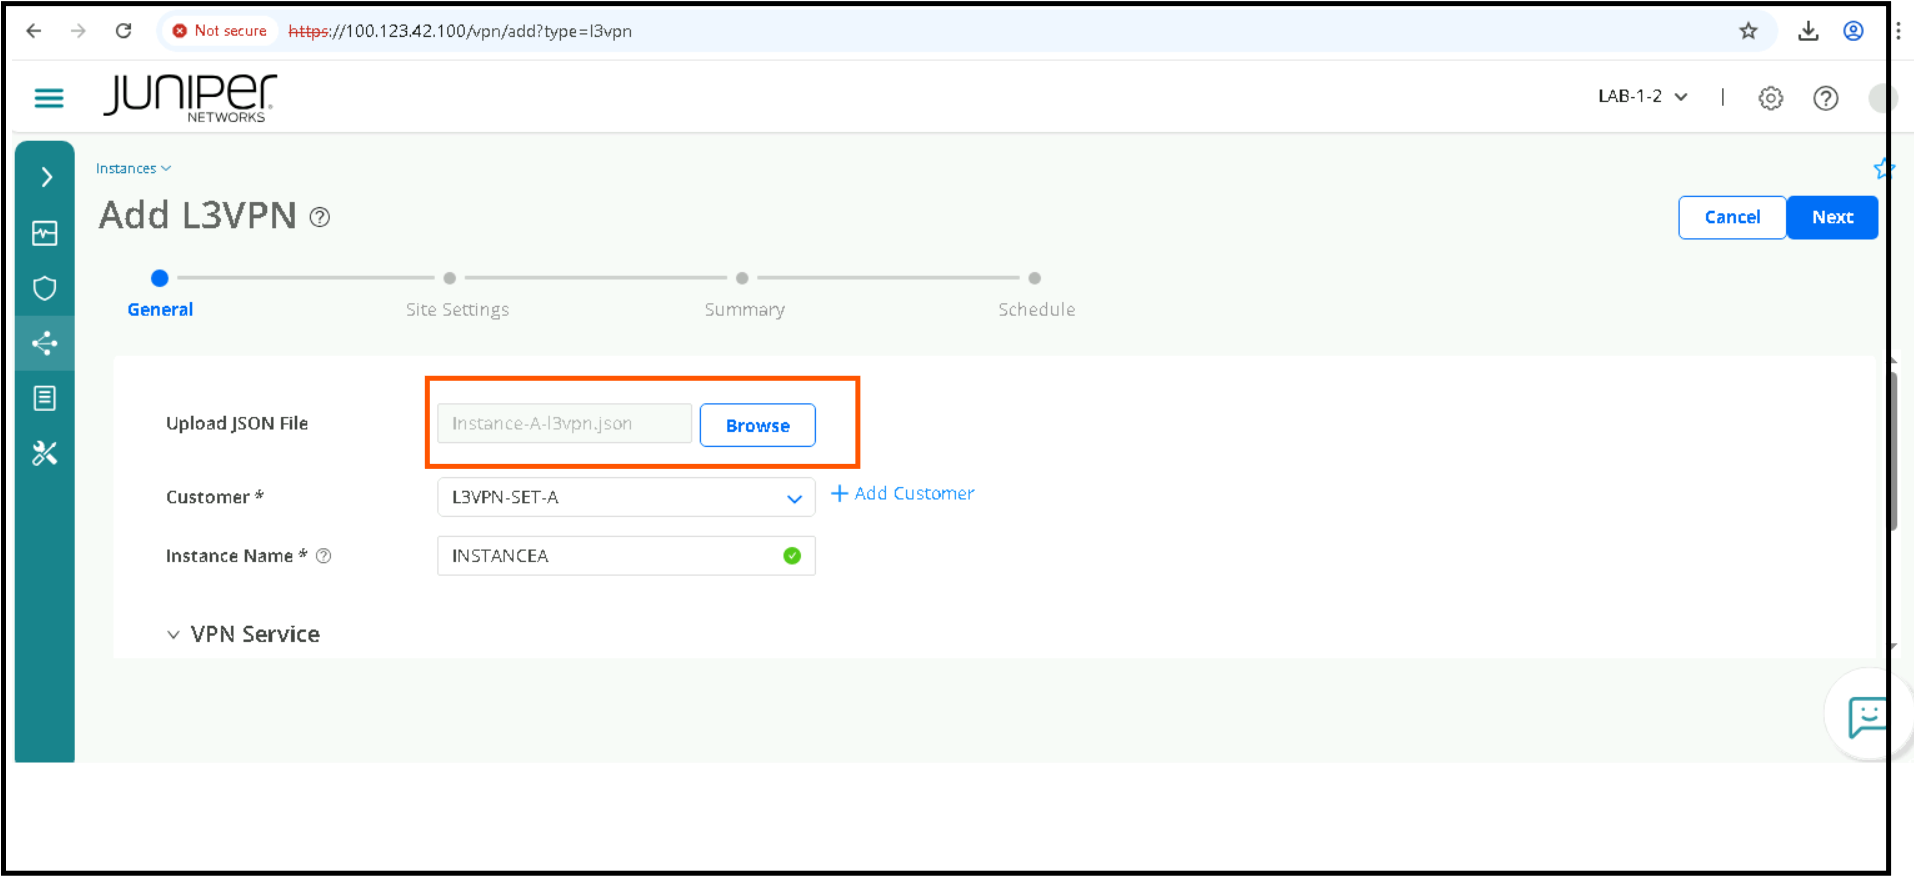
click Add L3VPN.
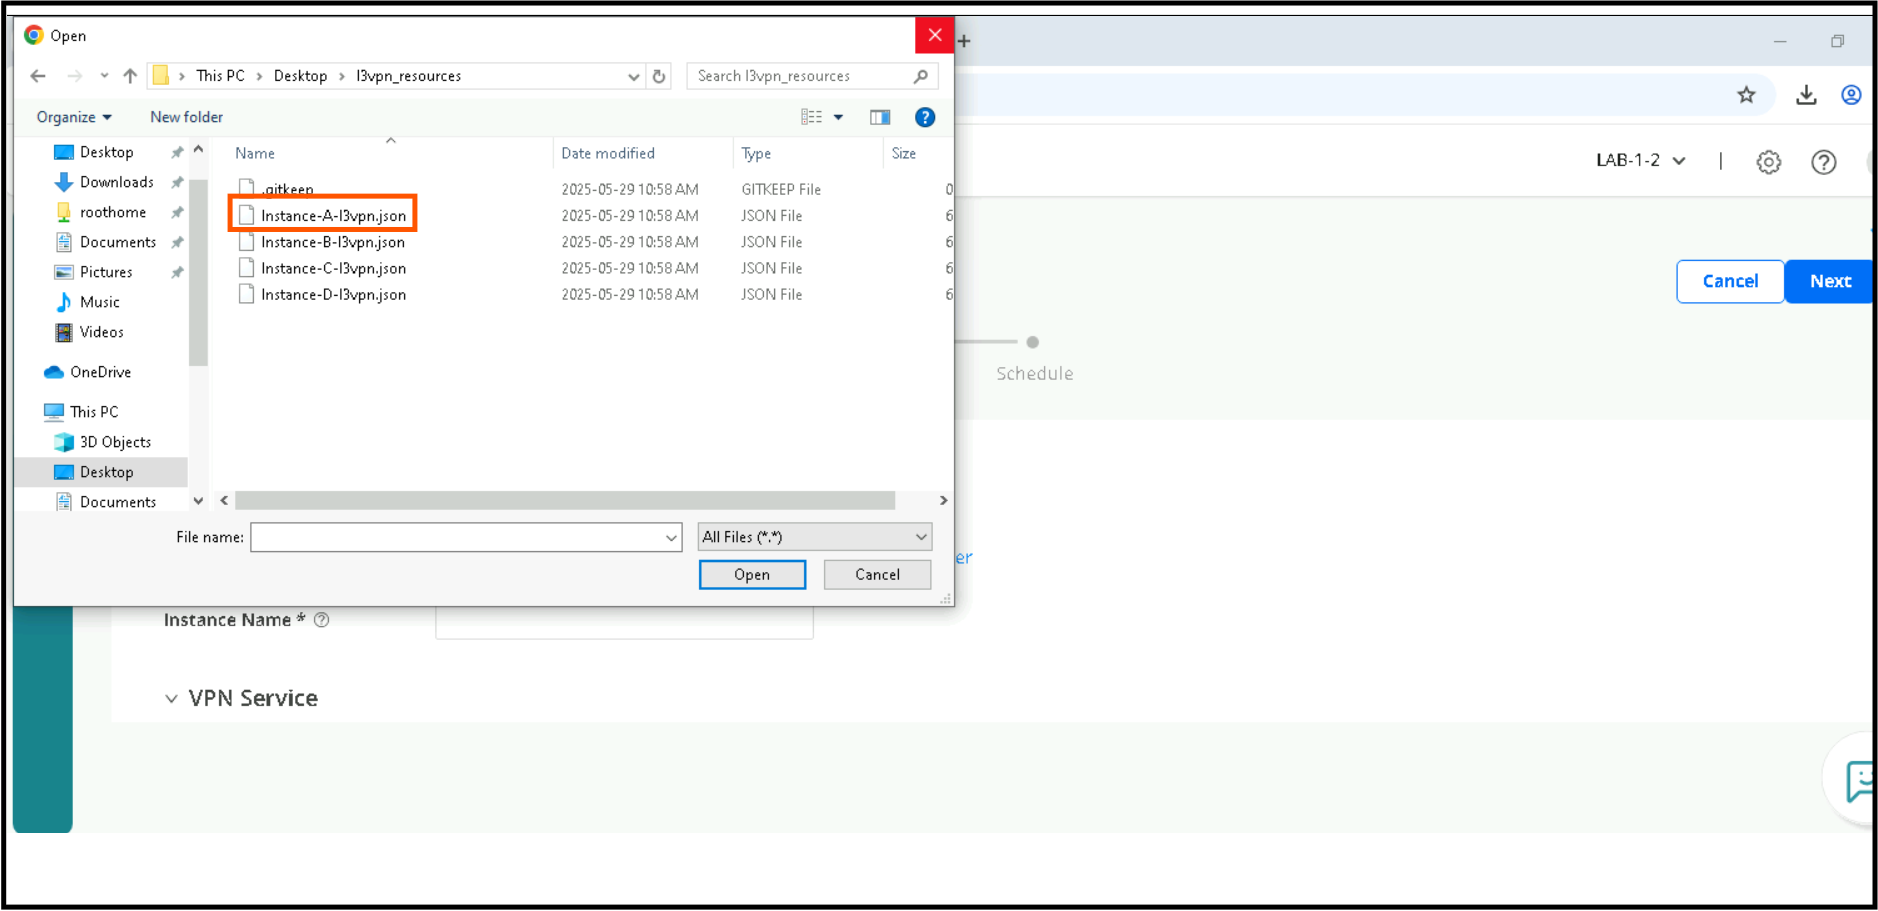
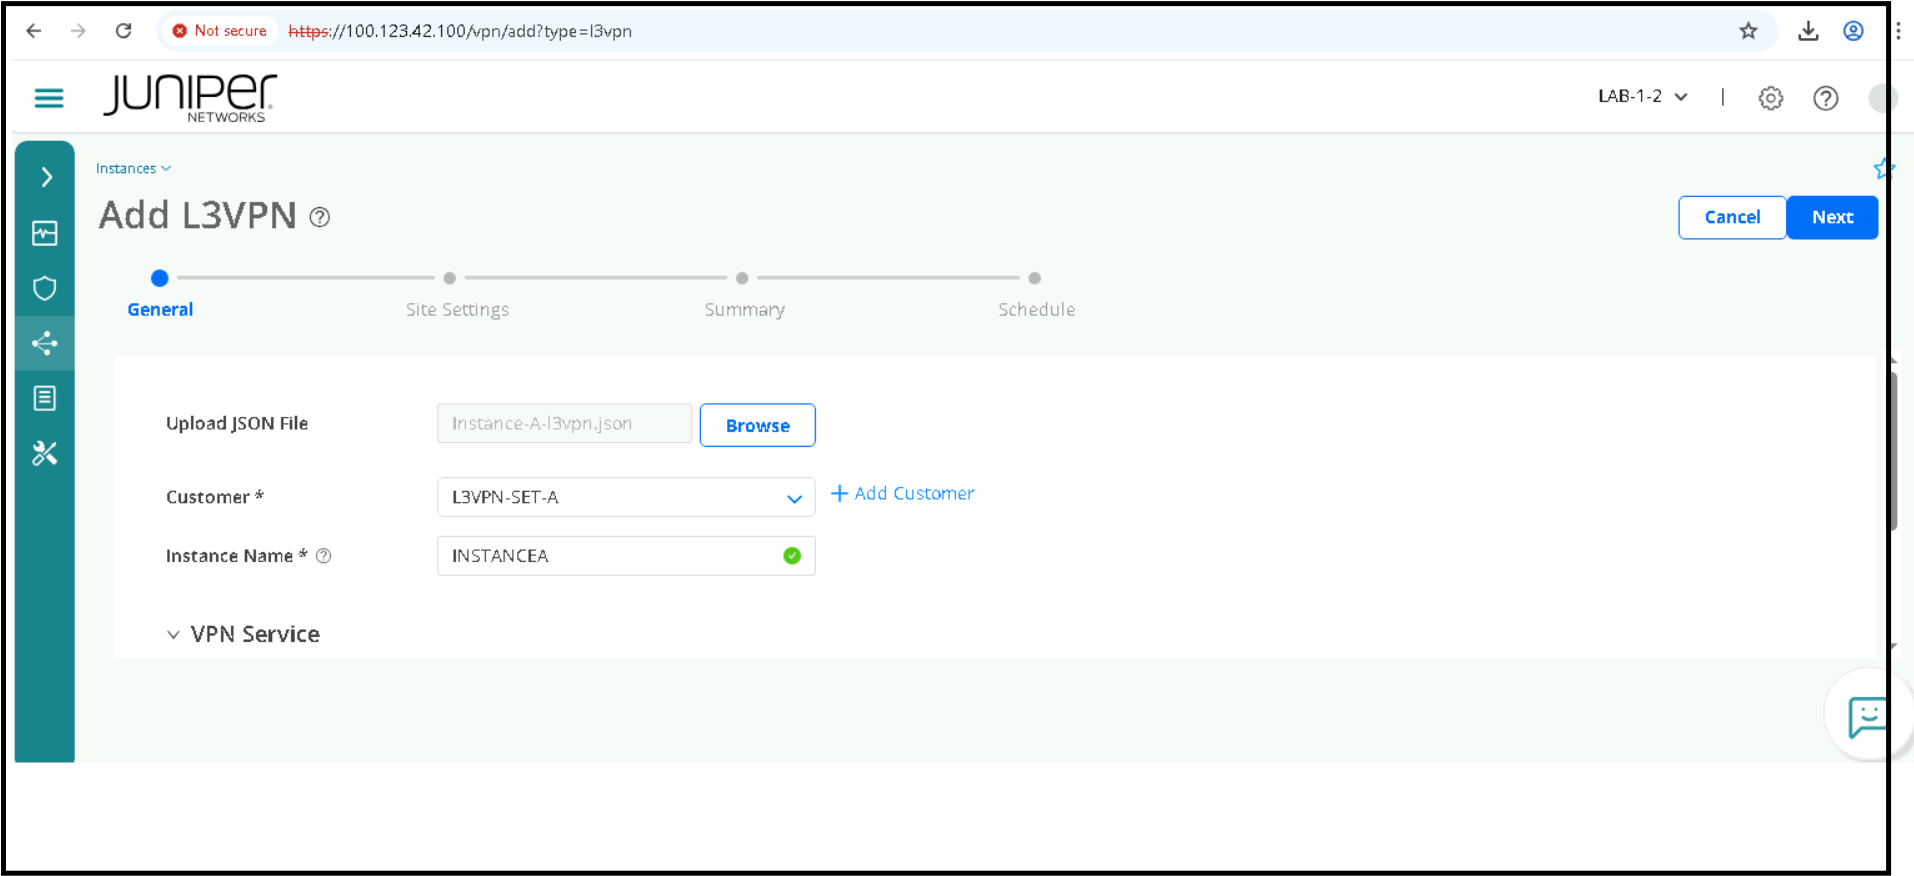
we will be uploading a JSON file for ease of use . Bear in mind that customers will be using API to provision a L3VPN, but for ease of use, we will use a JSON here along with GUI . Upload JSON File by clicking on Browse and selecting the JSON file for your Lab User Set. The JSON’s are under Desktop>l3vpn_resources>. please pick the correct JSON, for SETA we have to pick Instance-A-l3vpn.json and so on. Please consult the table below
SET |
Devices |
Network Implementation Plane |
JSON |
|---|---|---|---|
SETA |
vMX-A1, vMX-A2 |
NIP-A |
Instance-A-l3vpn.json |
SETB |
vMX-B1, vMX-B2 |
NIP-B |
Instance-B-l3vpn.json |
SETC |
vMX-C1, vMX-C2 |
NIP-C |
Instance-C-l3vpn.json |
SETD |
vMX-D1, vMX-D2 |
NIP-D |
Instance-D-l3vpn.json |
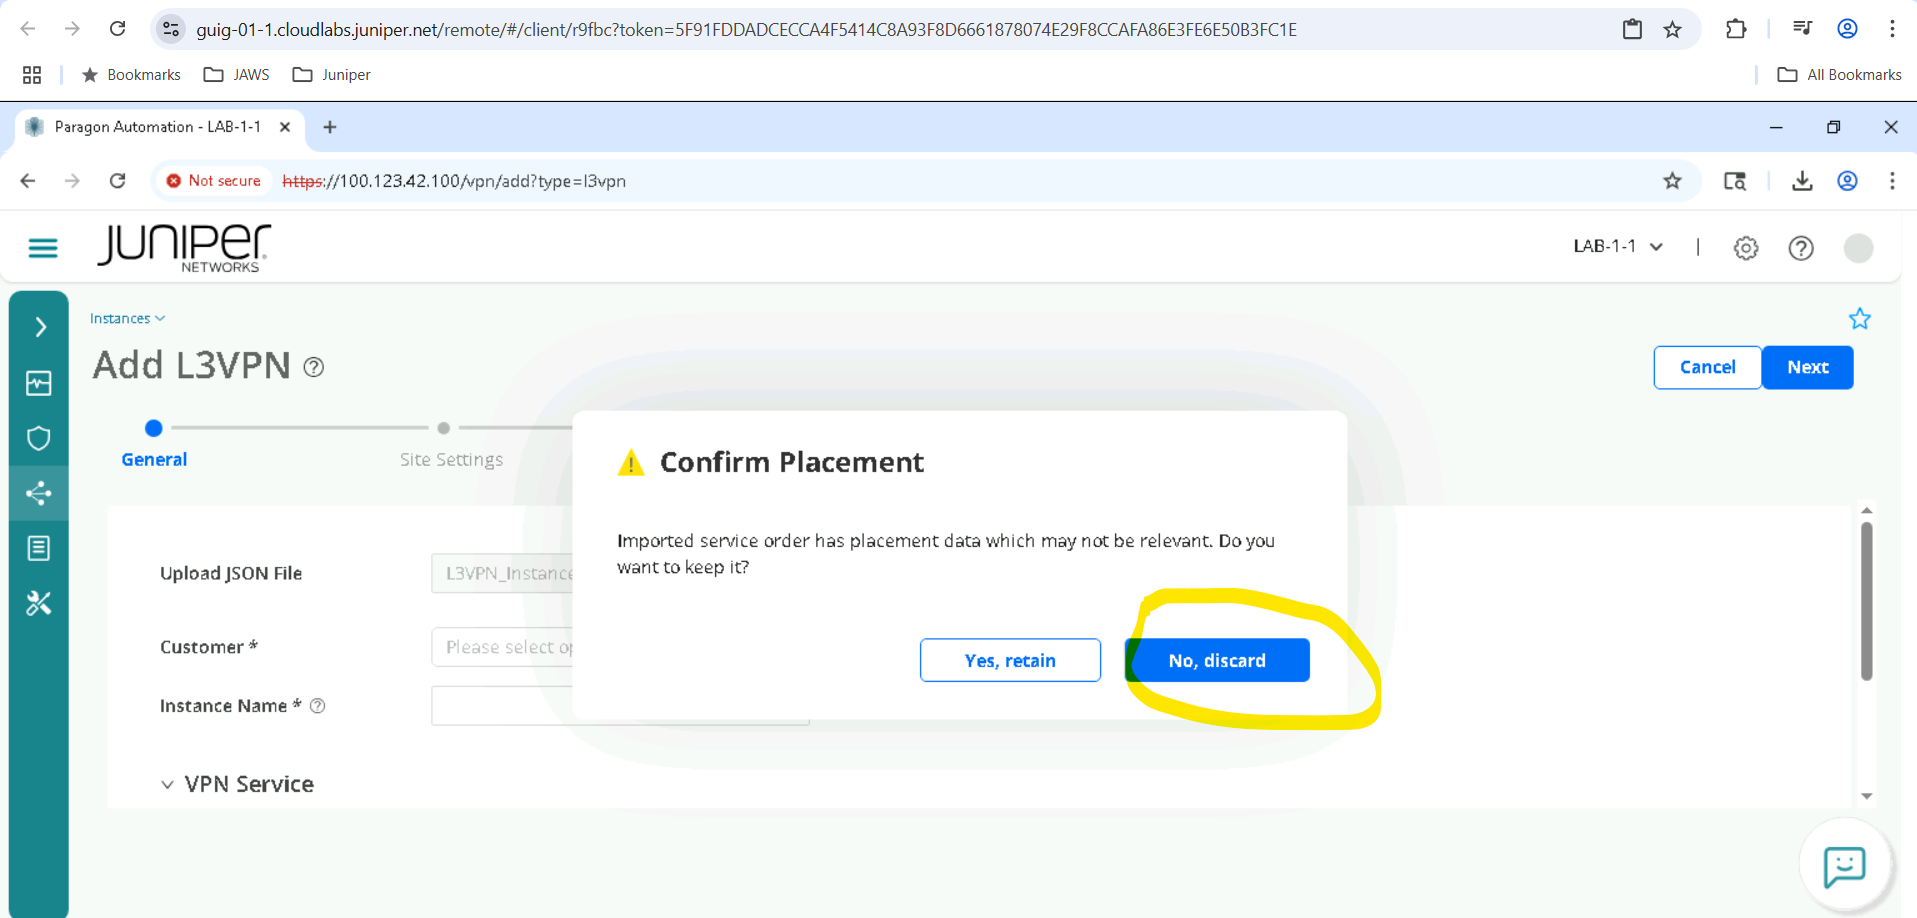
If prompted , we will need to discard any prior placement, hence we will click on No, discard. You should see a message successfully imported.
Click Next. You should see the site settings Page, please review the different parameters used, but DO NOT CHANGE THEM as it may impact other lab users.
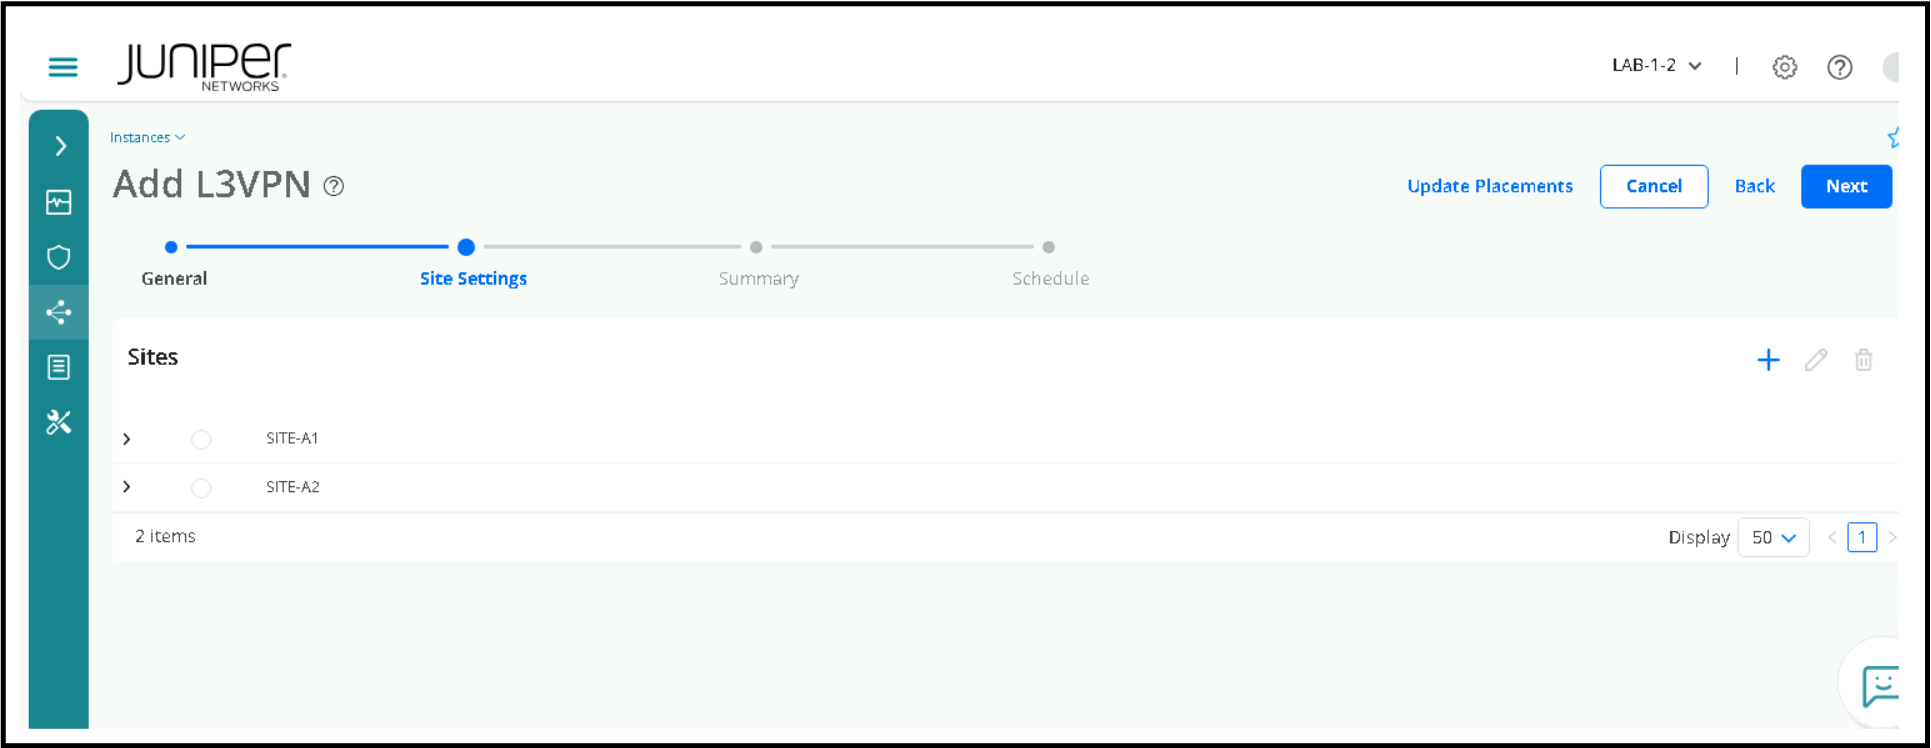
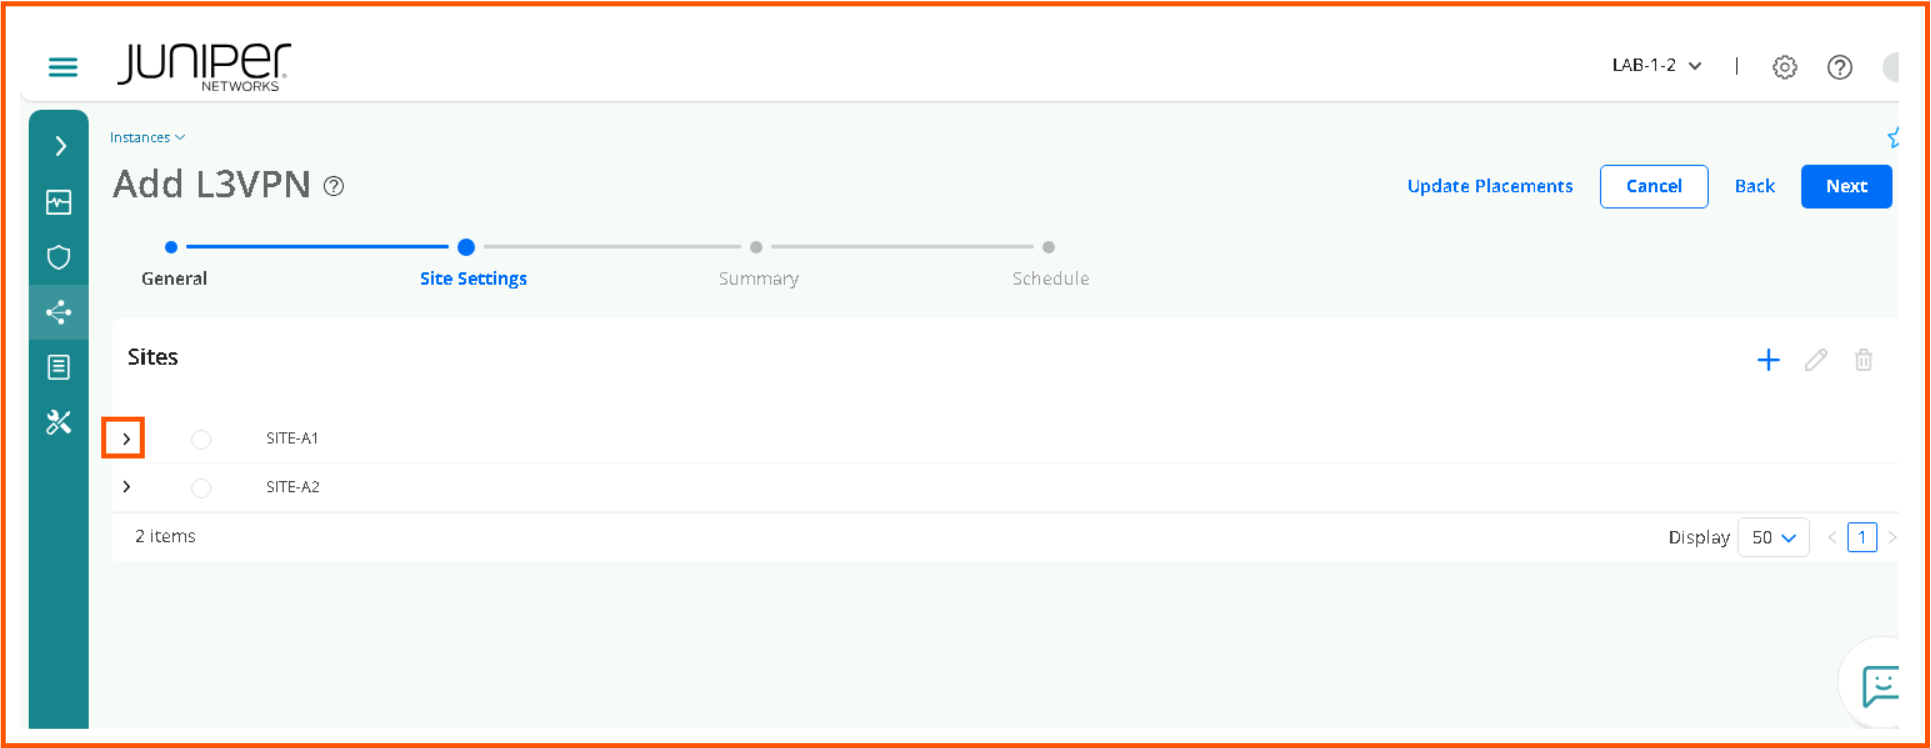
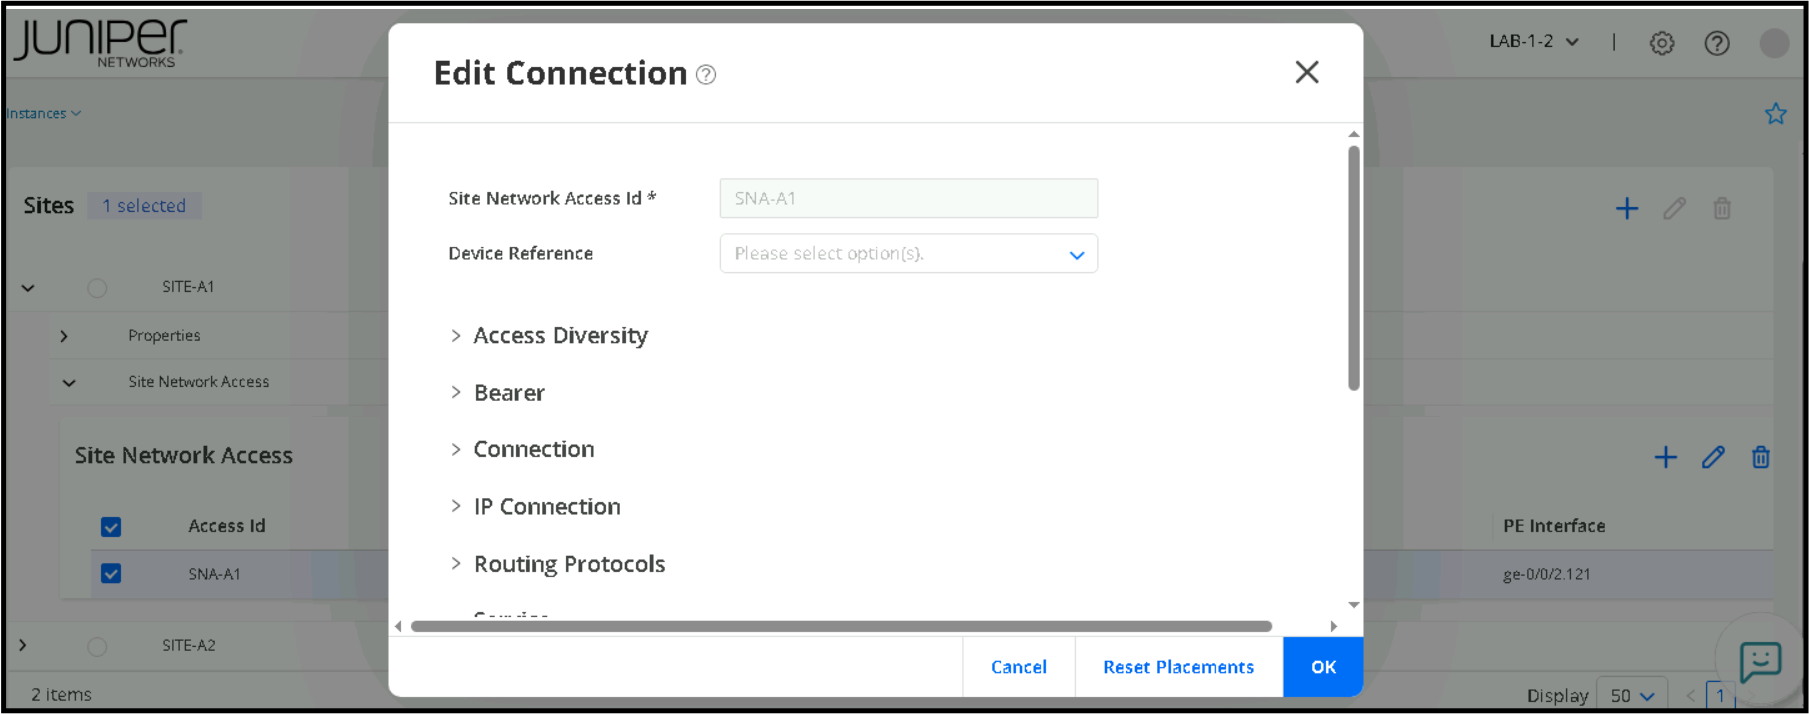
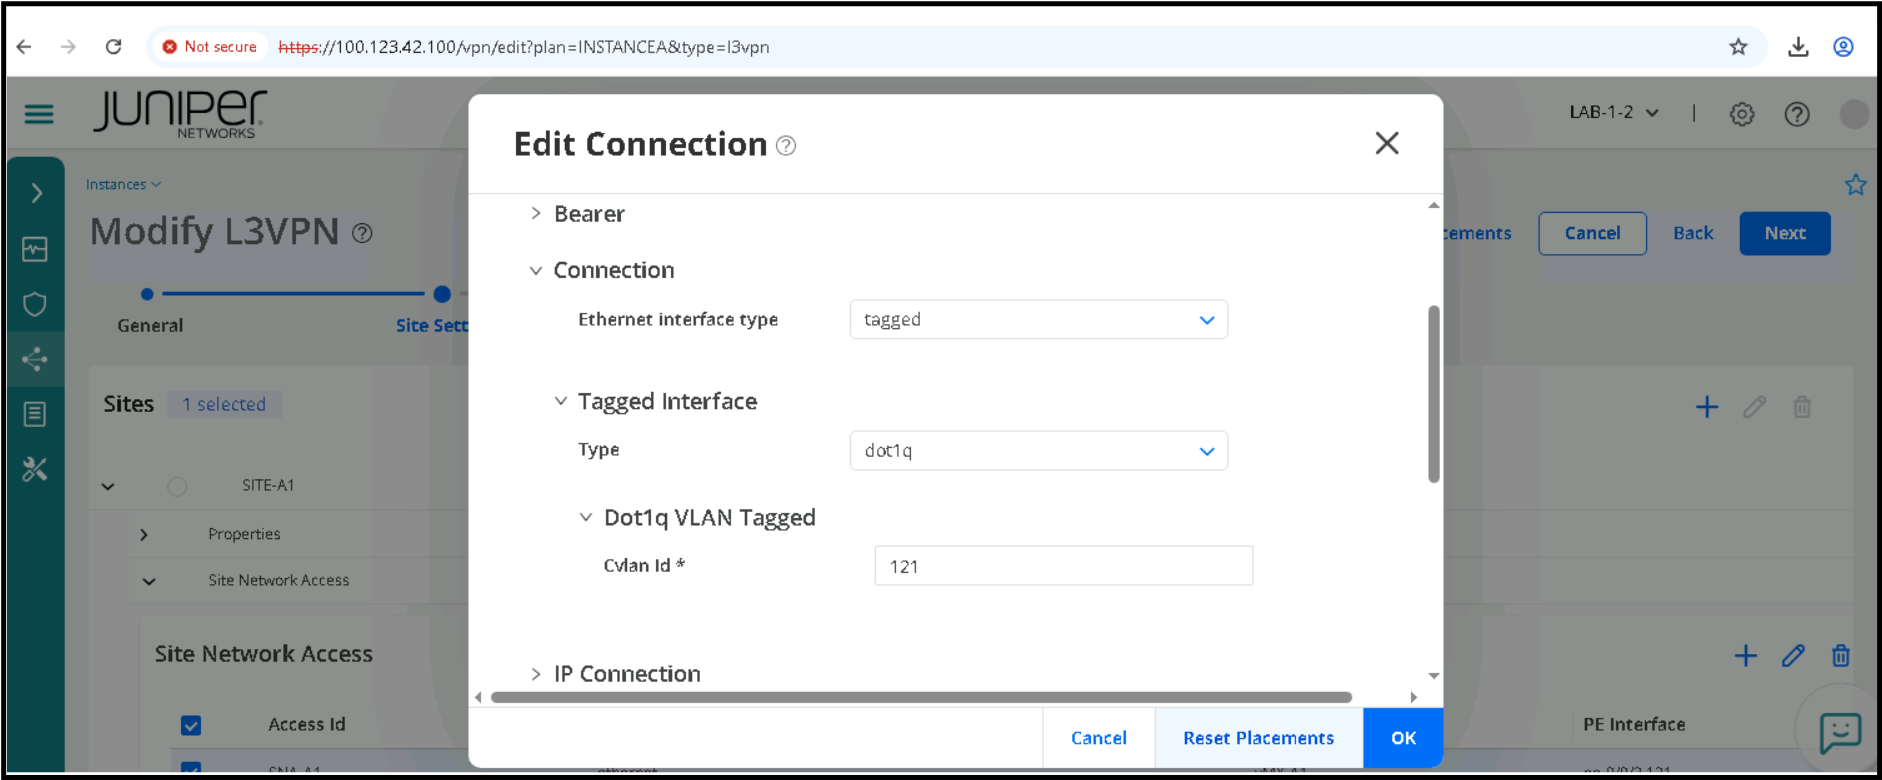
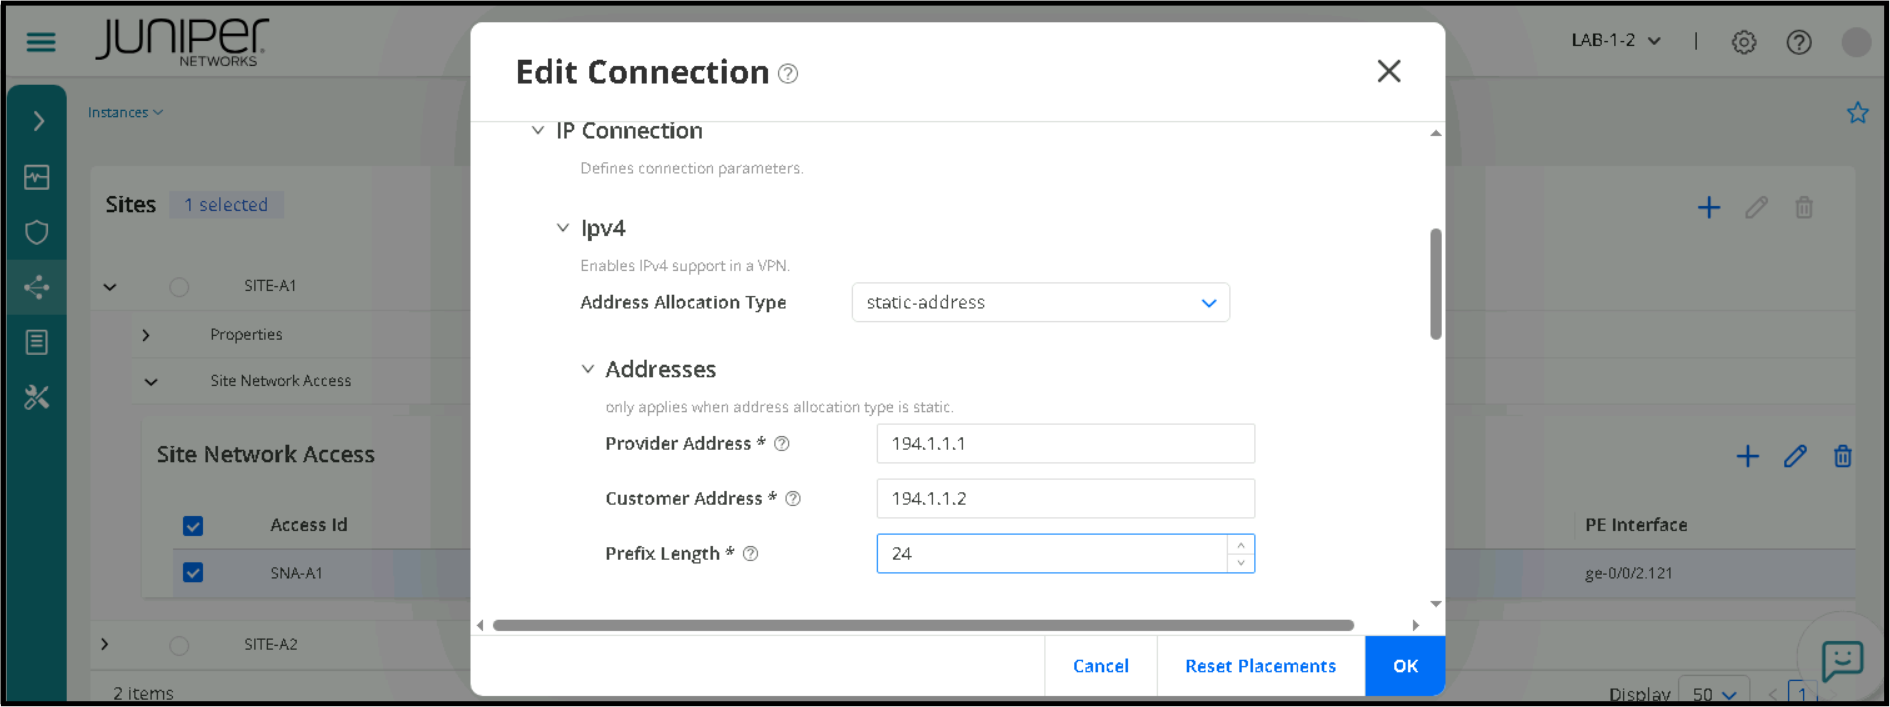
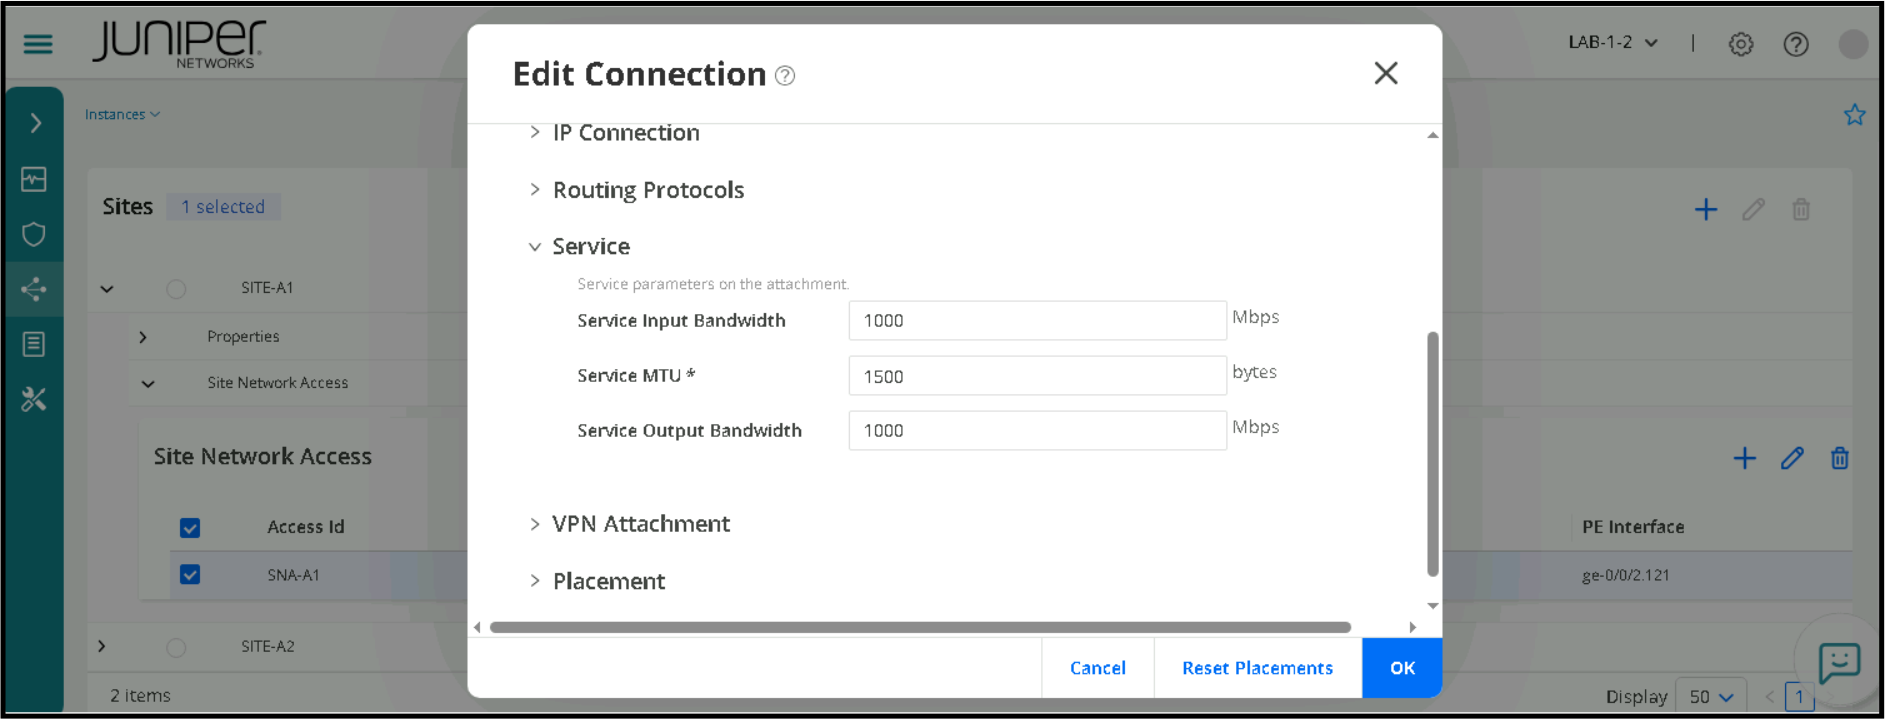
Review the Sites, there will be 2 sites. If you expand the symbol “>” and if you click and expand you will see site network access parameters.
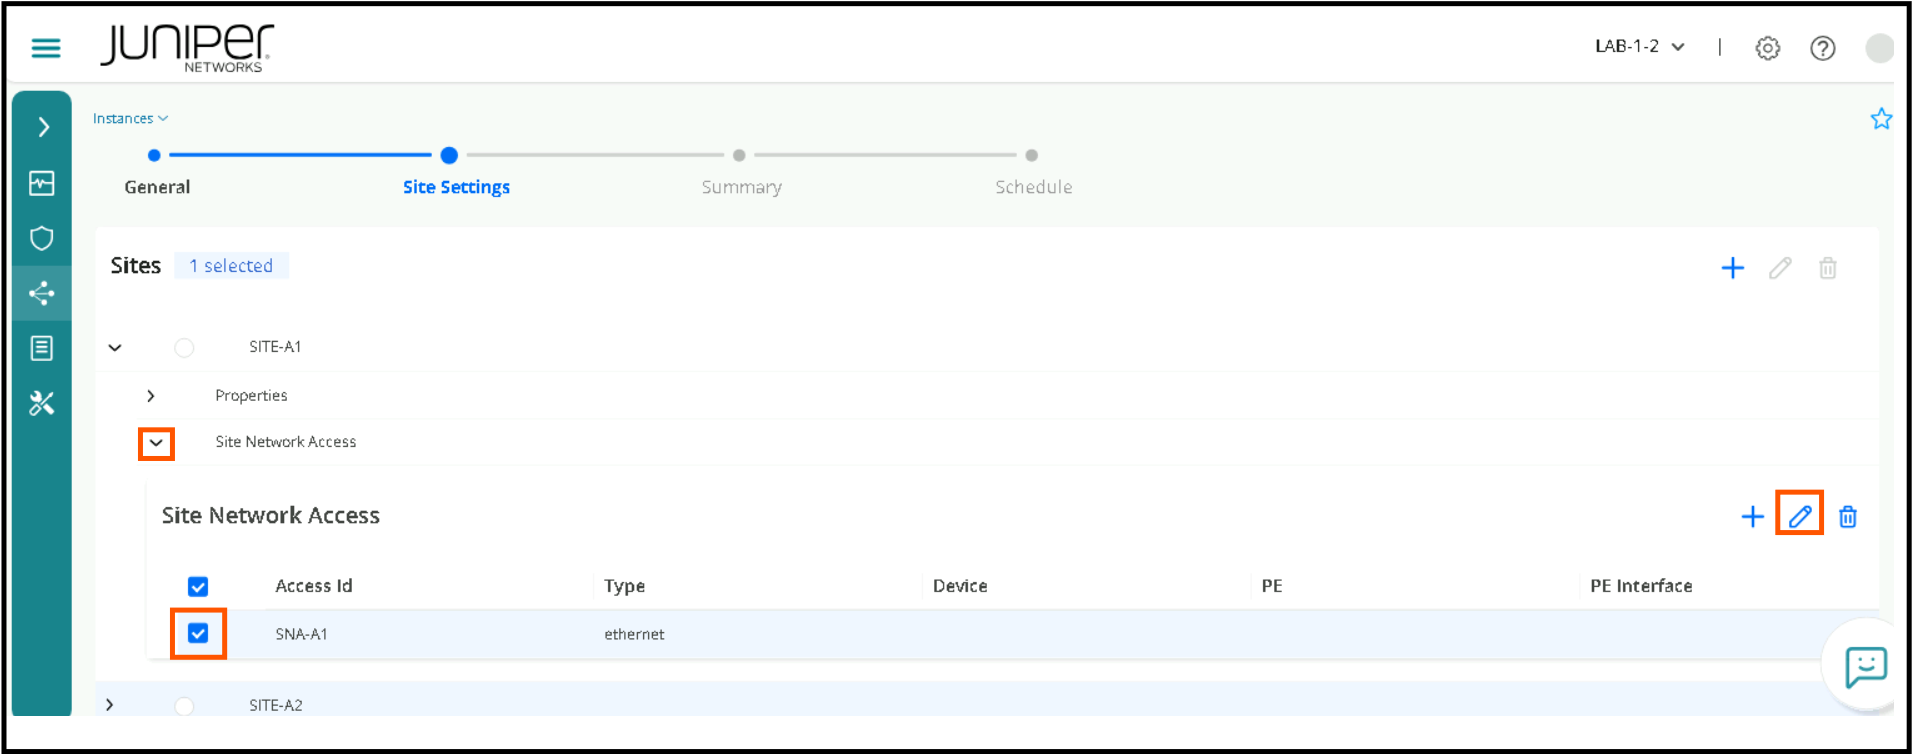
You can click to edit the Site network access parameters, to review the various parameters like Bearer, IP Connection, Routing Protocols etc. Please expand and review but do not change them. Once you are done reviewing these parameters click cancel. Please don’t change as it may impact the lab.
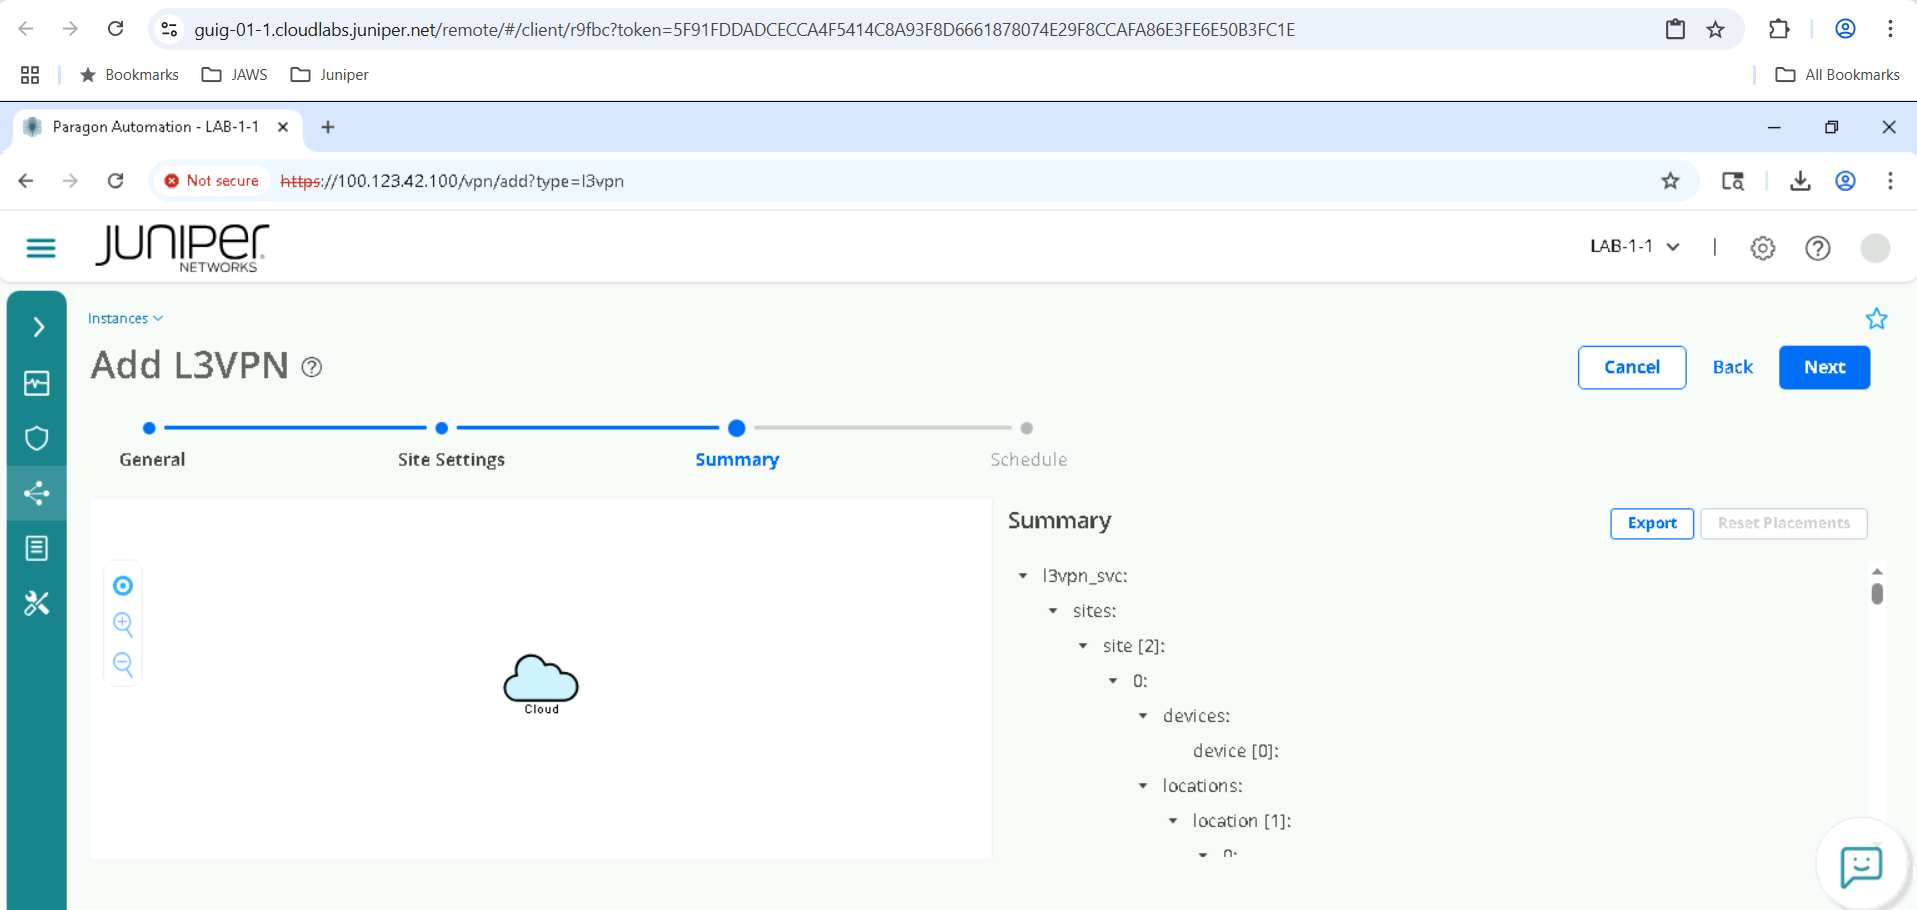
Click Next and you will see Summary Page. And you will also see the JSON representation in the Summary.
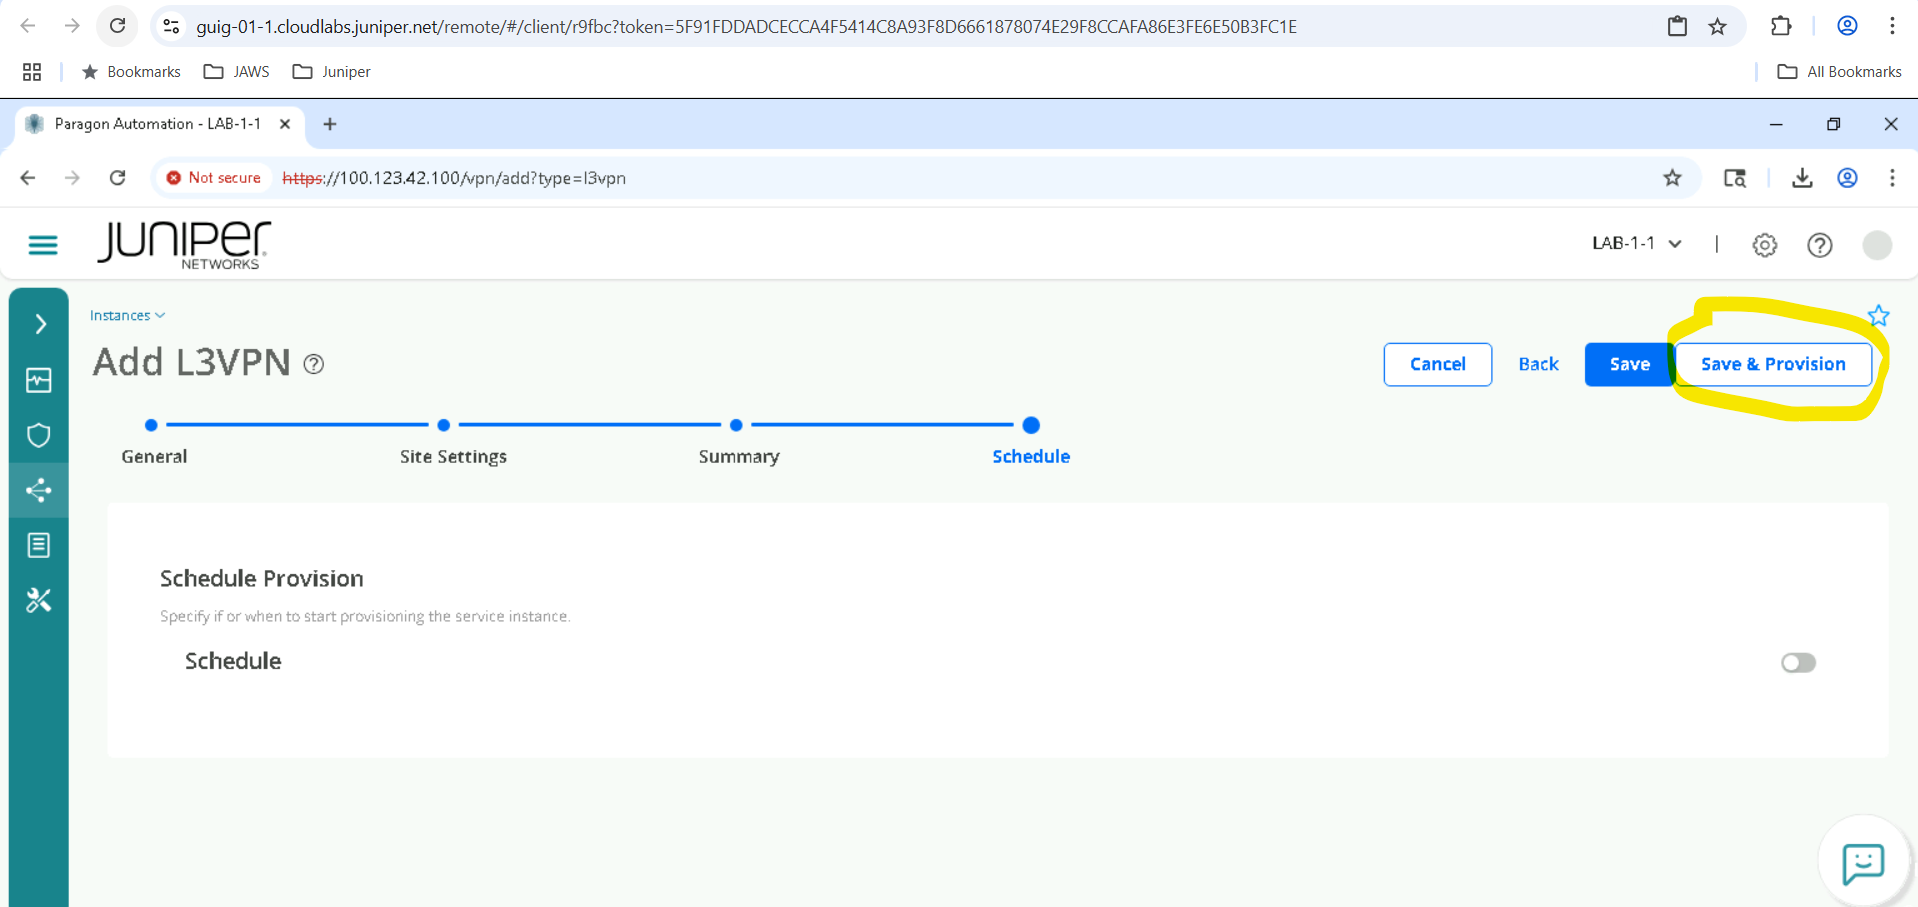
Click Next
Click Save and Provision
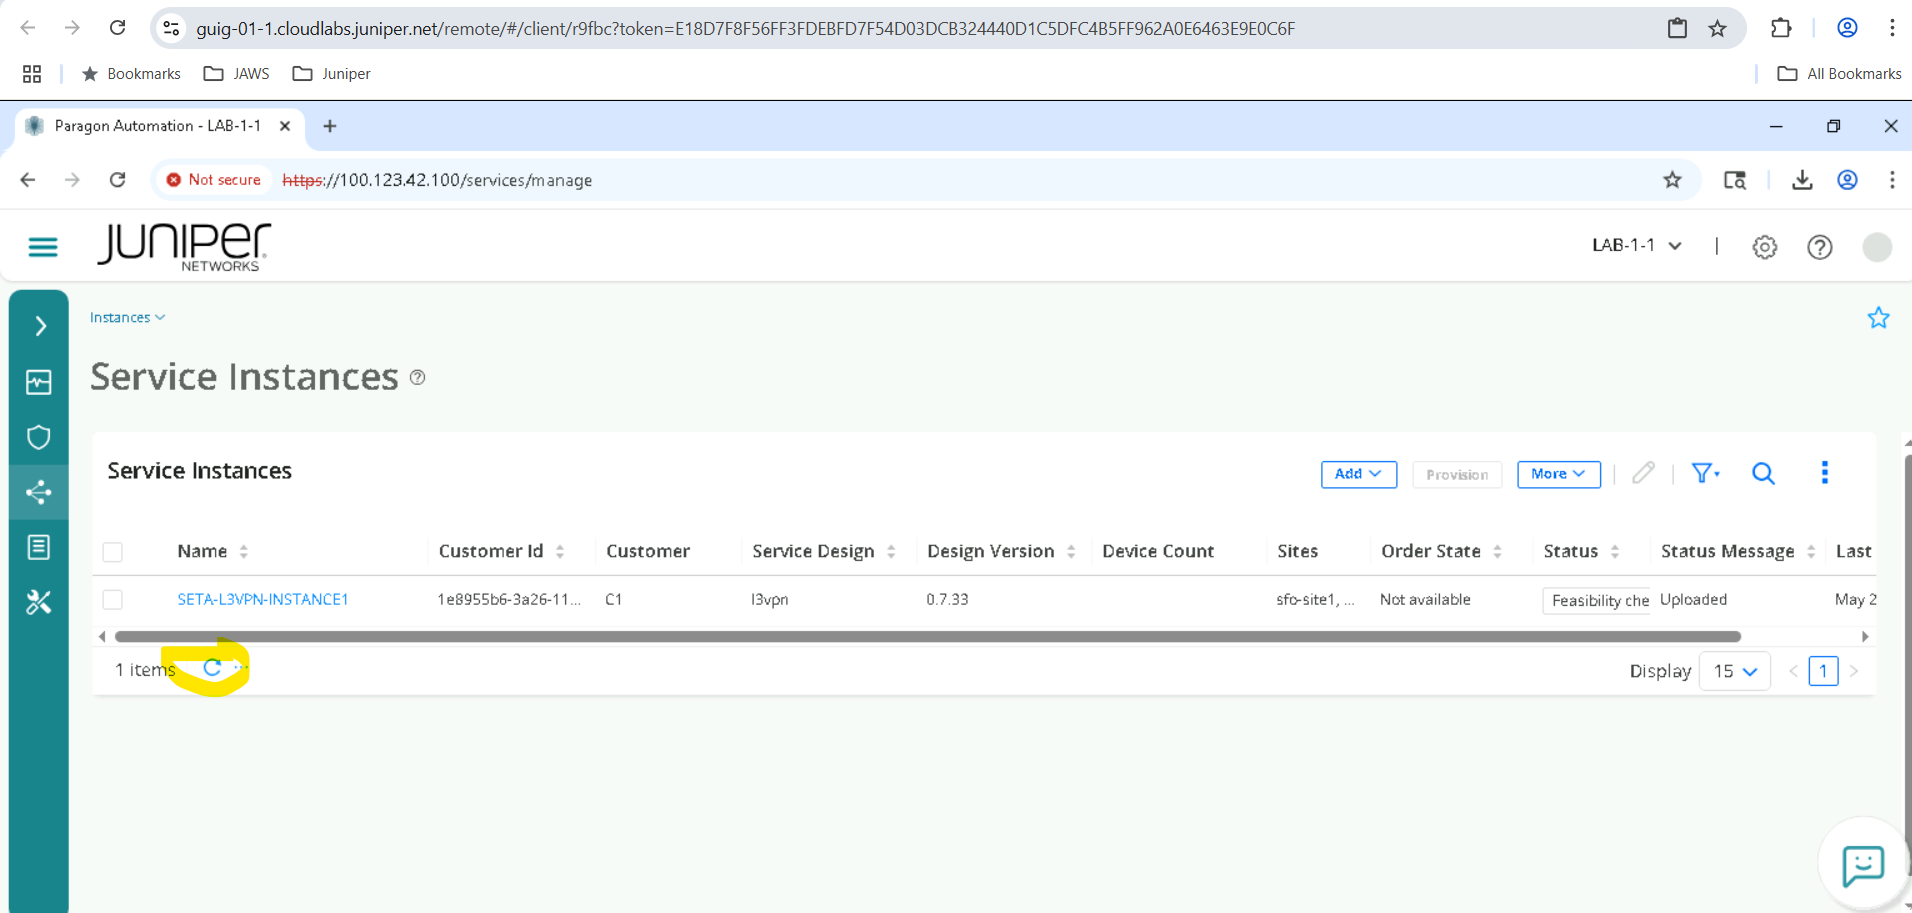
The Service will go through various states to be provisioned, first it will be in uploaded state , we must refresh it couple of times till it gets provisioned. There are other ways to view the workflow in progress which we will see at a later point.
Observability and Assurance of your Service Instance
Now that the service is provisioned, we would like to see various aspects of the service .
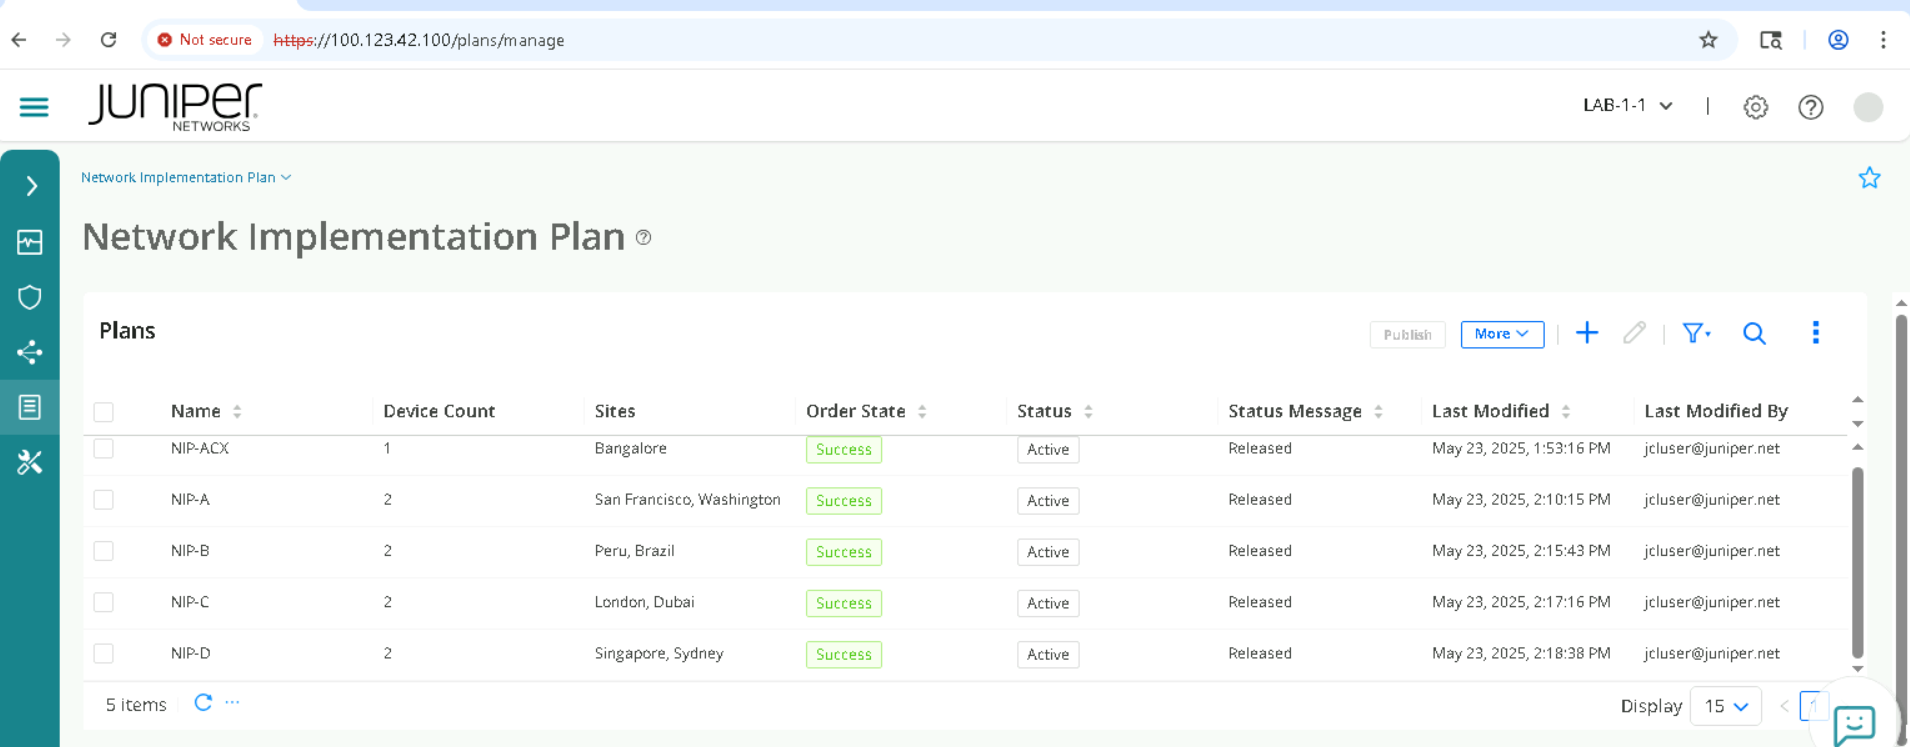
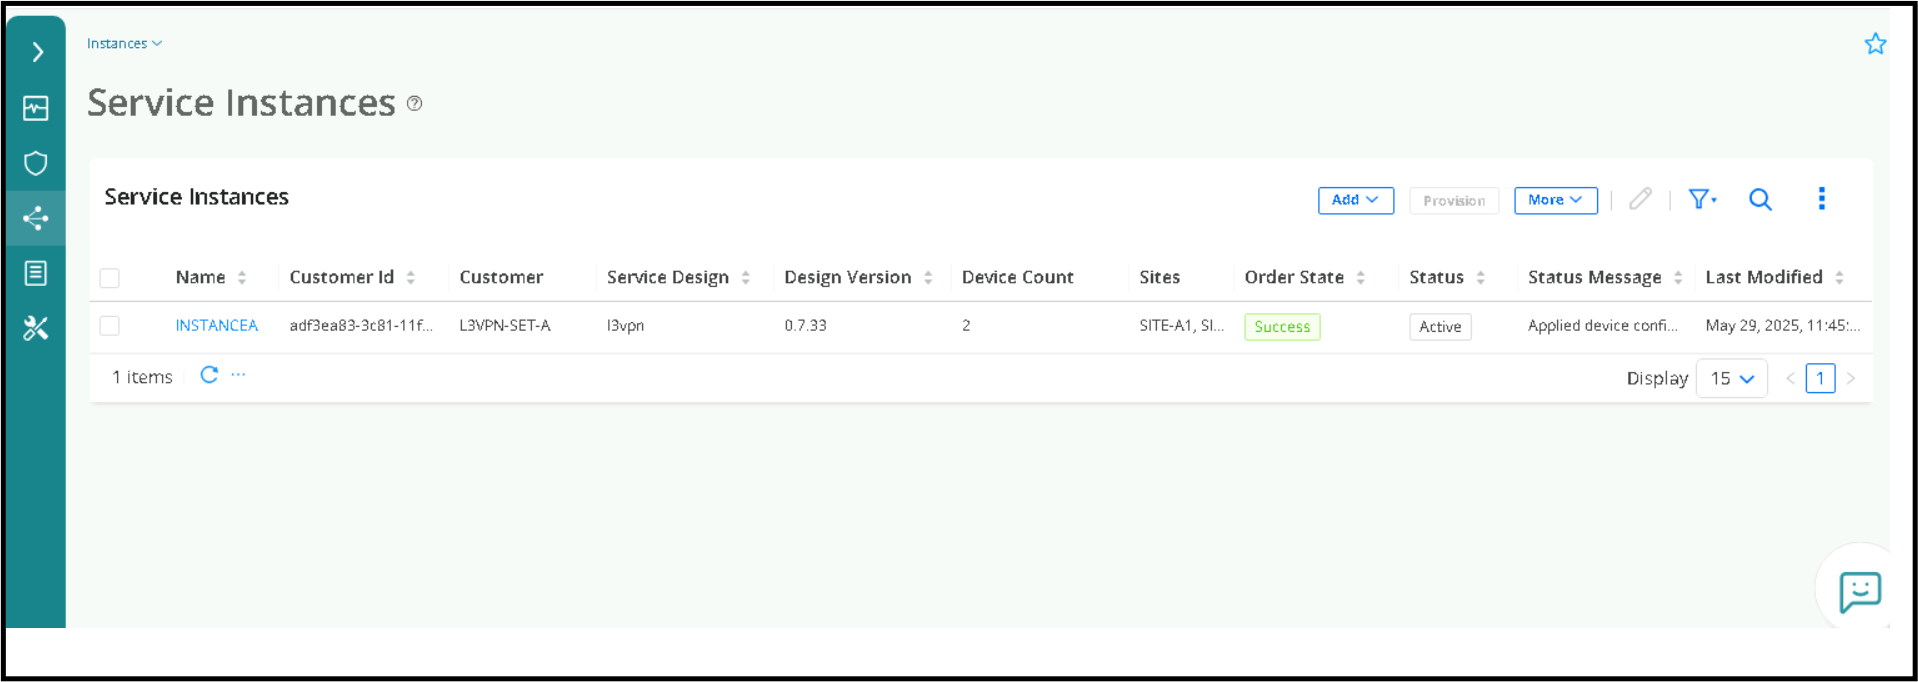
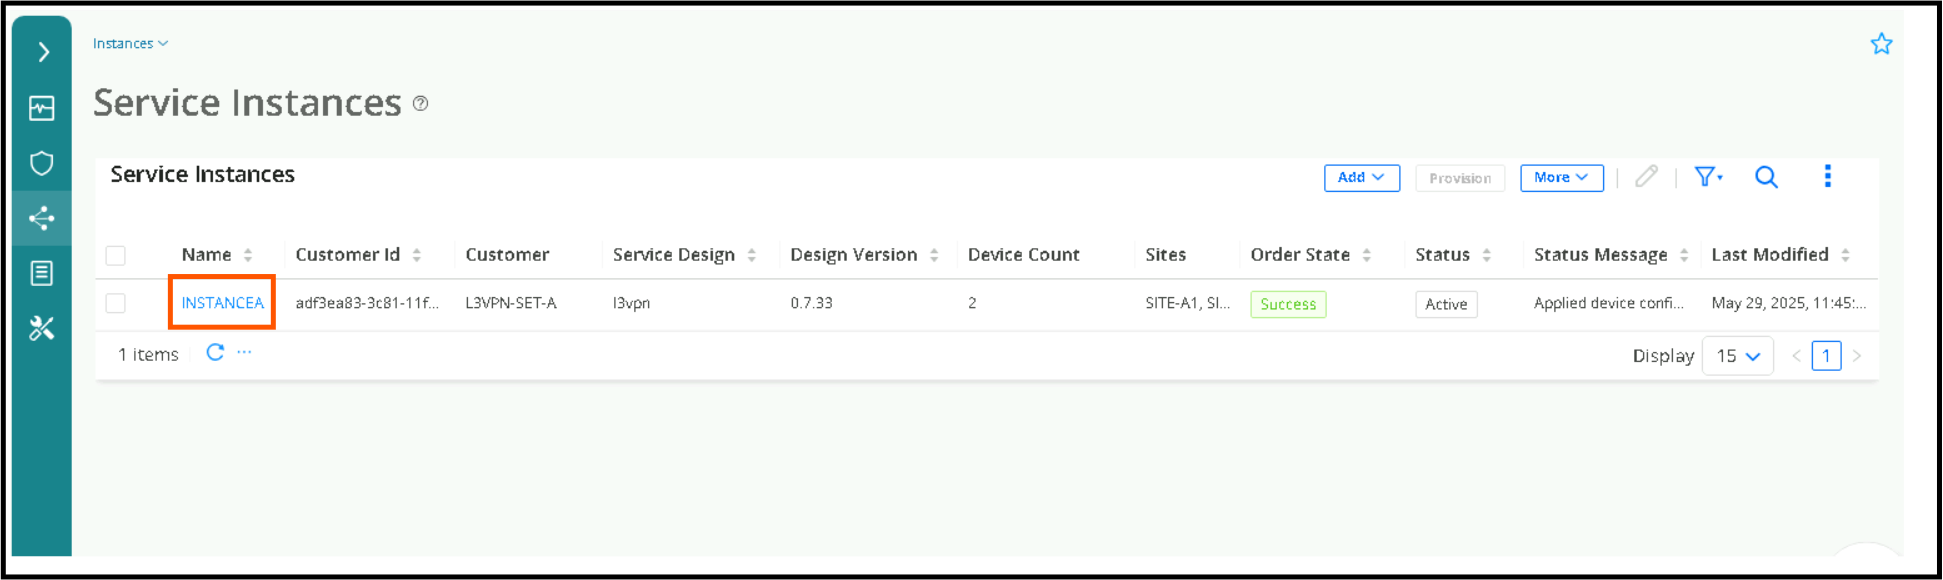
Verify that the Service Instantiation was successful. Navigate to Orchestration > Instances, and check if State is Success as below.
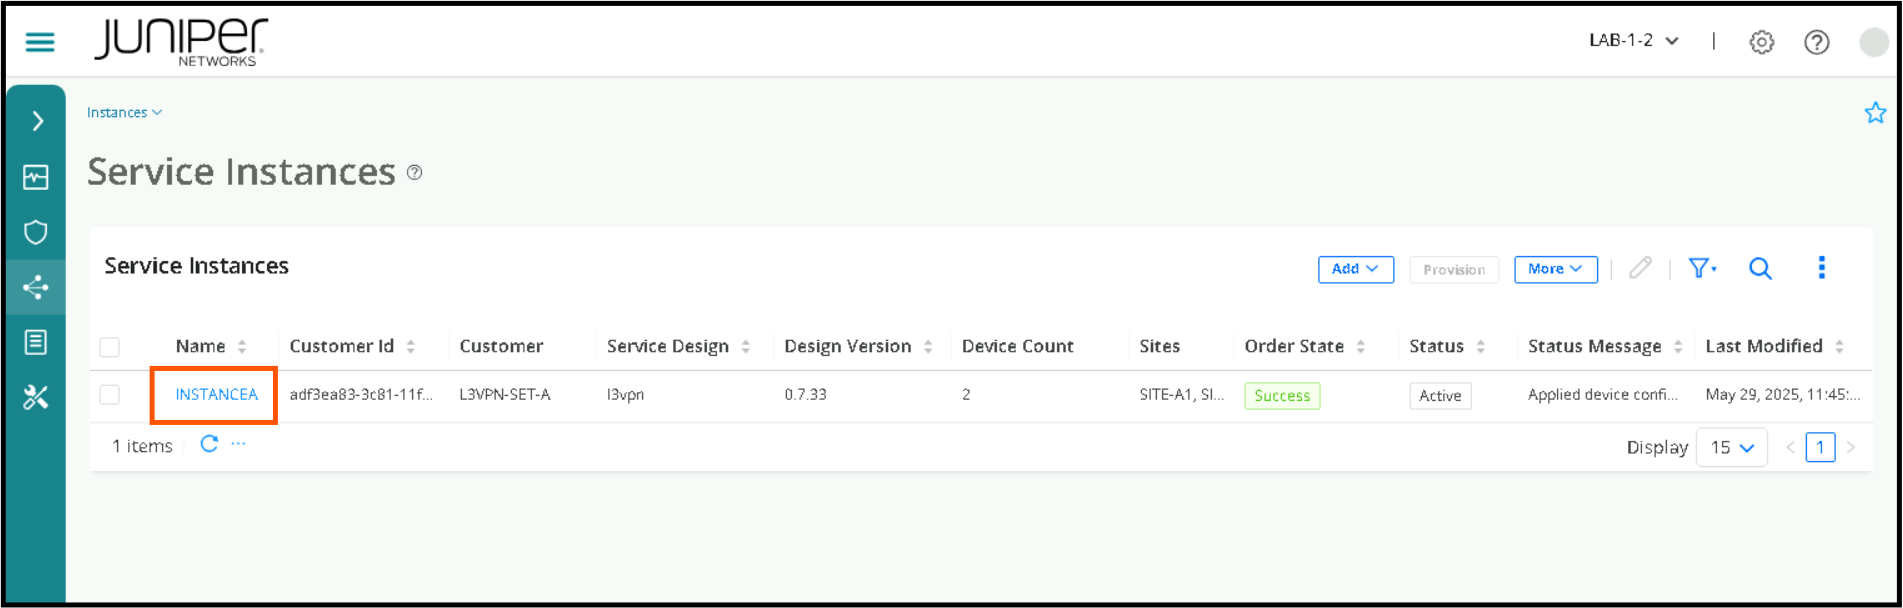
Click on the Instance Name to open more details , for SETA it will be INSTANCEA
Review various Properties like Service Name , Last Modified by (who modified or created this service), Last modified time(When was this service created or modified) , Sites etc.
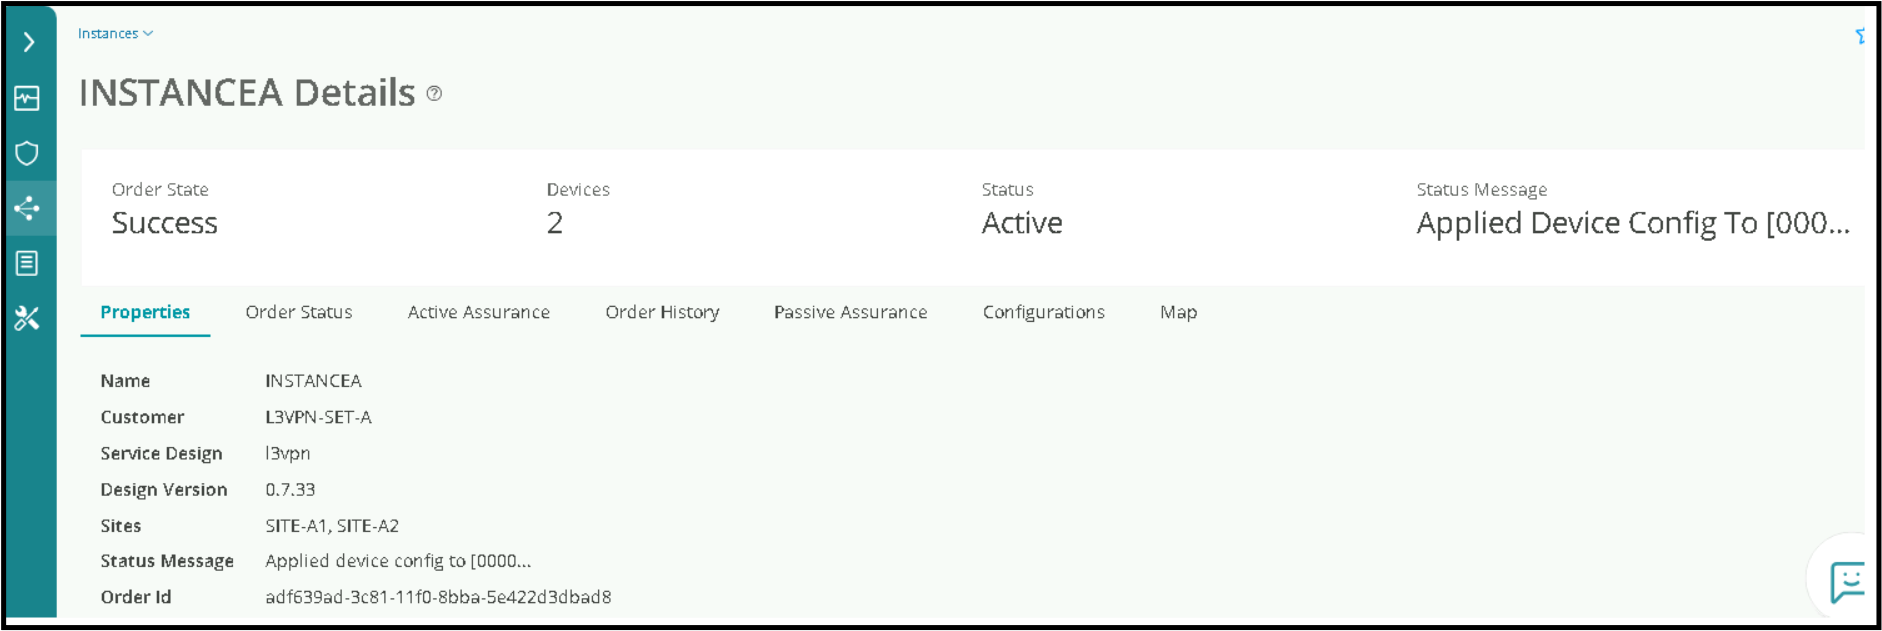
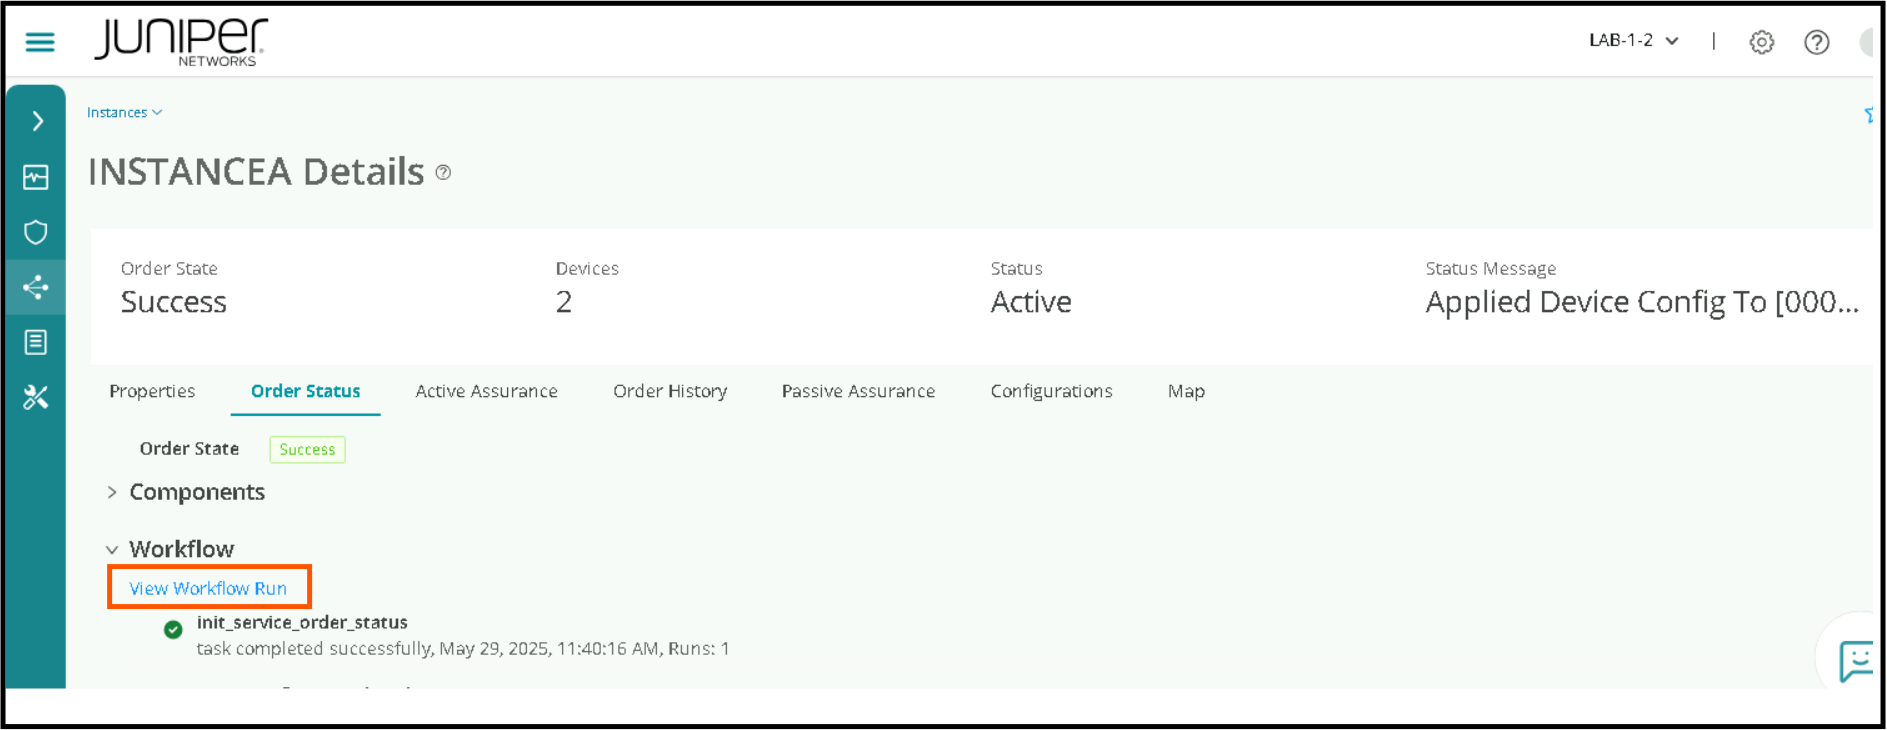
We can get into more details or what exactly happened in the workflow by clicking on order status, then expanding Workflow.
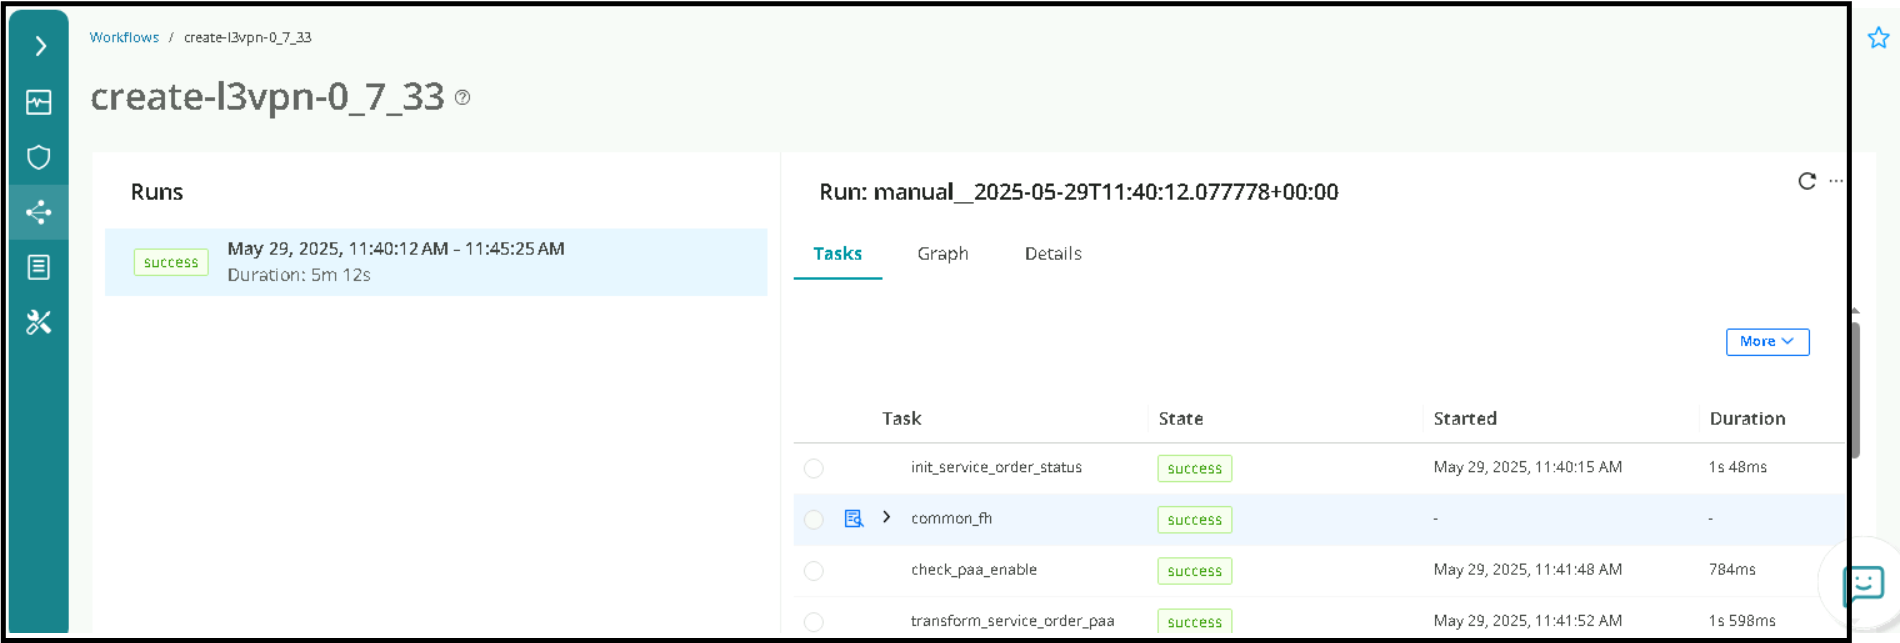
Click View Workflow Run to get more detailed information about various steps and sequence in the workflow. This way we can track exactly what’s going on internally and if there is a failure we can troubleshoot and pin point what went wrong.
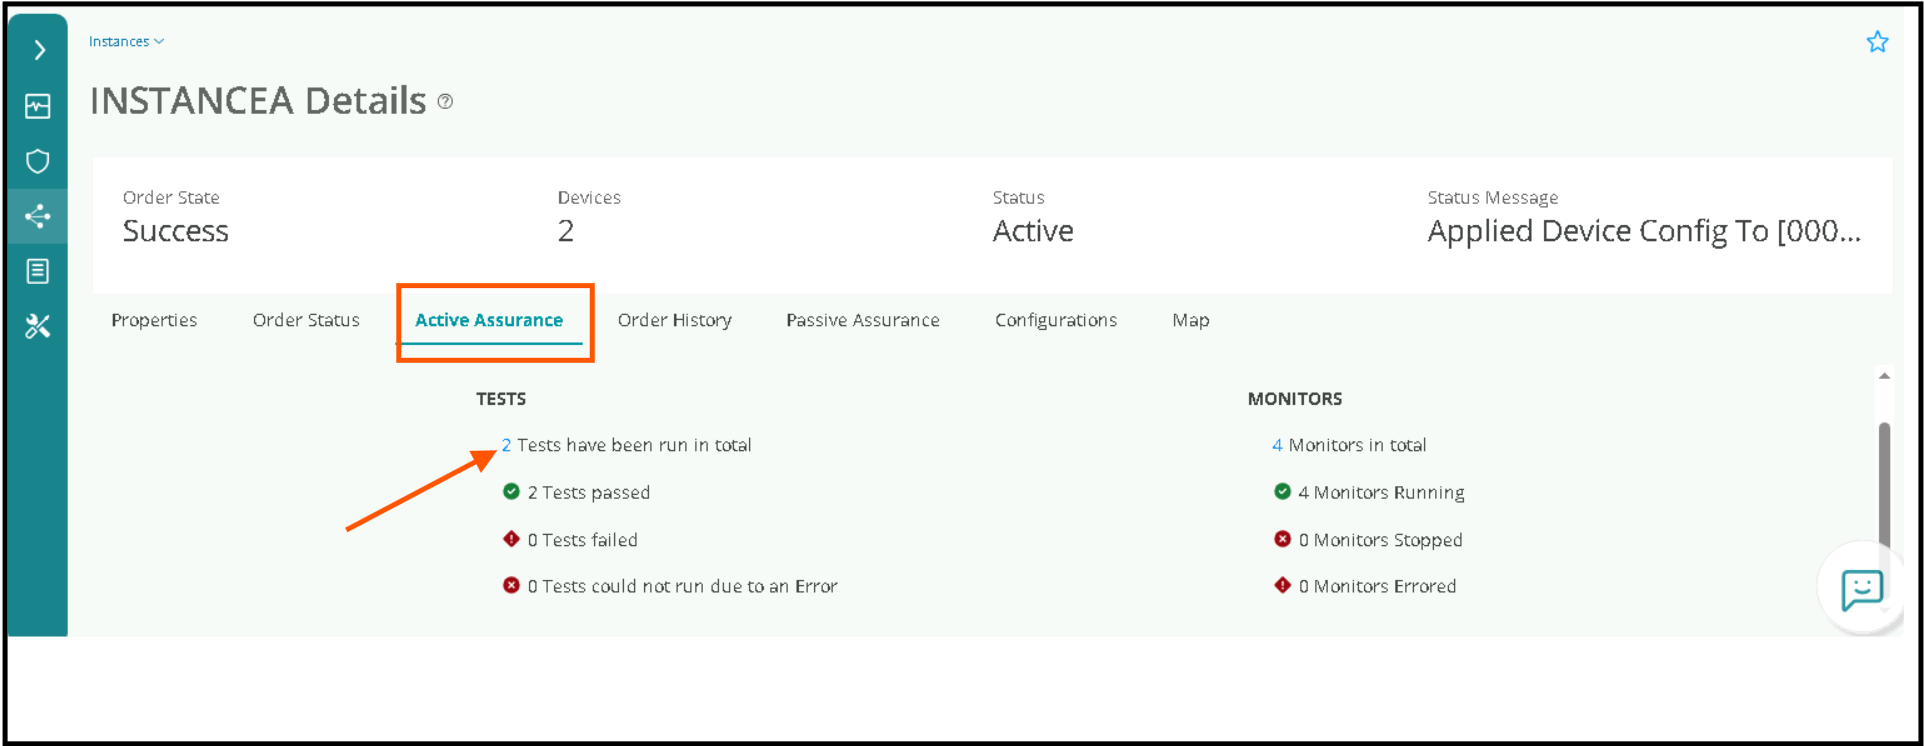
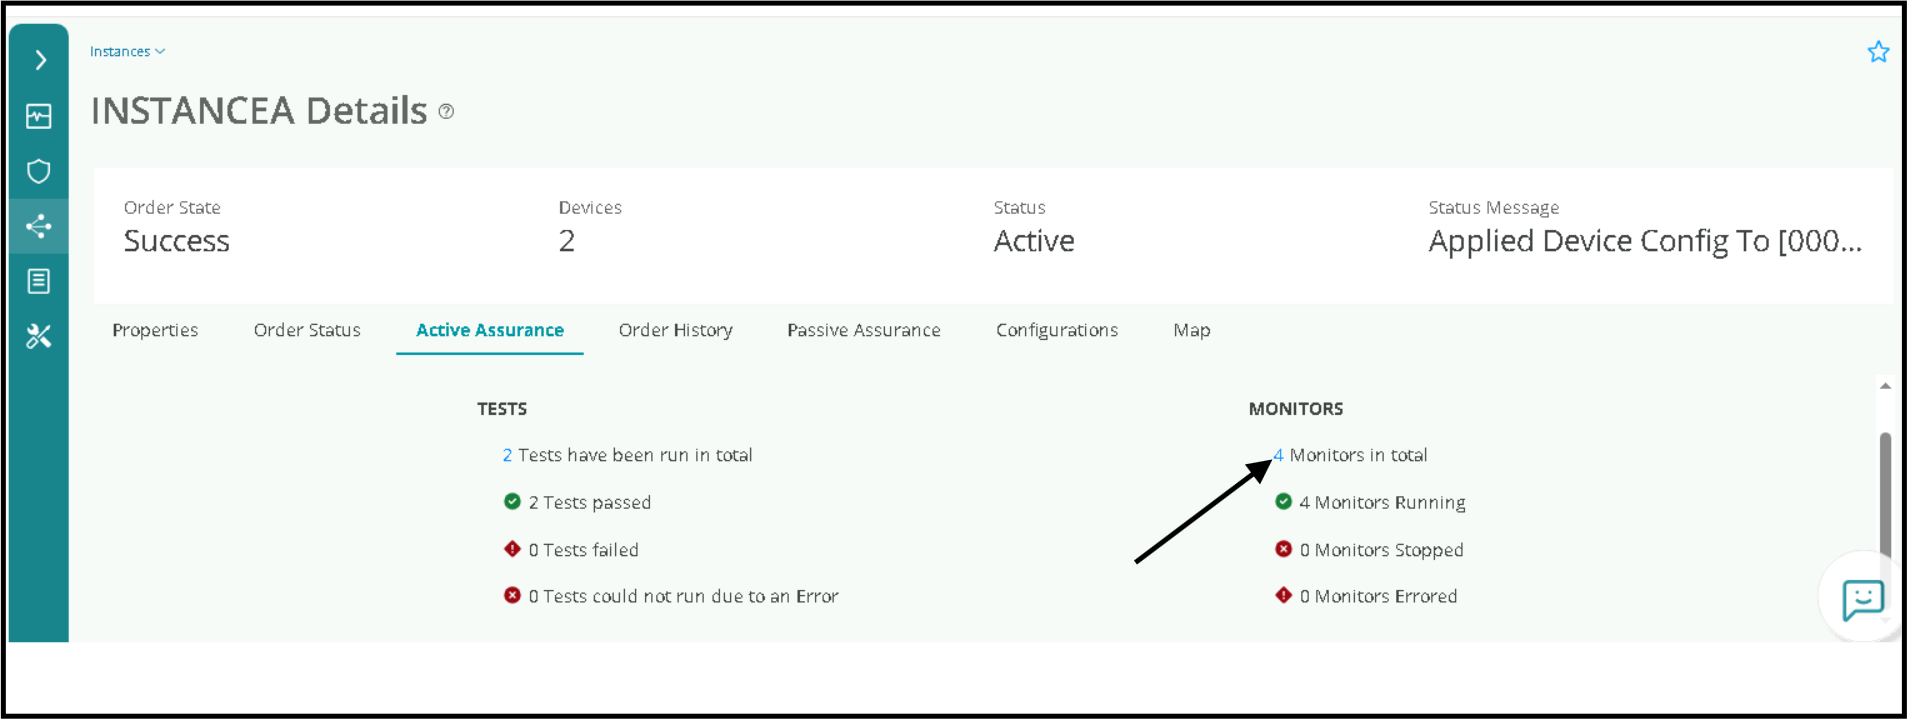
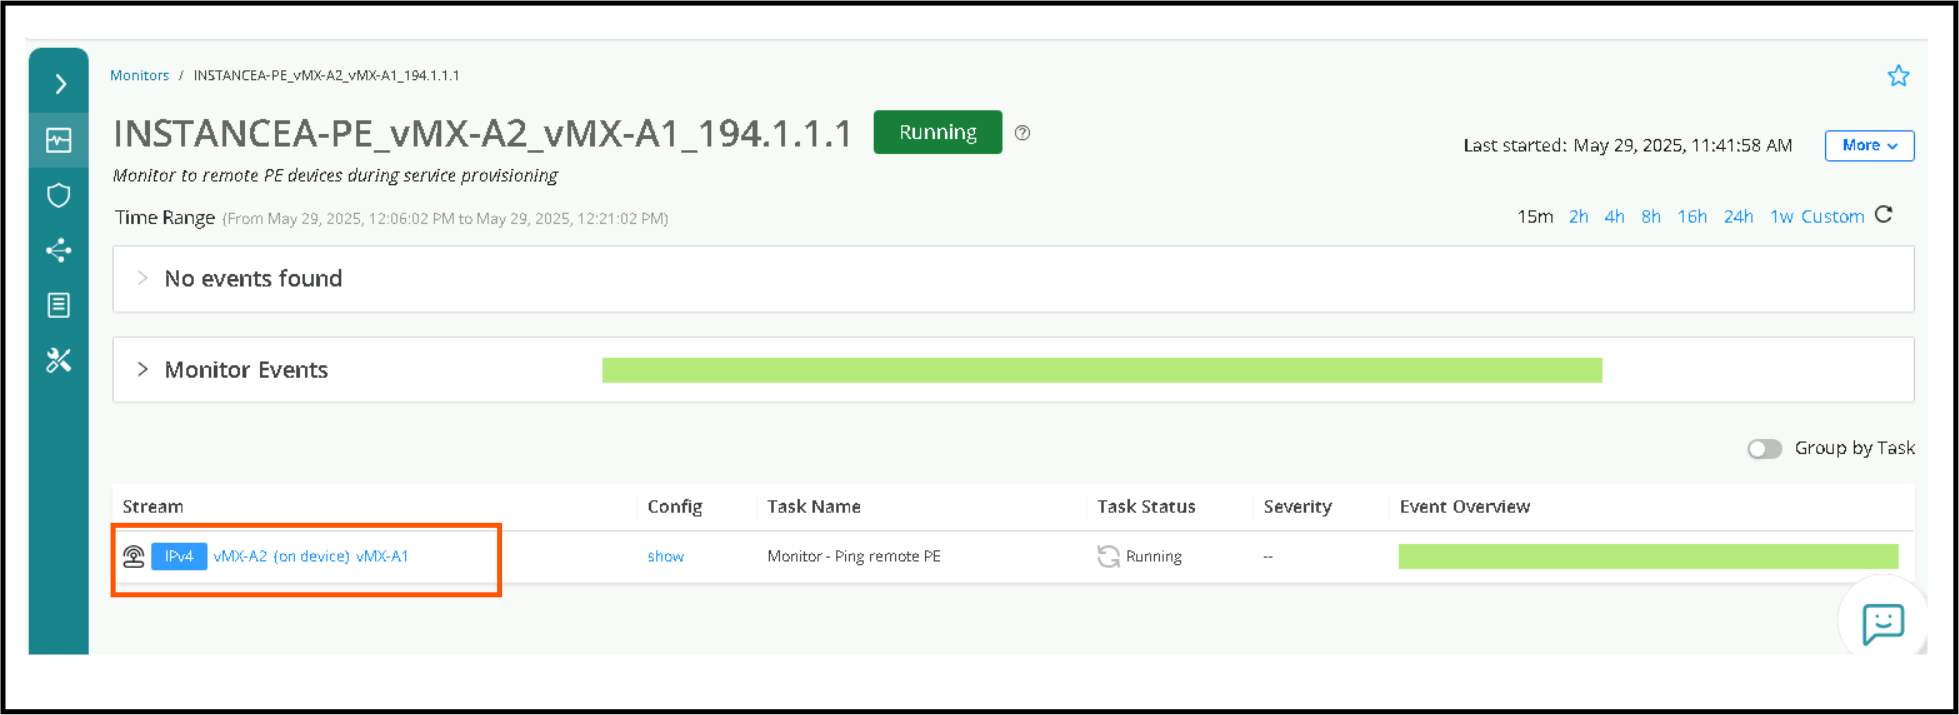
Now lets have a look at Routing Active Tests which will determine if the service is indeed functioning end to end . Click on Active Assurance , there will be TESTS and MONITORS. Please move to next step to check test results
Click on the Tests link , this number can change , it’s a link to all the Routing Active tests that were run for this instance. You will see individual Tests that were run along with Passed or Failed. click on the Test name to view the stream.
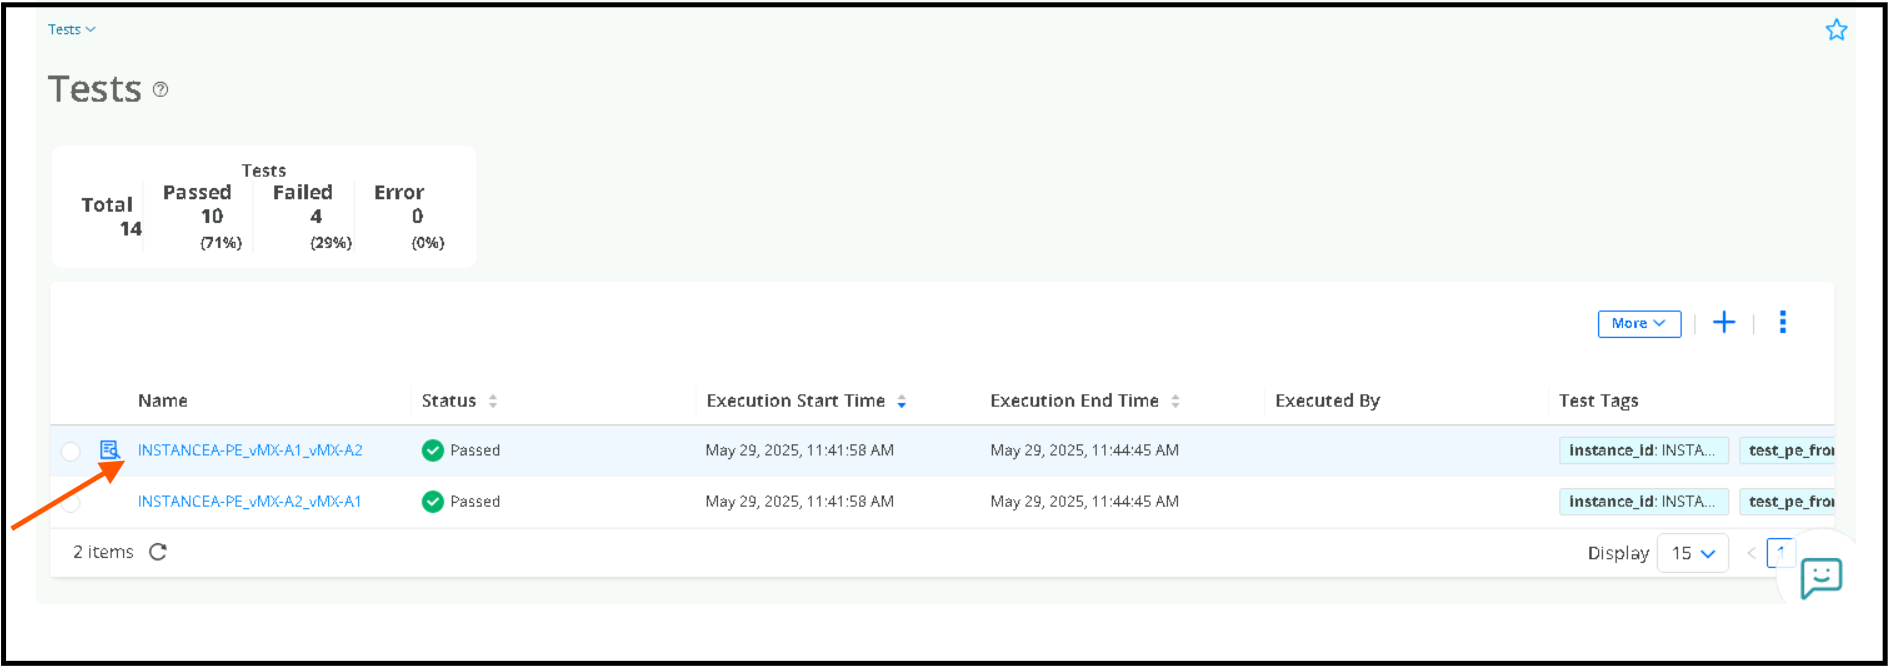
We need to now click on the stream highlighted to view the results.
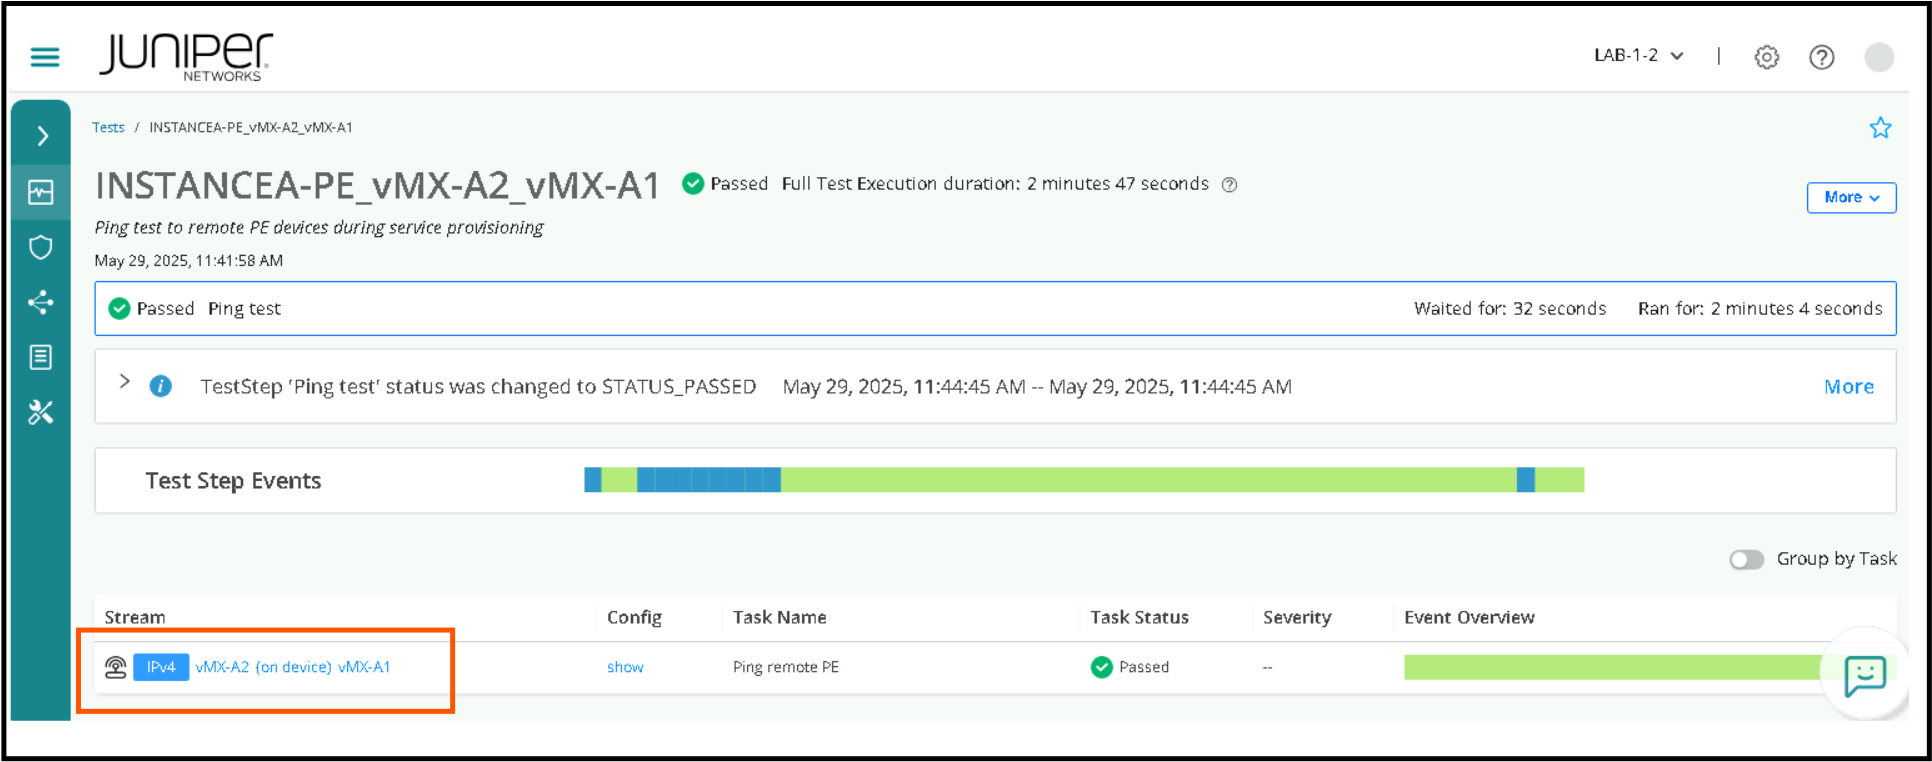
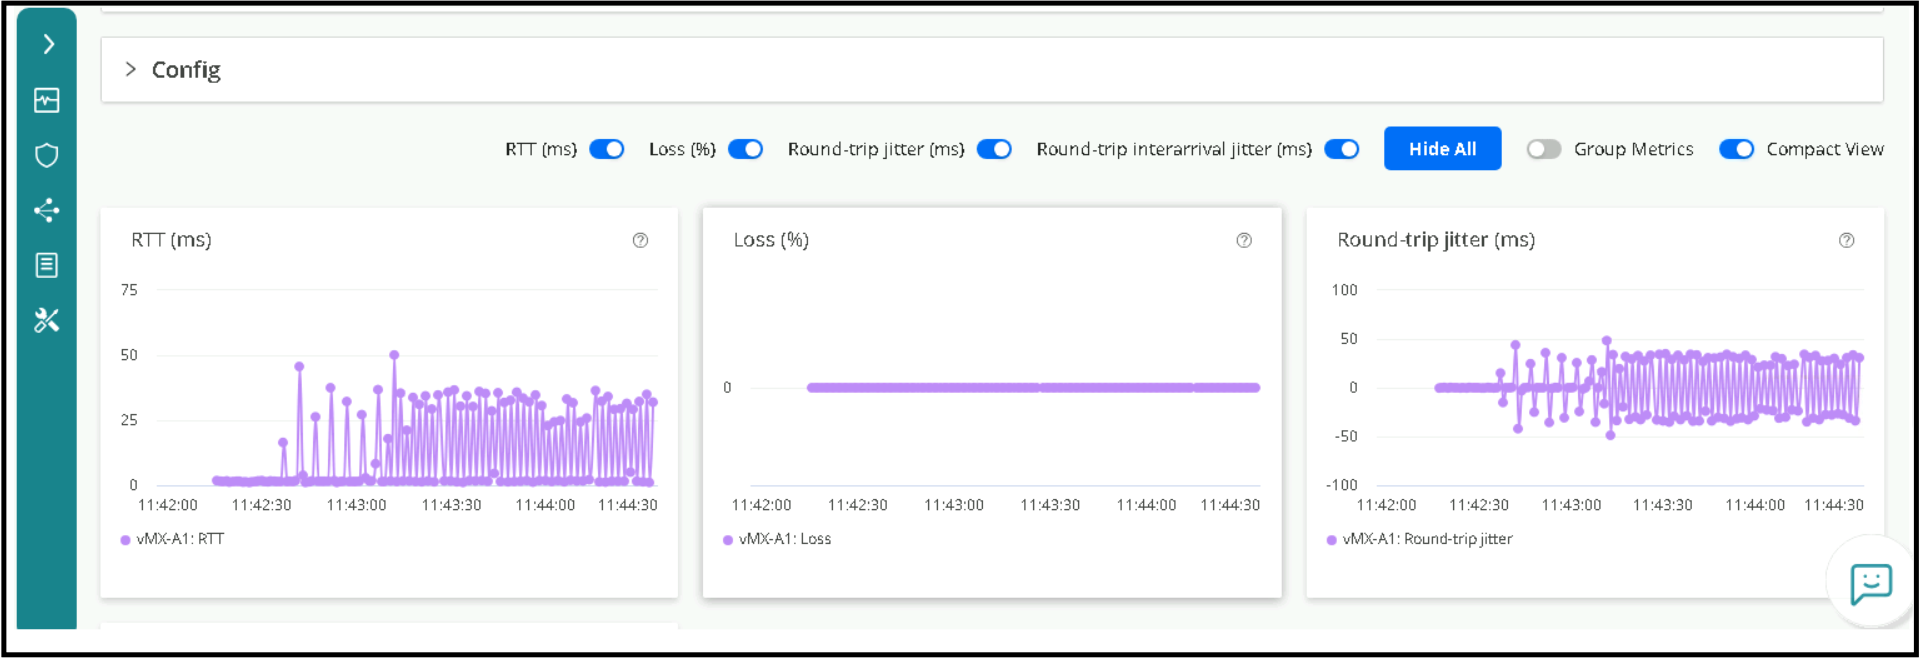
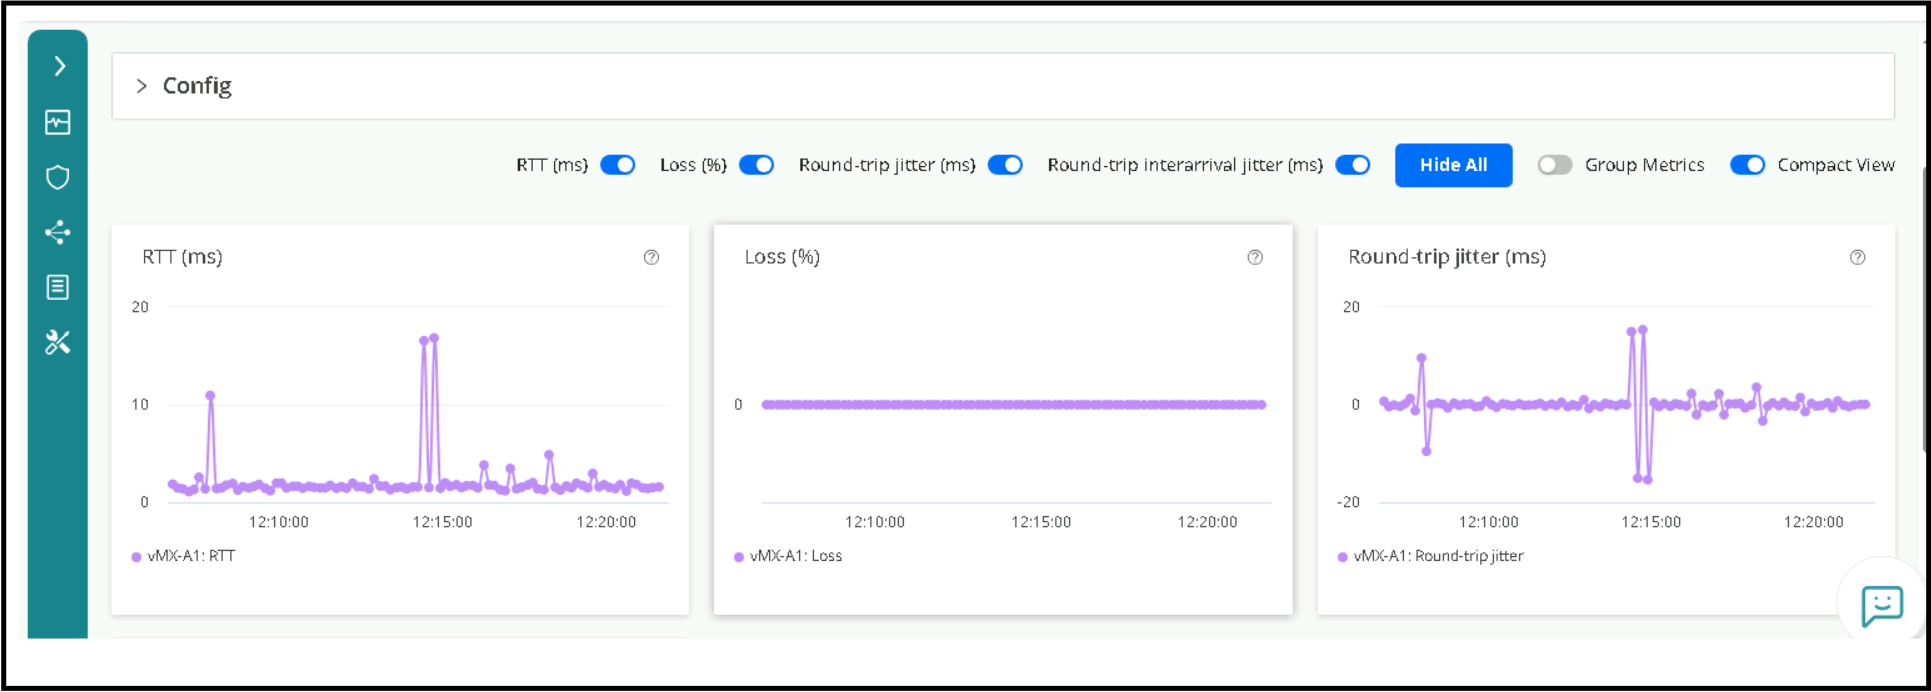
Enable both Show all and Compact View to get a overall view of KPI’s measured which will be RTT, Loss and Jitter. this is a beautiful visual representation of time series based KPI’s . There is a separate lab for Routing Active Testing (Paragon active assurance and you can run other tests in that one) .

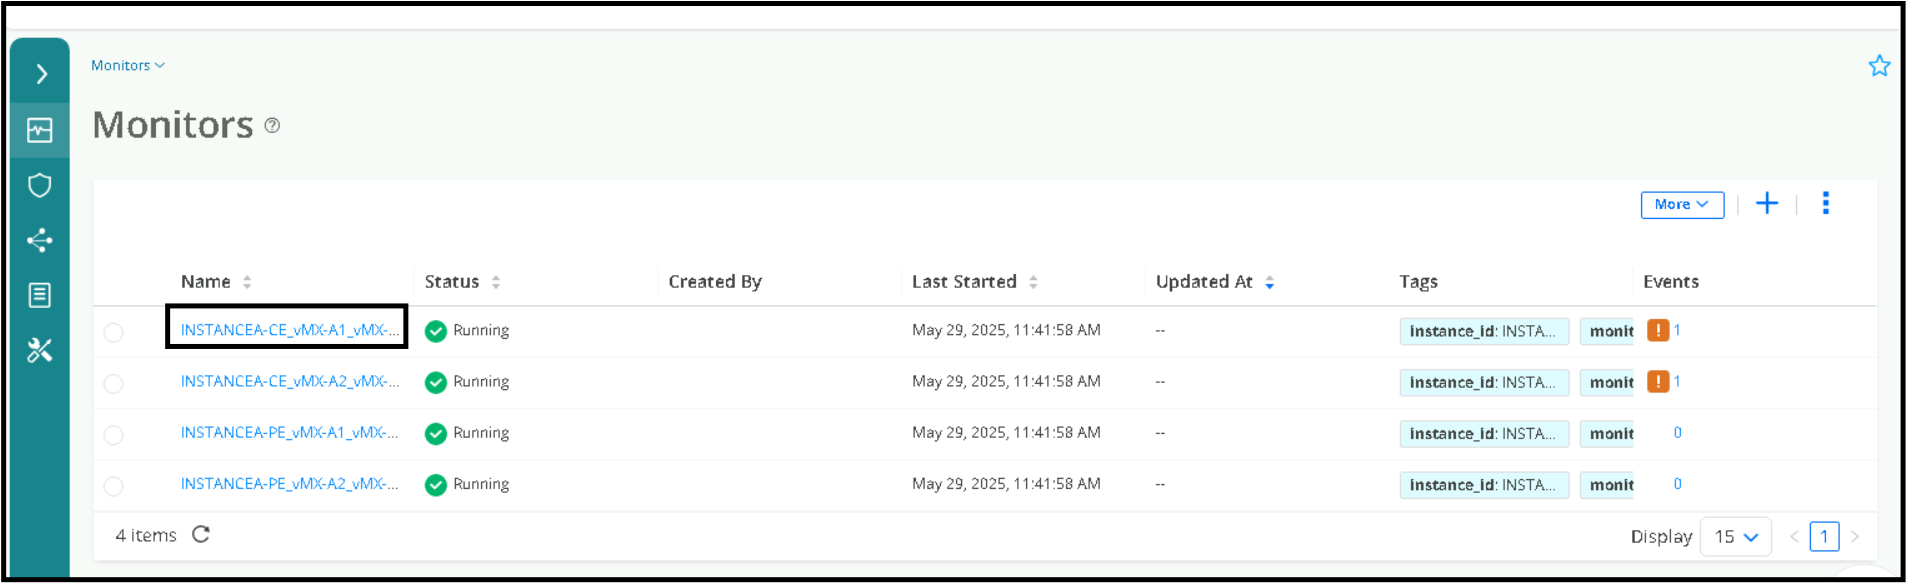
(Optional Step to review KPI’s via Monitors) . We can navigate back to Orchestration->Instances the <Service Instance Name INSTANCEA for SETA> and then click on Active Assurance to have a look at the monitors.
 {
{
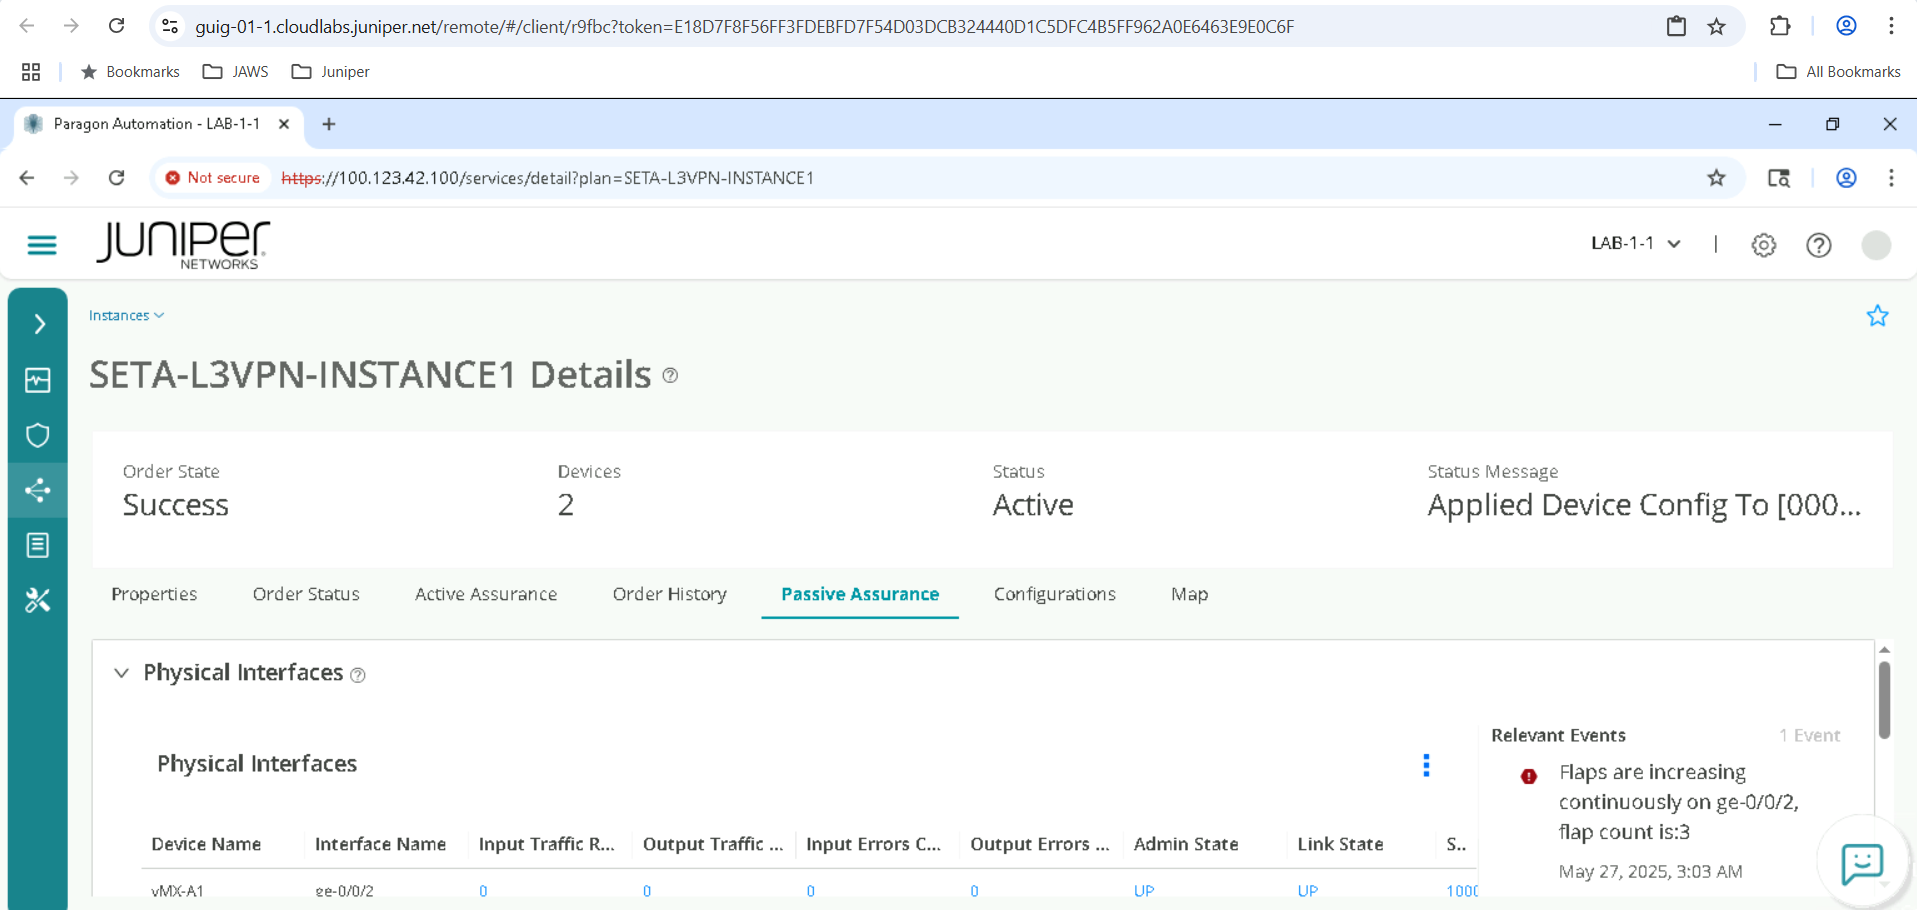
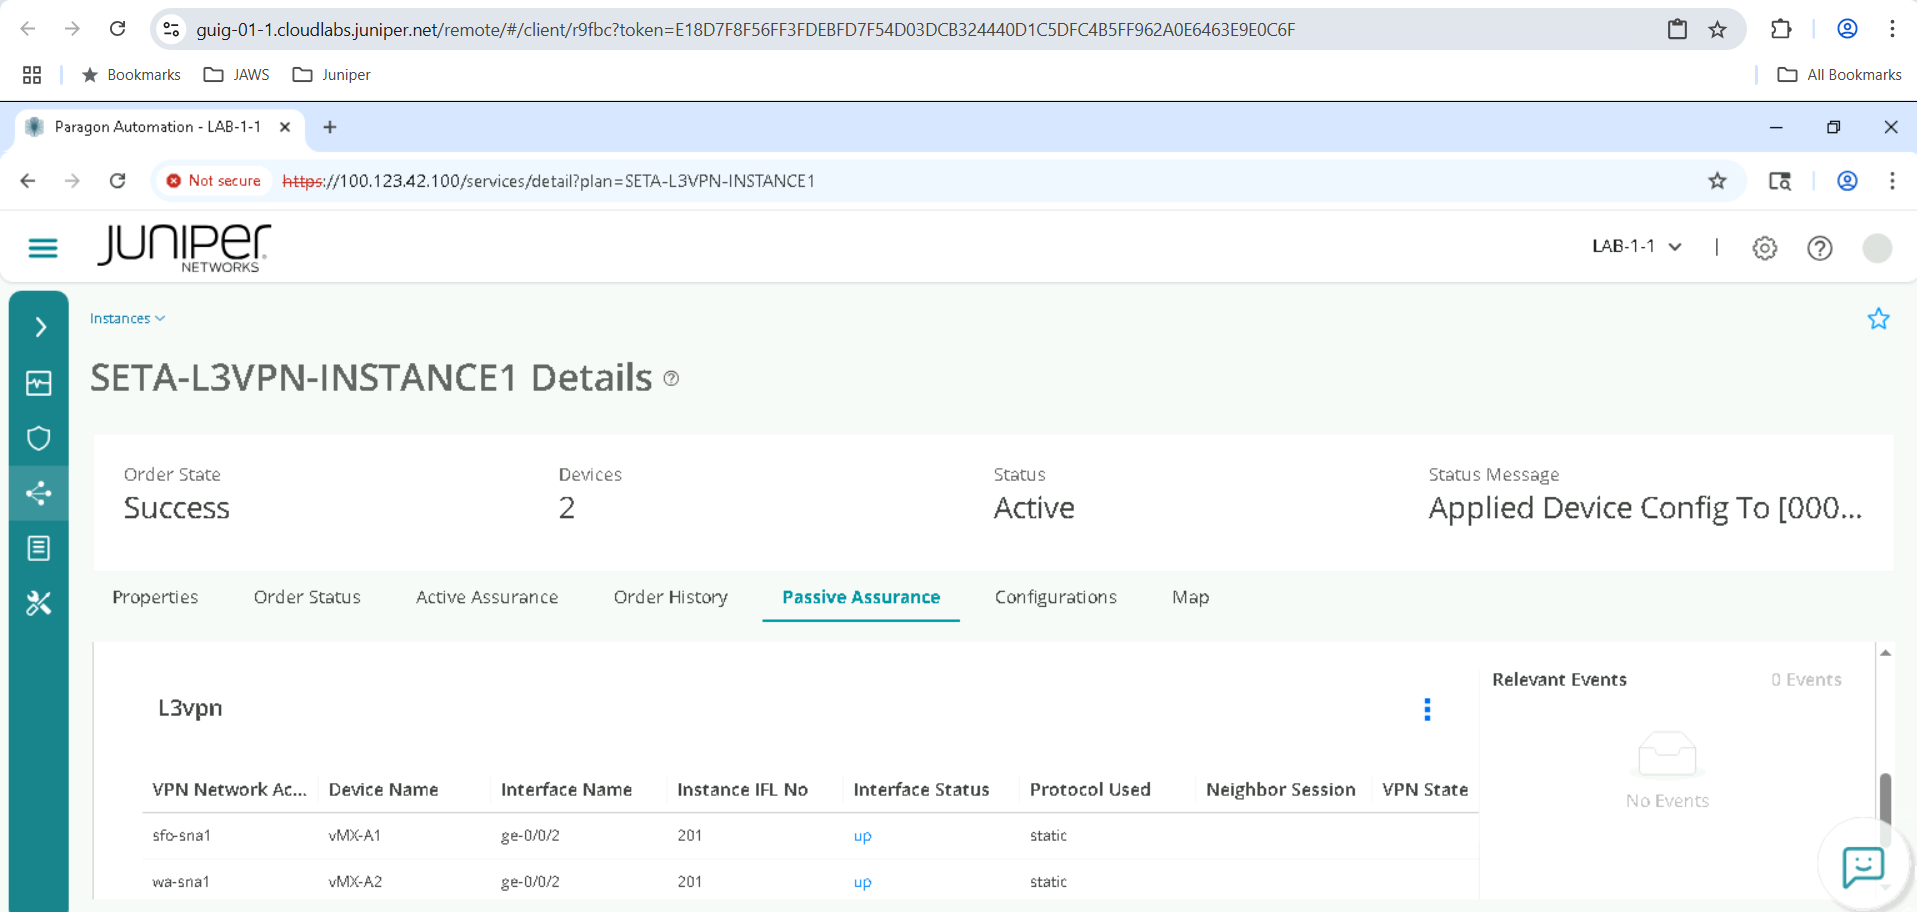
We are now moving to the Passive Assurance tab . Passive Assurance is used to monitor Interface stats and status, logical interfaces and BGP/OSPF peering from PE towards CE side. Please expand each view. Not all protocols are enabled in the lab, but this will give an idea of what to expect in a production deployment.

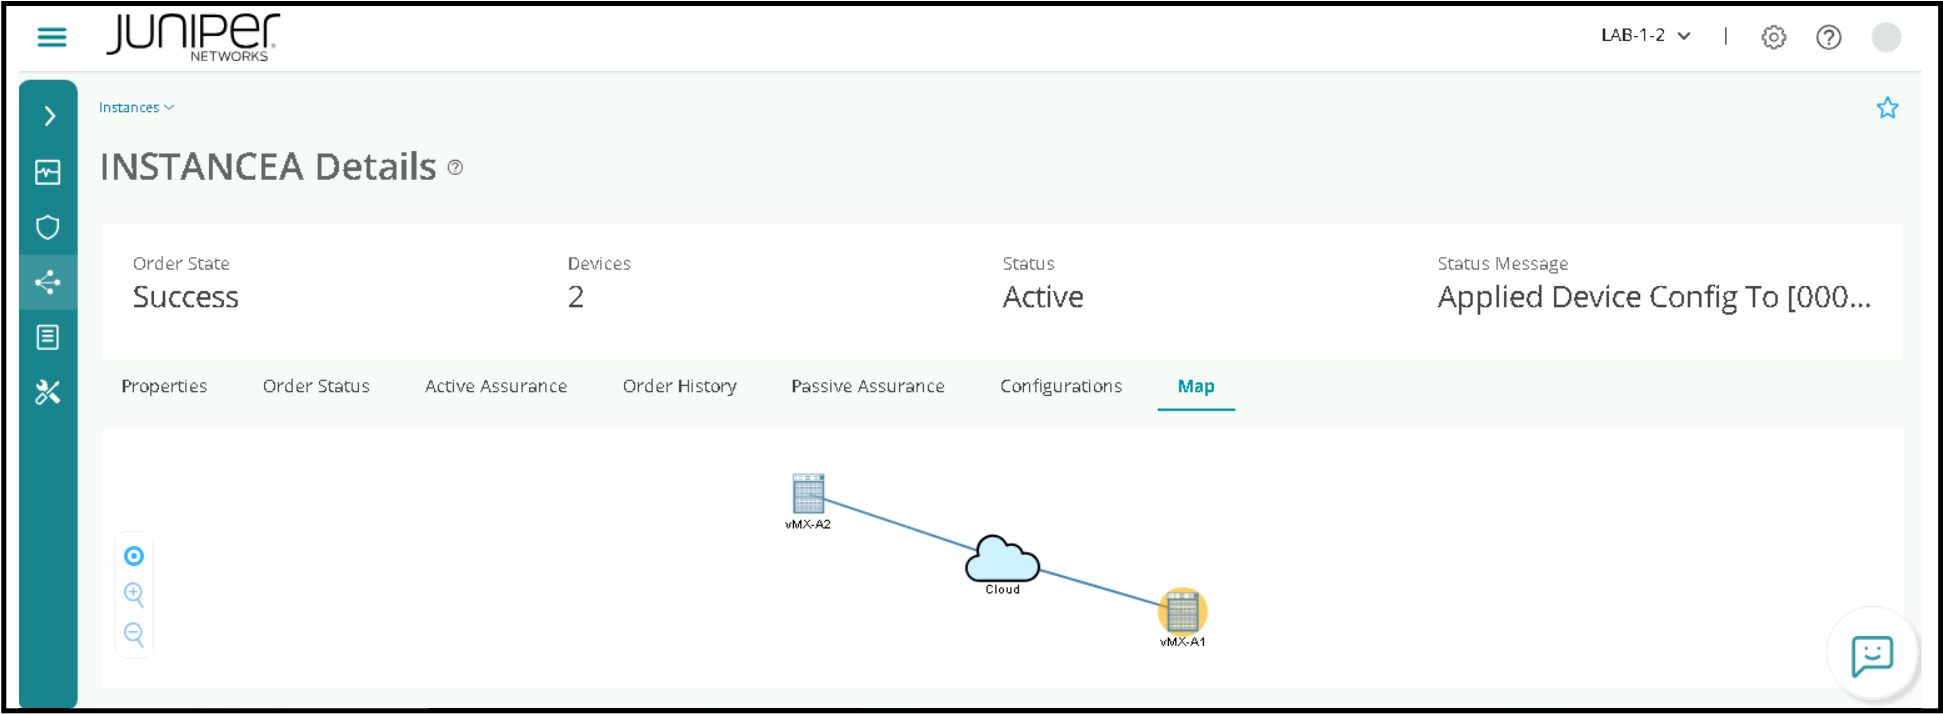
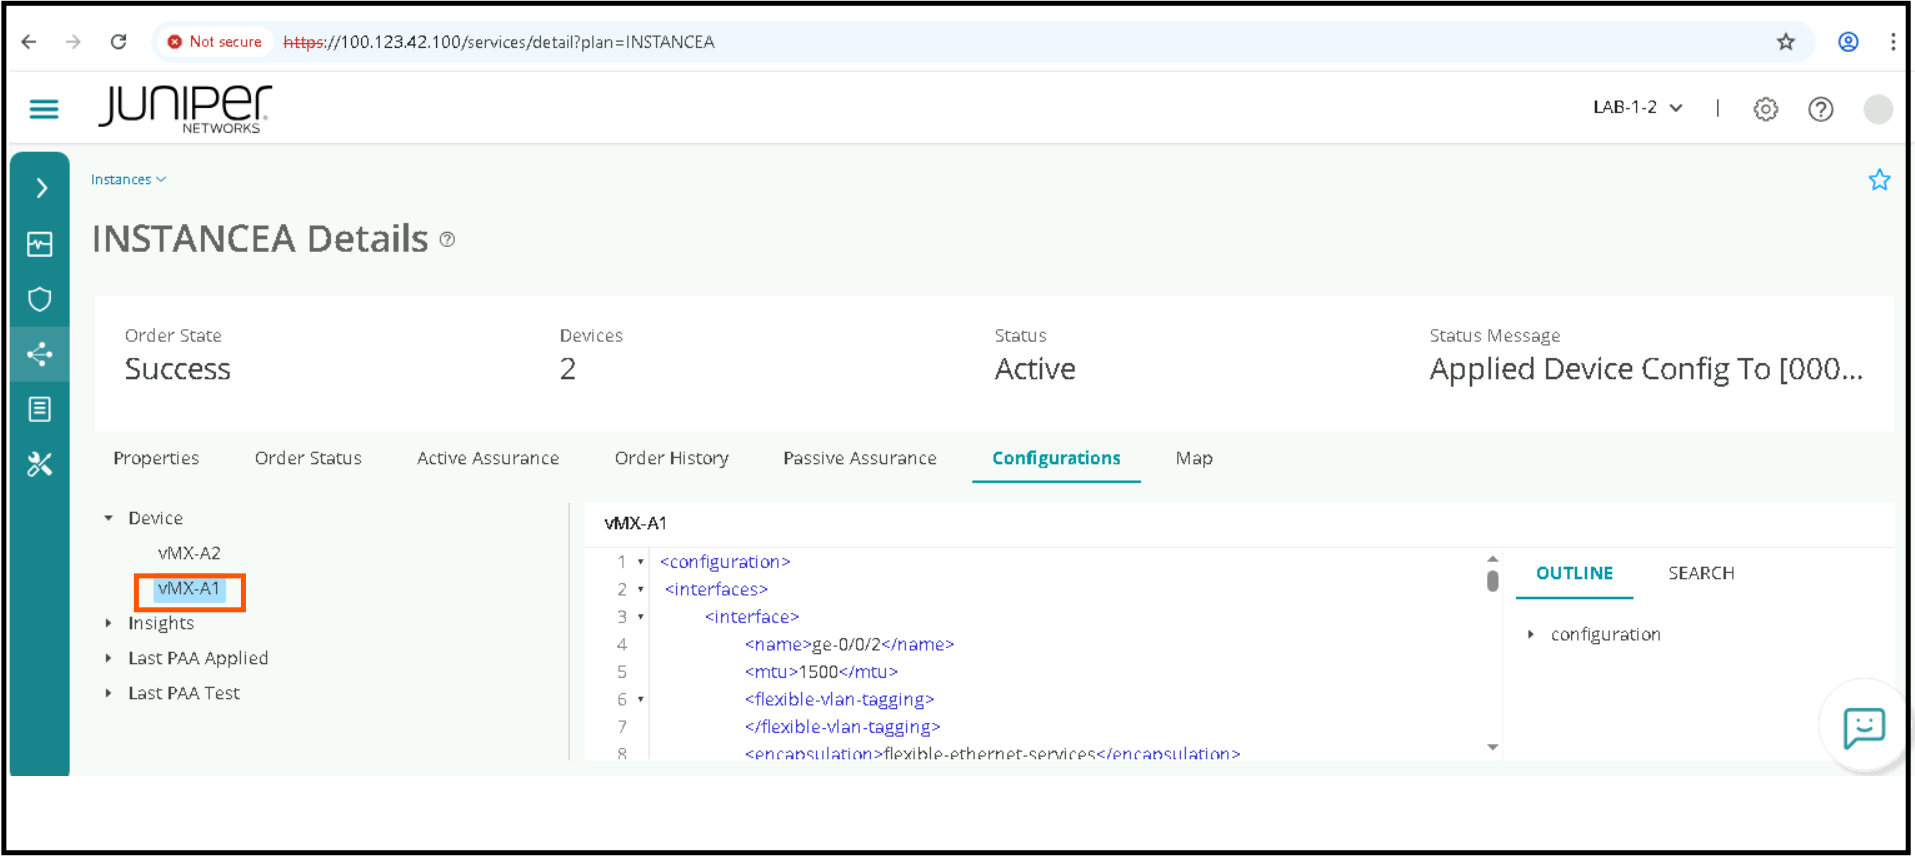
Review of the Map and Configurations Tabs . make sure to click on individual device to view config.
De-Provision of L3VPN Service Instance
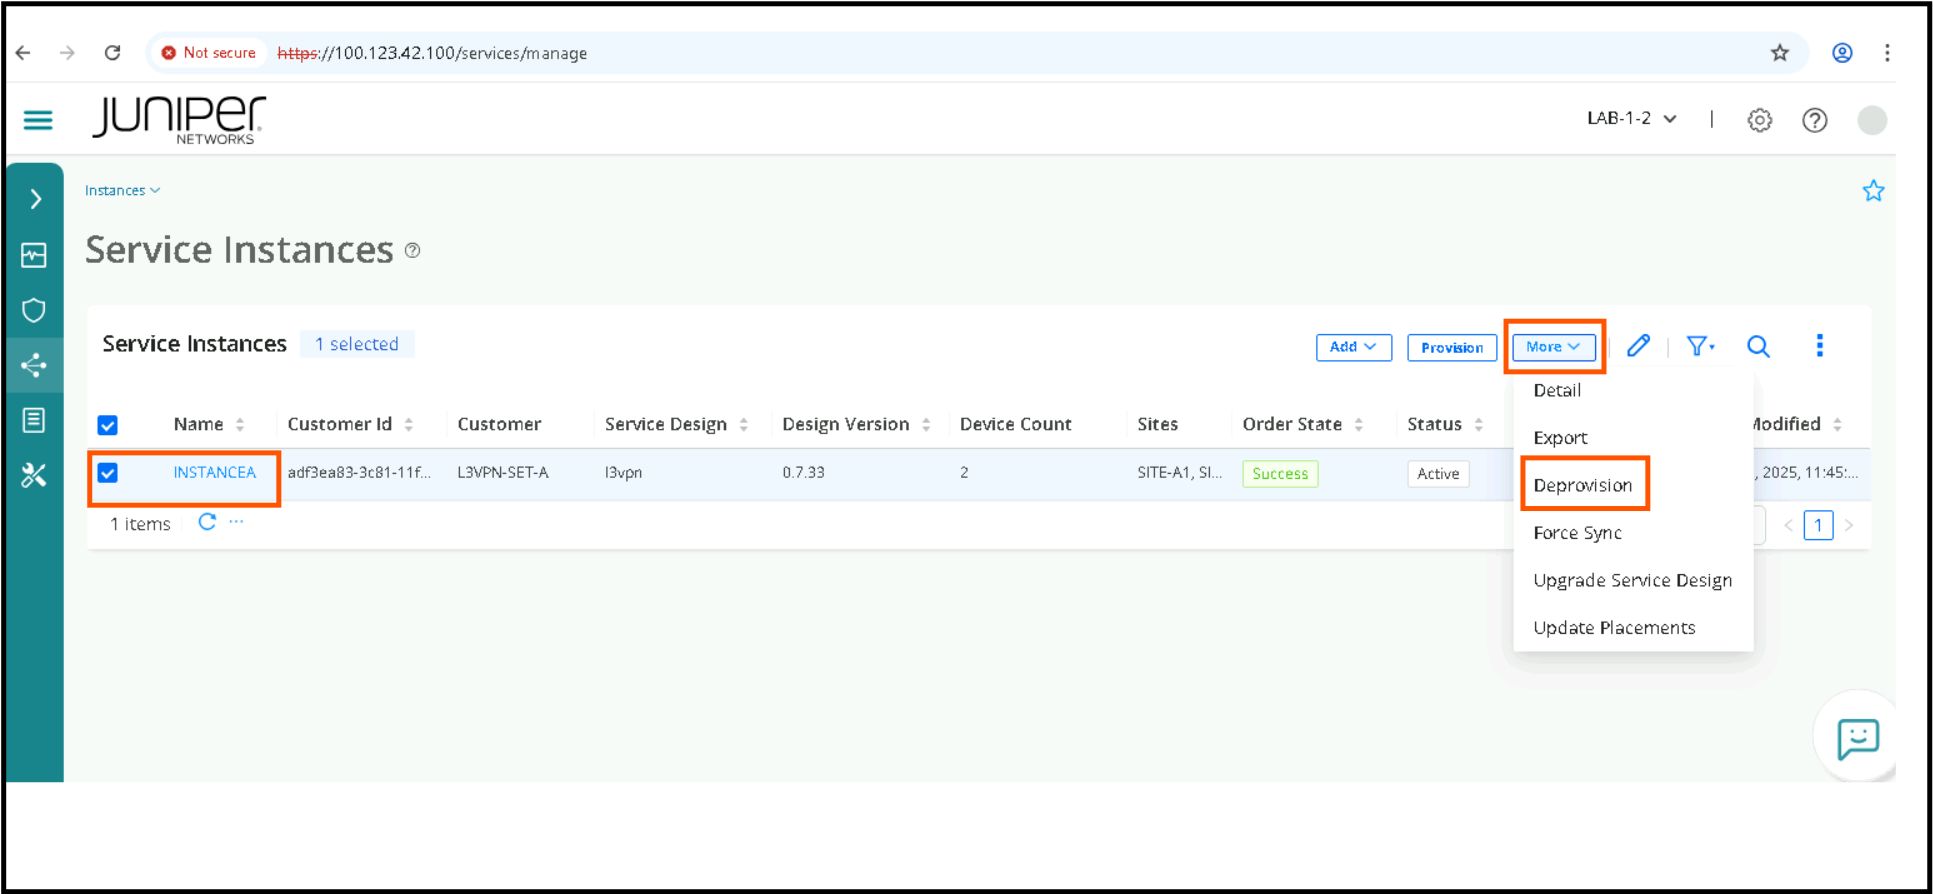
Navigate to Orchestration > Instances, select the Service Instance, then click More > deprovision. Confirm the deprovision, Give it a few minutes to complete processing.

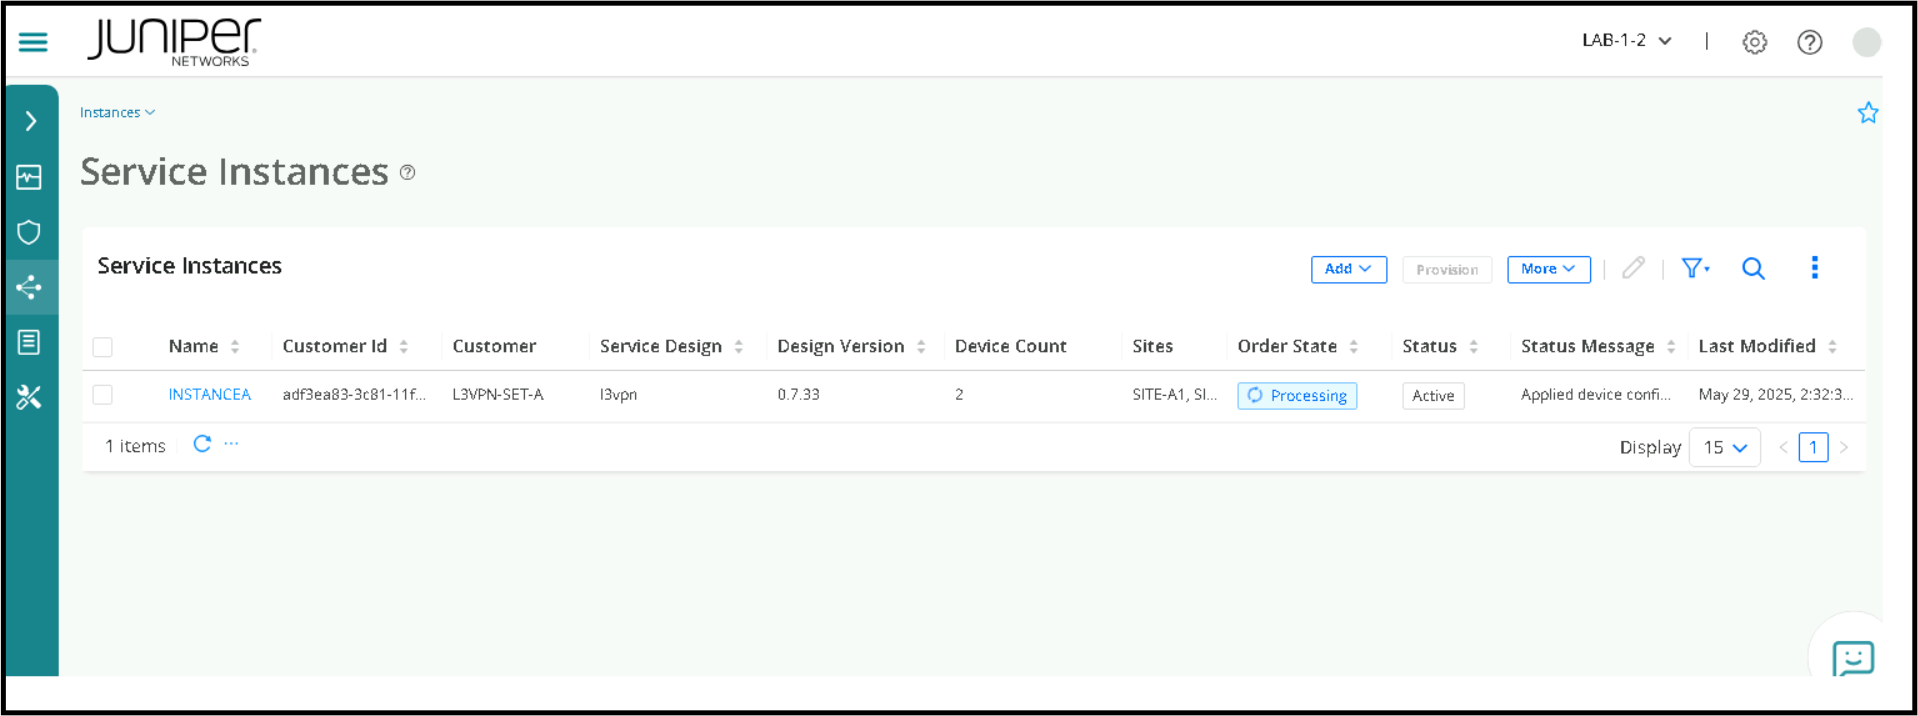
Wait for a few minutes for the deprovisioning to be completed, you will see Processing status message again during the process of deletion.
You should see the instance is gone from this page within 2-3 mins. With this step we will finish this lab exercise and hope now you get a idea of Service Provisioning and the benefits of using Juniper Routing Director.
You have successfully completed this Hands-On Lab!
Lab Survey
Please take 2 minutes and complet the Routing Director Service Provisioning Hands-On Lab Survey